Paper 3 - Choosing and reading measuring instruments
Learn to choose a suitable instrument, read its scale, check its zero and collect a useful set of measurements. You will practise the techniques behind accurate laboratory work, from measuring a fine wire to timing an oscillation.
Lengths, volumes, masses and forces
Can a micrometer showing more decimal places give a worse result than a simple ruler? Yes: an impressive display cannot rescue the wrong measuring technique. Choose the instrument for the quantity and size of measurement, then check how it touches or views the object.
A resolution is the smallest change in a quantity that an instrument can distinguish. Resolution helps you choose an instrument, but the total uncertainty also includes alignment, zero error, reaction time and the object itself. A millimetre rule is suitable for a spring's length; a micrometer is better for a fine wire's diameter. A rule's damaged end can be avoided by measuring between two scale positions and subtracting them.
For a length, place the scale close and parallel to the object and view each endpoint square-on. Looking from an angle causes parallax when the object and scale lie in different planes. A set square or horizontal pointer can transfer an endpoint to the scale without guessing where it lines up.
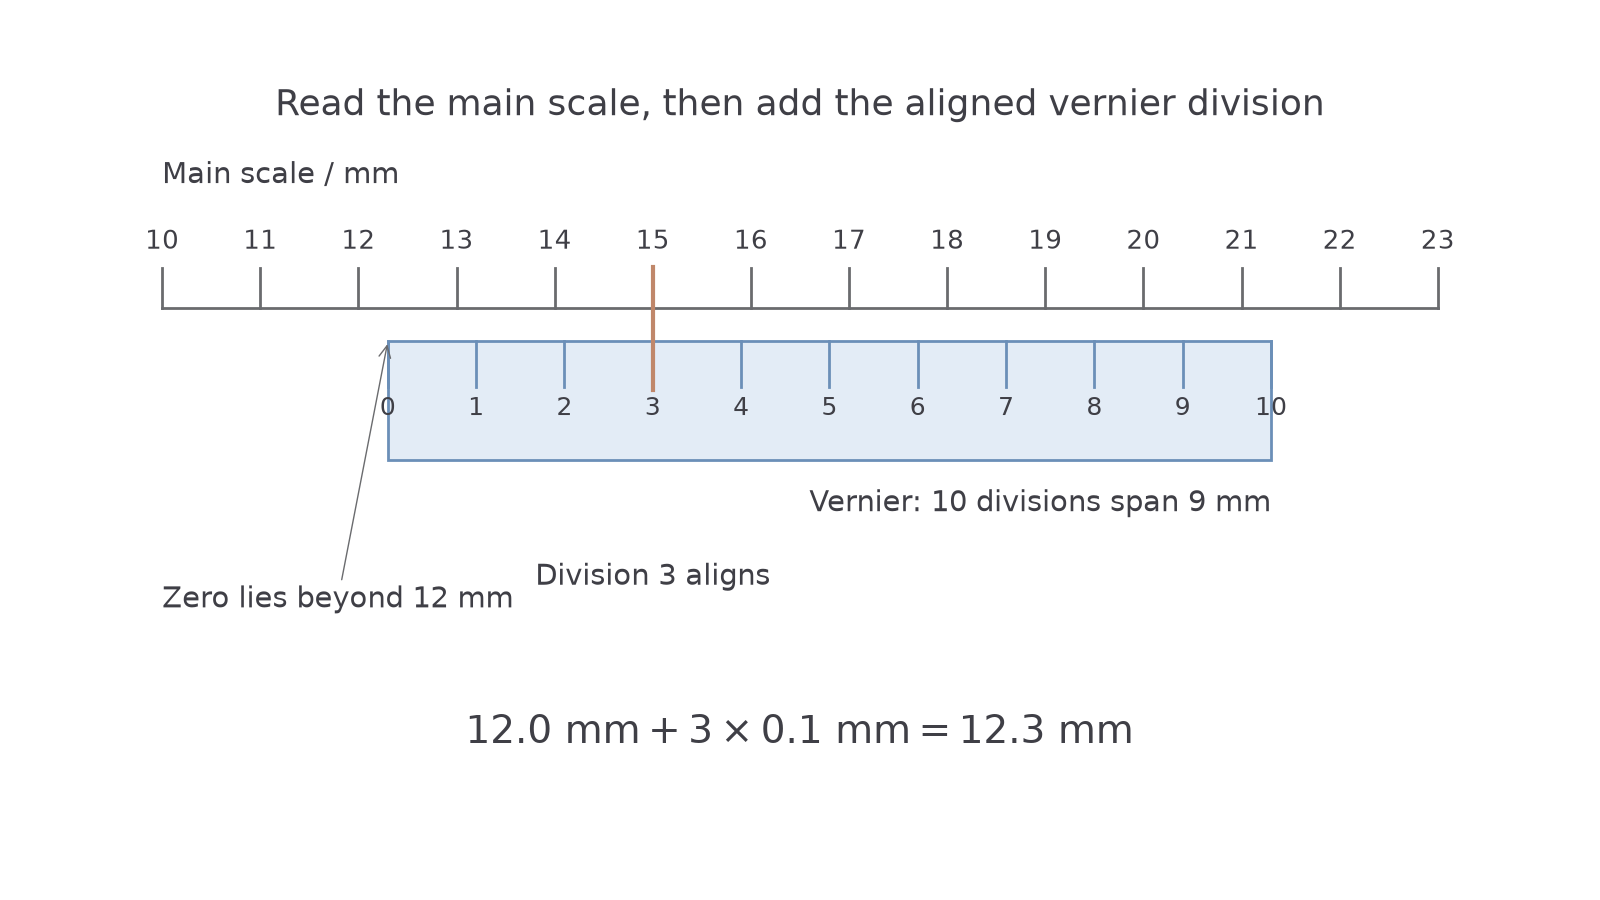
Calipers have external jaws for outside dimensions, internal jaws for a bore and often a depth probe. Close the clean jaws gently to check zero. Align the jaws with the diameter; a tilted measurement can be wrong even if the display is stable. Digital calipers display the result directly. On vernier calipers, read the main scale just before the vernier zero, then add the aligned vernier division multiplied by the vernier resolution.
[DIAGRAM: asset_name: Reading a vernier scale; asset_slug: p3-vernier-reading; caption: The vernier zero is beyond 12 mm and its third division aligns, giving 12.3 mm; description: A main scale marked in millimetres lies above a ten-division vernier whose ten divisions span nine millimetres. The vernier zero is at 12.3 millimetres on the main scale. Its third division coincides with the 15 millimetre main-scale mark. Labels show main reading 12 millimetres plus three times 0.1 millimetre equals 12.3 millimetres.]
A micrometer screw gauge uses a screw to move a spindle. Read the sleeve scale, including any visible half-millimetre mark, then add the thimble reading. Use the ratchet to apply a reproducible gentle force; overtightening can compress an object. Check zero with the faces clean and closed. Correct a reading by subtracting the signed zero reading.
Worked example 1: a micrometer with zero error
Question. A micrometer has a sleeve reading of . Division 23 of a thimble with per division aligns with the reference line. With the faces closed, the instrument reads . Find the corrected thickness.
Plan. Add sleeve and thimble, then subtract the zero reading.
Answer. .
Check. A positive zero error makes raw measurements too large, so the correction must reduce the reading.
For a liquid volume, choose a measuring cylinder whose range suits the amount. Place it upright on a level bench and read the bottom of a water meniscus at eye level. A beaker's graduations usually give only a rough volume. A top-pan balance measures mass: zero or tare it with the empty container before adding a sample. A newton meter measures force: check zero in the orientation used, read along the force direction and stay within its range. A protractor measures an angle from a defined reference line; put its centre at the vertex and use the scale whose zero matches that line.
Watch out
“More digits” means finer displayed resolution, not guaranteed accuracy. A micrometer with a dirty measuring face or an uncorrected zero error can give a precise-looking wrong answer.
Put the correction into practice with new readings.
Analogue and digital readings
An analogue instrument asks you to interpret a scale; a digital instrument asks you to interpret a display and its selected range. Neither removes the need to know what is being measured.
On an analogue scale, count the intervals between two labelled marks. If to spans 50 equal intervals, each interval is . Read the pointer at eye level; on a mirror scale, align the pointer with its reflection. Estimate a fraction of a division only when the scale and pointer genuinely permit it, rather than inventing digits.
On a digital meter, record all stable displayed digits with the unit appropriate to its selected range. A display of 24.6 on a milliampere range is , or , rather than . Check that leads are in the correct sockets and the meter is set to the correct quantity and d.c./a.c. mode. Start on a safe high range if the size is unknown, then use a suitable lower range for better resolution.
An ammeter measures current and is connected in series so the current being measured passes through it. A voltmeter measures potential difference and is connected across the component. Connecting an ammeter directly across a low-resistance supply can cause a dangerously large current. Assemble low-voltage circuits with the supply off and have the arrangement checked before switching on when required.
A liquid-in-glass thermometer needs its bulb immersed appropriately, without touching the container, and time to reach thermal equilibrium. Stir gently to reduce temperature differences in the liquid. Read the scale at eye level while the bulb remains in the liquid. A digital temperature probe also needs time to respond; an instantly changing display is not evidence that the whole liquid has that temperature.
Worked example 2: an unlabelled interval
Question. An analogue voltmeter has ten equal intervals between and . Its pointer lies on the seventh interval after . Determine the reading.
Plan. Find one interval before counting seven of them.
Answer. . Check. Seven tenths of the way from 2.0 to 4.0 lies nearer 4.0, as the answer does.
A stable reading still needs a sensible interpretation.
Timing motion and repeating readings
A stopwatch may display hundredths of a second while your reaction time is much larger. The useful trick is to time a longer event, then divide, so reaction timing occupies a smaller fraction of the result.
One complete oscillation returns an object to the same position moving in the same direction. Its period, , is the time for one complete oscillillation. For a pendulum, use a fixed reference mark at the centre of the swing and count crossings in the same direction. Start the clock at count zero; stop after the chosen number of complete oscillations. Counting both directions as complete cycles halves the apparent period.
Period from several oscillations
Here is the total time in seconds for complete oscillations, an exact count; is the period in seconds. The motion must remain sufficiently repeatable over the timed interval.
Not on the data sheet: learn it.
Repeat the timing to reveal variation. An arithmetic mean reduces the influence of random timing variations; it does not remove a consistent counting error or repair a systematically wrong start point. Use enough oscillations to make the timing interval long, without allowing large changes of amplitude or the apparatus to drift.
Worked example 3: a pendulum period
Question. Three timings of 20 complete oscillations are , and . Determine the mean period.
Plan. Average the total times, then divide by the count.
Answer. . Check. Twenty periods of about 1.4 seconds take about 28 seconds. The count 20 does not limit significant figures because it is exact.
A useful consequence is that, for a similar absolute uncertainty in the total stopwatch timing, timing 20 oscillations rather than one makes the uncertainty in the calculated period about 20 times smaller. It does not improve the stopwatch's resolution; it changes the measurement method.
Key idea
Repeat when variation is possible, and repeat a meaningful measurement. Re-reading an unchanged digital display five times gives little information about how reproducibly you can set up the experiment.
Now check both the calculation and the reason for the method.
A useful set of measurements
A practical investigation needs an arrangement that works and data that can answer its question. Read the complete instructions and diagram before assembling anything. Identify what you vary, what you measure and what must stay fixed. Follow the given measurement definitions: a spring's length and its extension, for example, are different quantities.
Check stands and clamps are stable, scales are positioned for the defined reading, connections are secure and the apparatus has room to move. Take a trial measurement. It can reveal a range that is too small, an overloaded instrument or a moving object that strikes the bench. You should be familiar with the apparatus your laboratory provides, including its style of calipers.
Choose values spread across the largest safe range allowed by the apparatus and instructions, rather than several clustered values. If six measurements are requested over a permitted range of to , values near 10, 20, 30, 40, 50 and 60 cm are more informative than six values near 30 cm. A wider range helps reveal the trend relative to the scatter. Add repeats where appropriate and record every raw reading immediately; never improve a result by inventing or adjusting data to match a prediction.
Common school apparatus serves several distinct jobs:
| Arrangement | Apparatus and useful habits |
|---|---|
| Low-voltage circuit | Cells or a variable d.c. supply, leads and crocodile clips, switch, lamp, resistance wire and rheostat. Check ratings; switch off between readings if heating changes resistance. |
| Loads and springs | Stand, boss, clamp or G-clamp, mass hanger, slotted masses, spring and newton meter. Support the load securely and keep feet clear of falling masses. |
| Pendulum or moving mass | Bob or modelling clay, string, pulley where required, reference card or pin, stopwatch and protractor. Keep a clear path and define the reference position. |
| Thermal measurement | Beaker or polystyrene cup, thermometer, stirrer, measuring cylinder, balance and controlled hot water. Reduce spillage and handle hot water with suitable protection. |
| Magnetic and construction work | Bar or ceramic magnets, copper wire, adhesive tape or putty, card, scissors and wire cutters. Keep fingers clear of cutting edges and secure components before measuring. |
You need actual laboratory practice with these arrangements. Cambridge's syllabus recommends at least 20% of teaching time in individual or small-group practical work, excluding demonstrations. Reading a scale here helps you prepare, but collecting reliable measurements also requires hands-on judgement.
Exam tip
Independent setup and collection are assessed in Paper 3. If assistance is necessary, ask rather than invent data or use unsafe apparatus; the supervisor records the help. Analysis and evaluation remain your own work.
The answer to our opening question is now clear: a finer instrument helps only when it measures the right thing, has been checked and is used properly.
Quick Recap
- Choose an instrument for the quantity, range and required resolution; check zero and alignment.
- Read analogue intervals carefully and keep the selected range and unit with every digital reading.
- Time several complete oscillations, repeat and average to reduce random timing uncertainty.
- Follow the defined method and collect readings across the widest safe, permitted range.
A micrometer can give a worse result than a ruler when its finer resolution is undermined by zero error, poor contact, misalignment or an unsuitable measurement method.