2.11 - Investigating inks by distillation and chromatography
In this core practical, you will separate the water and dyes in an ink, carry out both methods safely, and use the results to make supported conclusions about its composition.
Separating the solvent by simple distillation
This core practical uses two techniques on water-based inks. Simple distillation collects the water solvent; paper chromatography separates the soluble dyes and compares them with known dyes.
Simple distillation involves vaporisation followed by condensation. The dyes used here are non-volatile under the conditions of the practical, so they stay in the flask while water vapour passes into the condenser.
[DIAGRAM: asset_name: simple_distillation_of_ink - diagram 1; asset_slug: 070_2_11_core_practical_investigate_the_composition_of_inks_using_simple_distillati_diagram1; file: distillation_repaired.png; recommended_method: imagegen; description: Supported simple distillation apparatus with electric heating. The thermometer bulb is level with the side arm, vapour and distillate travel through the inner condenser tube to an open receiver, and separate coolant enters the lower outer-jacket connection and leaves the upper one. Stop before boiling dry. The distillate is labelled mainly water; colourlessness alone does not prove purity.]
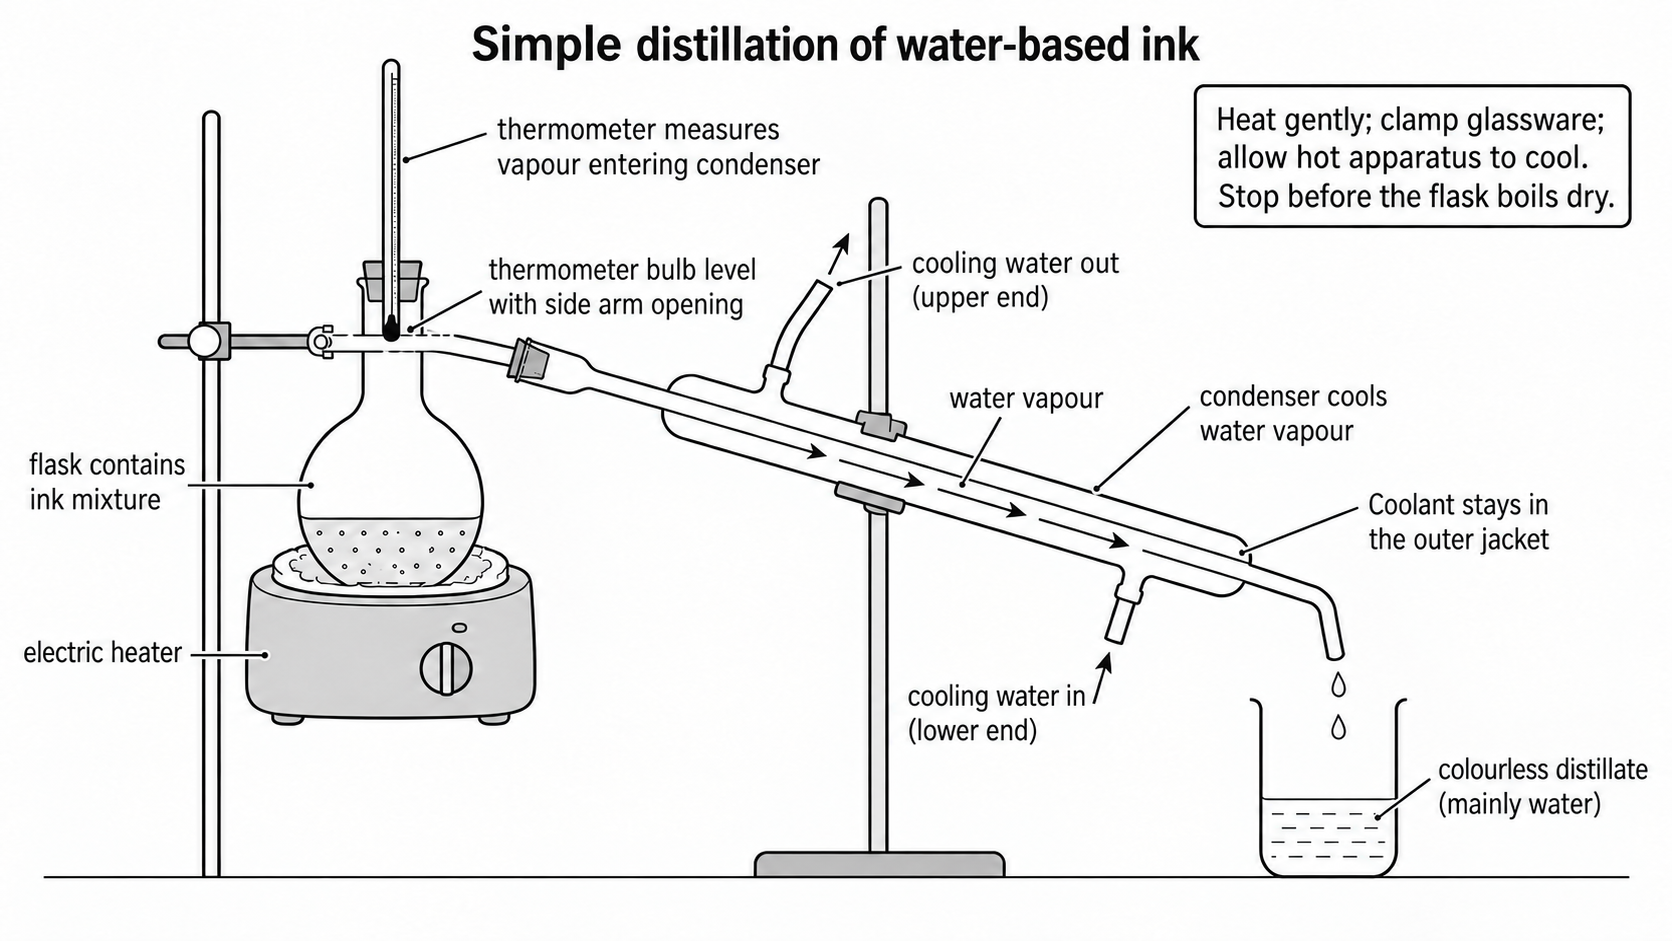
Follow the two separate paths
Water vapour from the ink flows through the inner tube of the condenser, loses energy and condenses. The liquid runs downhill into an open receiver. Cold cooling water enters the outer jacket at its lower end and leaves at the upper end, keeping the jacket full. This coolant does not mix with the vapour or become the distillate.
Method and safe heating
- Use the teacher-supplied water-based ink. Add a measured volume and anti-bumping granules to the cold flask before heating; do not add granules to hot liquid.
- Clamp the flask and support the condenser. Keep the receiving vessel open and the delivery outlet above the collected liquid. Never heat a sealed system.
- Position the thermometer bulb at the side-arm entrance so it measures the vapour passing to the condenser.
- Turn on the cooling water before heating. Heat gently and collect a small volume of distillate. Stop while liquid remains in the flask; do not boil it dry.
- Record the distillate and residue colours, and the vapour temperature. Allow the apparatus to cool before dismantling it.
The drawing shows electric heating. The core practical also requires safe Bunsen-burner use: with the teacher-approved aqueous ink and apparatus, place the burner on a heatproof mat, light it with the air hole closed, and use a controlled blue heating flame after lighting. Return to the yellow safety flame when not heating, then switch the gas off when finished. Keep flammable chromatography solvents well away from any flame; never directly heat an unknown or flammable ink with a burner.
A colourless distillate and coloured residue show that the solvent has separated from the dyes. Colourlessness alone does not identify the liquid or prove purity. A steady vapour temperature close to 100 °C at atmospheric pressure supports the identification as water.
Separating dyes by paper chromatography
Paper chromatography works because different soluble dyes move at different rates through chromatography paper. The paper contains the stationary phase. The solvent is the mobile phase because it moves through the paper and carries soluble dyes with it.
Stationary phase
The stationary phase is the phase that does not move. In this practical, the stationary phase is in the chromatography paper.
Mobile phase
The mobile phase is the solvent that moves through the paper and carries soluble substances with it.
Use this method for water-soluble inks.
- Draw a pencil baseline near the bottom of a strip of chromatography paper.
- Put a small spot of each ink and any known reference dyes on the baseline using separate clean capillary tubes. Label them in pencil and let the spots dry; add another small application if necessary.
- Add a shallow layer of solvent to a beaker.
- Suspend the paper with its lower edge in the solvent, but with the baseline and ink spots above the solvent level. Keep it clear of the beaker walls and cover the beaker with a lid or watch glass to reduce solvent evaporation.
- Allow the solvent to move up the paper.
- Remove the paper before the solvent reaches the top.
- Immediately mark the solvent front in pencil.
- Let the chromatogram dry, then record the number and position of spots.
[DIAGRAM: asset_name: paper_chromatography_setup - diagram 2; asset_slug: 070_2_11_core_practical_investigate_the_composition_of_inks_using_simple_distillati_diagram2; file: chromatography_start_repaired.png; recommended_method: imagegen; description: Starting setup only: three ink spots A, B and C on a pencil baseline above the solvent surface; the lower paper edge is immersed. Mobile phase is the solvent and the paper contains the stationary phase. Mark the solvent front immediately after the run.]
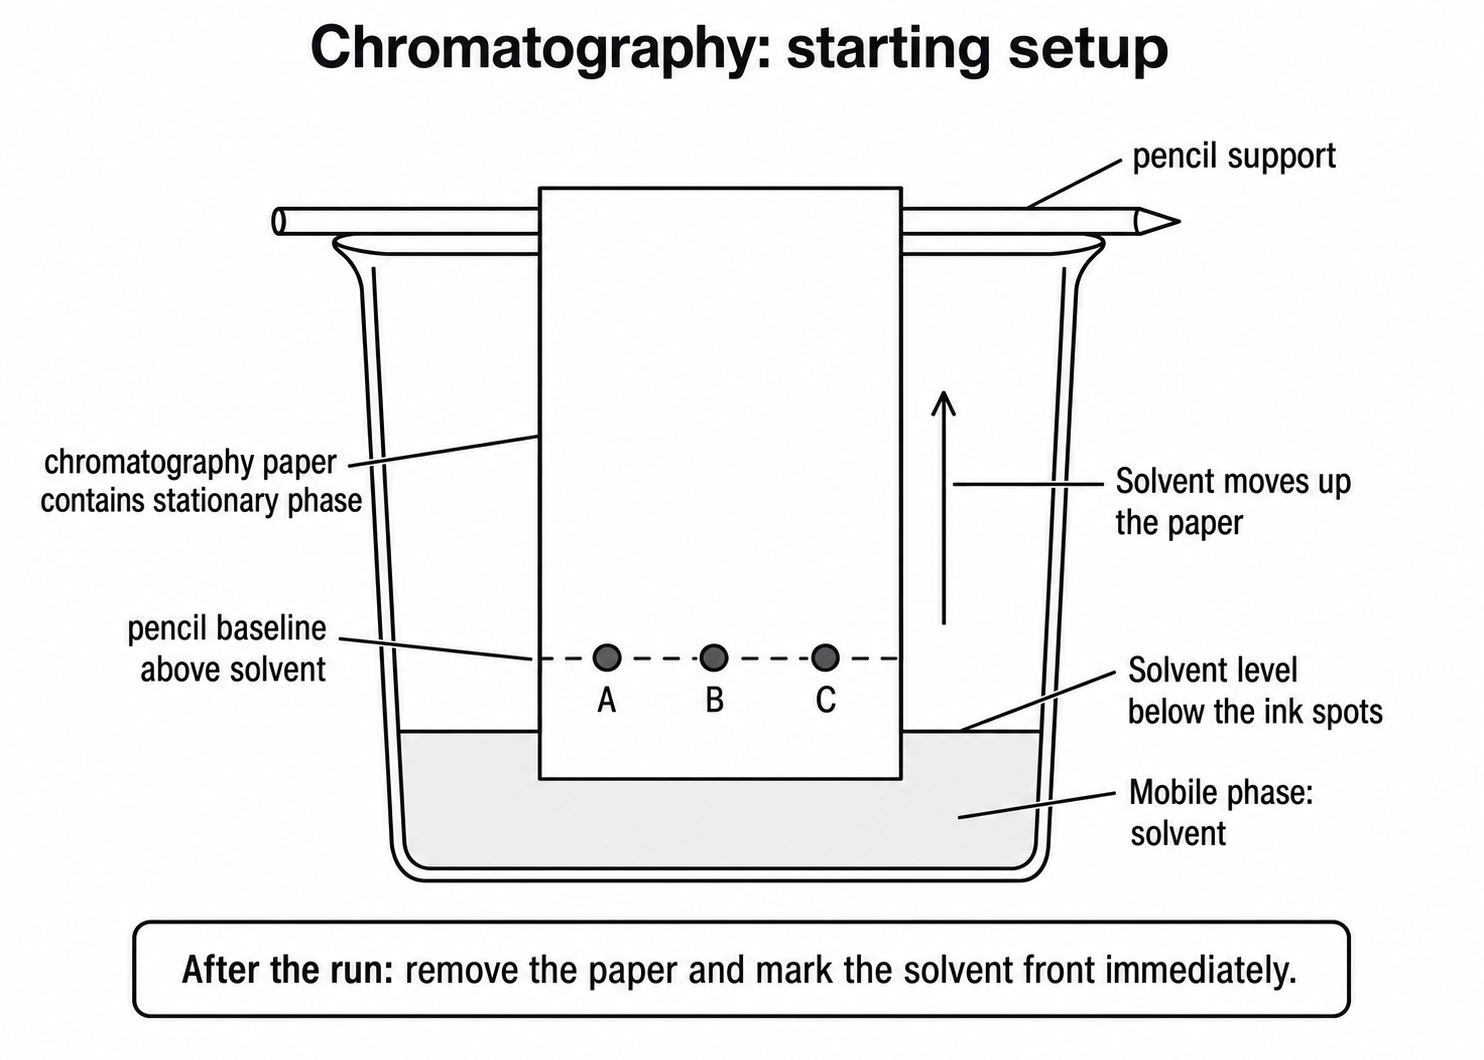
Two details are often assessed.
- Use pencil for the baseline because pencil is insoluble in the solvent. Ink would dissolve and separate, interfering with the results.
- Keep the ink spots above the solvent level. If a spot starts below the solvent surface, the dye can dissolve into the solvent reservoir instead of moving up the paper.
The solvent front is the furthest point reached by the solvent. You mark it immediately because the solvent may evaporate as the paper dries.
Rf values and the limits of the evidence
A chromatogram gives two main types of evidence.
First, the number of spots from one original ink spot gives evidence about purity. A pure detectable soluble dye should produce one spot. One spot alone is not proof of purity because different dyes can overlap or be undetected. An ink mixture can produce several spots because it contains several soluble dyes.
Second, the distance moved by a spot can be compared using an Rf value. Rf has no unit because it is a ratio of two distances measured in the same unit.
Continue this lesson.
You’re previewing NovaLearn without an account. Create a free account to read the rest.
Create free account