4.7.1.2 - Magnetic Fields
A magnetic field is how a magnet can exert a force without touching another object. In this lesson you will describe what a magnetic field is, use field lines to show its strength and direction, explain how to plot a bar magnet's field using a compass, and connect compass behaviour to the Earth's magnetic field.
What a magnetic field is
A magnet can exert a force on another magnet or on a magnetic material even when the objects are not touching. The region where this magnetic force can act is called a magnetic field.
Magnetic field
A magnetic field is the region around a magnet where a force acts on another magnet or on a magnetic material.
The magnetic materials named by AQA are:
- iron
- steel
- cobalt
- nickel
The force between a magnet and a magnetic material is always attraction. For example, an iron nail is attracted to either pole of a bar magnet. That is different from the force between two magnets, where like poles repel and unlike poles attract.
The field is not a visible substance. It is a way to describe where a magnetic force can act and how that force would be directed.
Direction and strength
Magnetic fields have direction as well as strength. The direction of a magnetic field at a point is the direction of the force that would act on a north pole placed at that point.
For a bar magnet, magnetic field lines are drawn from the north-seeking pole to the south-seeking pole outside the magnet. The arrows on the field lines show this direction.
[DIAGRAM: asset_name: bar_magnet_field_pattern - diagram 1; asset_slug: 102_4_7_1_2_magnetic_fields_diagram1; file: diagram_assets/102_4_7_1_2_magnetic_fields_diagram1.png; recommended_method: image_gen; description: Image-generated bar-magnet magnetic field-line diagram. A horizontal bar magnet is labelled N on the left and S on the right. Smooth field lines curve outside the magnet from N to S with arrowheads. Lines are closest together near the poles and more spread out farther away. Labels state strongest field at poles, field weakens with distance, and arrows show force direction on a north pole. Generated with built-in Codex Image Gen; field-line shape, arrow direction, pole labels and relative spacing remain the assessed content.]
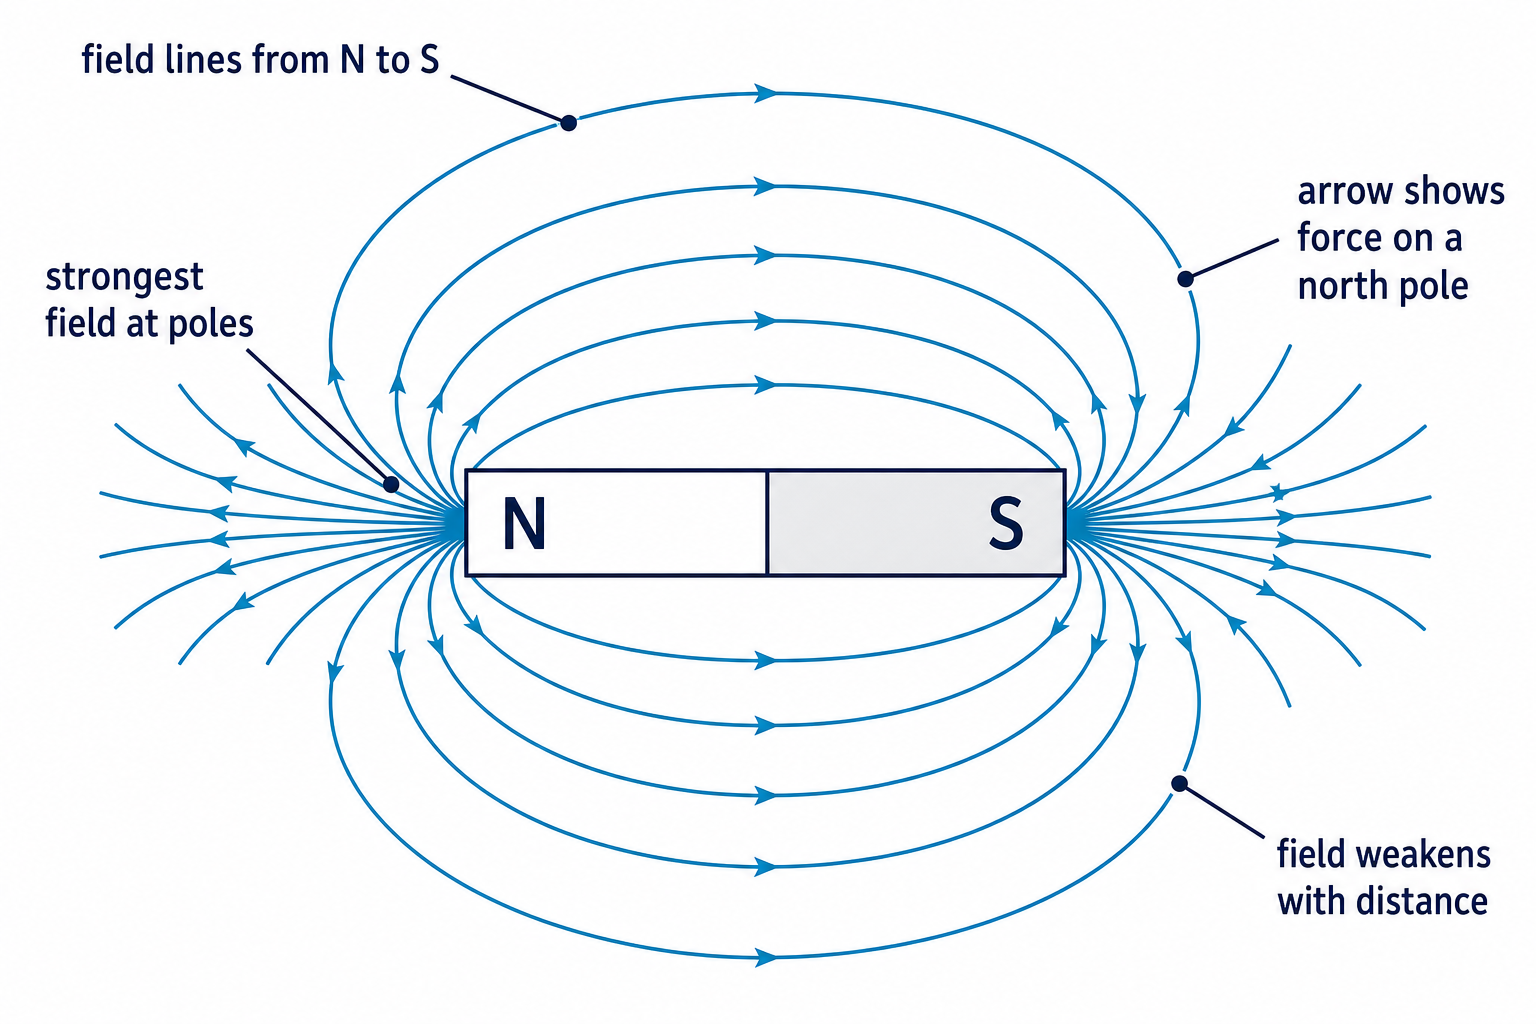
Field strength depends on distance from the magnet. The field is strongest at the poles and becomes weaker farther away from the magnet. On a diagram, a stronger field is shown by field lines that are closer together. A weaker field is shown by field lines that are more spread out.
Common drawing features for a single bar magnet are:
- field lines leave the north pole and enter the south pole
- arrows point from N to S outside the magnet
- lines are closer together near the poles
- lines are more spread out farther from the magnet
- smooth field lines do not cross each other
Plotting with a compass
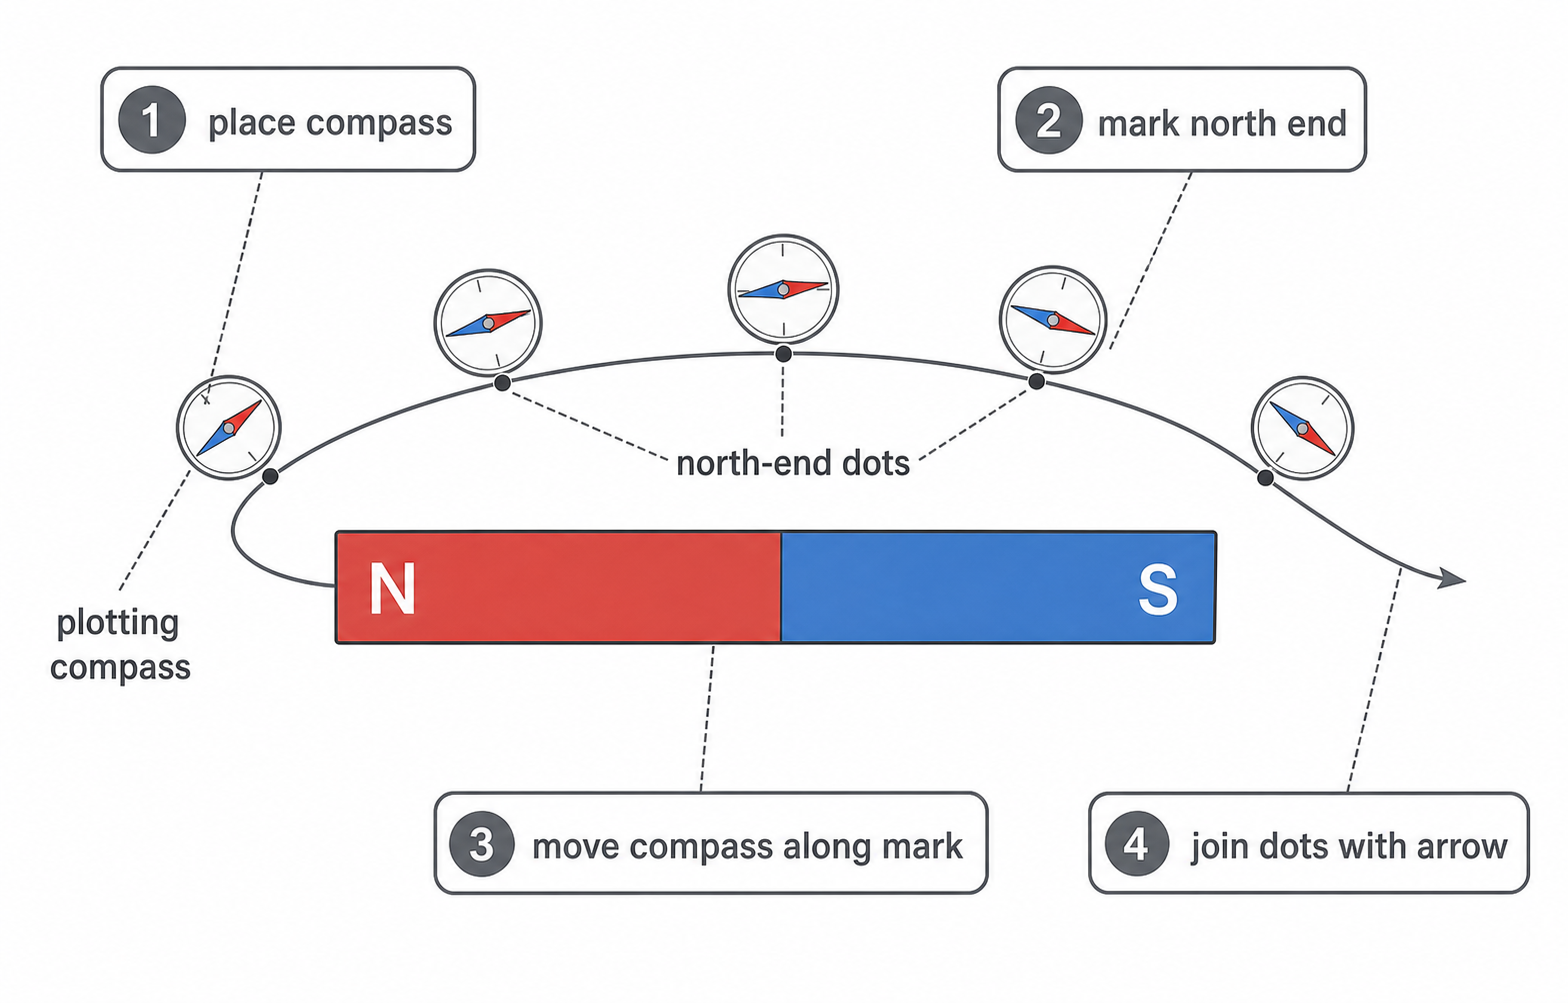
A magnetic compass contains a small bar magnet that is free to turn. The north-seeking end of the compass needle points along the magnetic field at that place.
To plot the magnetic field pattern of a bar magnet:
- Place the bar magnet on paper and draw around it.
- Label the north and south poles of the magnet.
- Put a plotting compass near one pole.
- Mark the direction of the compass needle with small dots or a short arrow.
- Move the compass so it follows the direction just marked.
- Repeat the marking and moving until the line reaches the other pole or moves far from the magnet.
- Join the marks with a smooth curve and add arrowheads in the direction the north end of the compass pointed.
- Repeat from several starting positions to build the whole field pattern.
[DIAGRAM: asset_name: compass_plotting_method - diagram 2; asset_slug: 102_4_7_1_2_magnetic_fields_diagram2; file: diagram_assets/102_4_7_1_2_magnetic_fields_diagram2.png; recommended_method: image_gen; description: Image-generated step diagram for plotting a bar magnet field using a plotting compass. It shows a horizontal N-S bar magnet on paper, a sequence of small compass positions following one curved field line from N to S, dots marking the north end of the compass needle, and a final smooth arrowed field line through the dots. Labels identify Step 1 place compass, Step 2 mark north end, Step 3 move compass along the marked direction, Step 4 join dots with an arrow. The compass orientation, dots, line direction and method order are assessed method content.]
Continue this lesson.
You’re previewing NovaLearn without an account. Create a free account to read the rest.
Create free account