4.5.3c - Required Practical 6 - Force and Extension
This required practical investigates how the force applied to a spring affects its extension. The practical evidence should let you plot a force-extension graph, identify the linear region, calculate a spring constant, and judge whether the spring has gone beyond the limit of proportionality. The important practical skill is not just taking readings; it is turning length measurements into reliable evidence.
Aim and variables
The aim is to investigate the relationship between force and extension for a spring.
The force stretching the spring is the weight of the masses hanging from it. If the masses are labelled in newtons, use those forces directly. If the masses are labelled in kilograms or grams, convert mass to weight using:
On Earth, GCSE practical work often uses , so has weight .
Extension
Extension is the increase in length of the spring: stretched length minus original length.
The variables are:
| Role | Quantity in this practical | How it is handled |
|---|---|---|
| Independent variable | force applied to the spring | change the hanging weight in known steps |
| Dependent variable | extension of the spring | calculate from length readings |
| Control variables | same spring, same ruler position, same pointer, same zero reference | keep the setup unchanged while taking readings |
The hypothesis is that, as long as the spring is not stretched too far, the extension is directly proportional to the force. This means doubling the force should double the extension.
Apparatus setup
The apparatus must let you measure length accurately while changing the force safely. A typical setup uses a clamp stand, boss and clamp, spring, metre ruler, pointer, weight stack, goggles, and a G-clamp or heavy base to stop the stand tipping.
[DIAGRAM: asset_name: required_practical_6_apparatus_setup - diagram 1; asset_slug: 061_4_5_3c_required_practical_6_force_and_extension_diagram1; file: diagram_assets/061_4_5_3c_required_practical_6_force_and_extension_diagram1.png; recommended_method: image_gen; description: Exact assessed apparatus layout for required practical 6. Show a clamp stand fixed with a G-clamp/heavy base, boss and clamp holding a vertical spring, metre ruler beside the spring with zero aligned to the top of the unstretched spring, a horizontal pointer attached to the bottom of the spring, slotted masses hanging below, and a tray under the masses. Include labels for spring, metre ruler, pointer, weight stack, eye-level reading, G-clamp/heavy base, and tray/goggles safety. Students should learn how the apparatus makes accurate length readings and manages falling-mass risk; deterministic rendering is required because apparatus labels and alignment are assessed.]
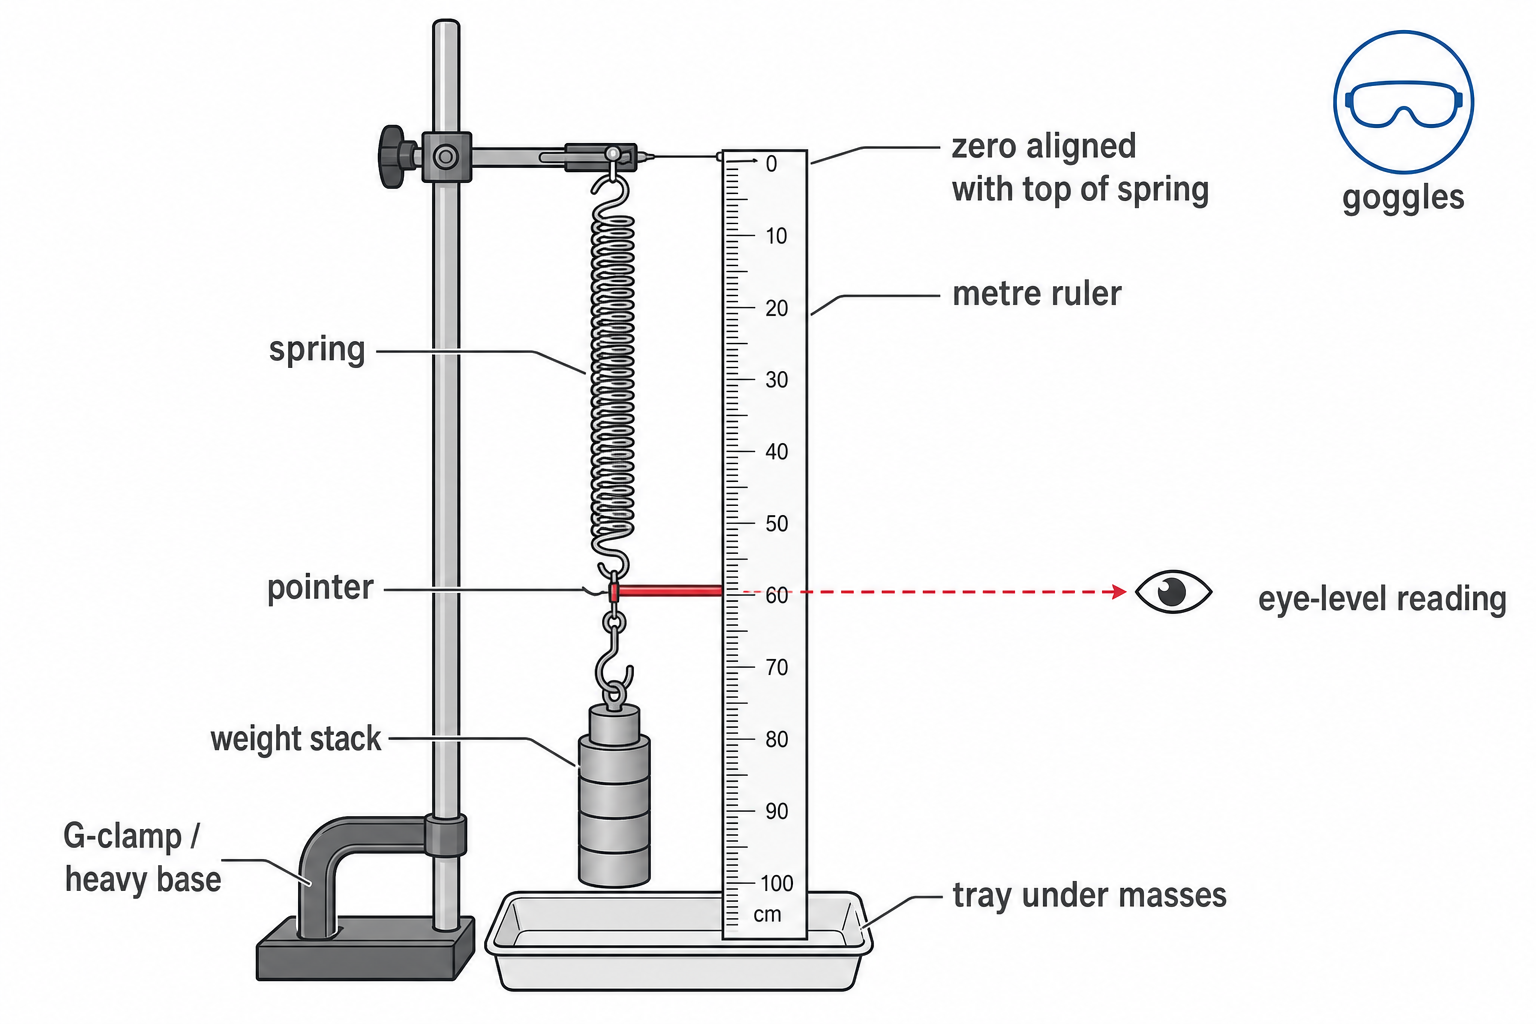
Set up the ruler vertically next to the spring. The zero mark should be level with the top of the unstretched spring, or the natural length must be recorded clearly so extension can be calculated later. A pointer attached to the bottom of the spring makes the scale reading easier and reduces uncertainty.
Good setup choices reduce common errors:
- read the ruler at eye level to reduce parallax error
- keep the pointer horizontal and close to the scale
- wait for the spring to stop moving before reading the length
- add and remove masses gently so the spring is not jerked
- keep feet and hands away from below the masses
- use a tray or box below the masses in case they fall
Method and recording
A reliable method uses a range of forces and records enough information to calculate extension for each force.
- Fix the spring to the clamp so it hangs vertically beside the ruler.
- Record the length of the unstretched spring with no added load.
- Add the first known weight, for example .
- Wait for the spring to settle, then record the new length.
- Add further weights in equal steps and record the spring length each time.
- Calculate the extension for each force.
- Repeat the readings, calculate means where appropriate, and check for anomalies.
- Remove the masses gently and check that the spring returns close to its original length.
A results table should include force, spring length, extension, and repeats if the investigation includes repeated readings. For example:
| Force in N | Length in cm | Extension in cm |
|---|---|---|
| 0.0 | 15.0 | 0.0 |
| 1.0 | 17.0 | 2.0 |
| 2.0 | 19.0 | 4.0 |
| 3.0 | 21.0 | 6.0 |
The extension is always the total increase from the original length. It is not the increase from the previous reading.
Worked example: the original length is . When a force is applied, the length is .
For calculations using , convert extension to metres:
Graph and pattern
Plotting a graph makes the pattern easier to see. The axes must be labelled with quantities and units. For calculating the spring constant directly from a gradient, use force on the vertical axis and extension on the horizontal axis.
Continue this lesson.
You’re previewing NovaLearn without an account. Create a free account to read the rest.
Create free account