4.6.1.2b - Measuring Wave Speed and Required Practical 8
Wave speed is not just a number from an equation; it is something you can measure with apparatus. In this lesson you will practise methods for measuring the speed of sound in air, the speed of ripples on water, and the speed of waves in a solid. You will also learn the required practical 8 method and the practical judgement exam questions often look for: whether the apparatus is suitable, what was measured, and how the measurements could be improved.
What wave speed means
The speed of a wave is the speed at which energy is transferred through the medium. A water ripple transfers energy across the water surface. A sound wave transfers energy through vibrating particles in air, water or a solid.
There are two useful routes to wave speed.
For a single pulse or sound travelling over a measured distance, use:
Speed from distance and time
Here v is speed in metres per second, m/s, d is distance in metres, m, and t is time in seconds, s.
For repeated waves where you can measure frequency and wavelength, use the wave equation:
Wave equation
Here v is wave speed in m/s, f is frequency in hertz, Hz, and λ is wavelength in metres, m. For AQA GCSE Physics exams in 2026 and 2027, this equation is supplied on the Physics Equations Sheet. You still need to recognise when it applies and use it accurately.
The measurements must match the equation. If you measure the distance travelled by one pulse, divide distance by time. If you measure the spacing between repeated wavefronts and how many pass each second, multiply frequency by wavelength.
Worked example: ripples have frequency 4.0 Hz and wavelength 0.075 m.
This answer is small compared with sound in air because surface ripples in a school ripple tank move much more slowly than sound waves.
Measuring sound speed in air
Sound travels too fast for a short stopwatch timing to be reliable. At room temperature, a typical value in air is about 340 m/s, so sound takes only about 0.015 s to travel 5 m. A good method either uses a long distance, times many journeys, or uses electronic timing.
[DIAGRAM: asset_name: Measuring Wave Speed and Required Practical 8 - diagram 1; asset_slug: 085_4_6_1_2b_measuring_wave_speed_and_required_practical_8_diagram1; file: diagram_assets/085_4_6_1_2b_measuring_wave_speed_and_required_practical_8_diagram1.png; recommended_method: image_gen; description: Exact assessed method diagram for measuring the speed of sound in air. Show two valid panels: Panel A has two microphones a measured distance d apart connected to a data logger or oscilloscope, with a clap made next to microphone 1 and the time delay Δt between traces used in v = d/Δt. Panel B has a student a measured distance x from a large wall, clapping wooden blocks and timing repeated echoes, with total sound distance = 2x multiplied by the number of echoes. Labels should make distance, time interval, sound path and repeated timing clear.]
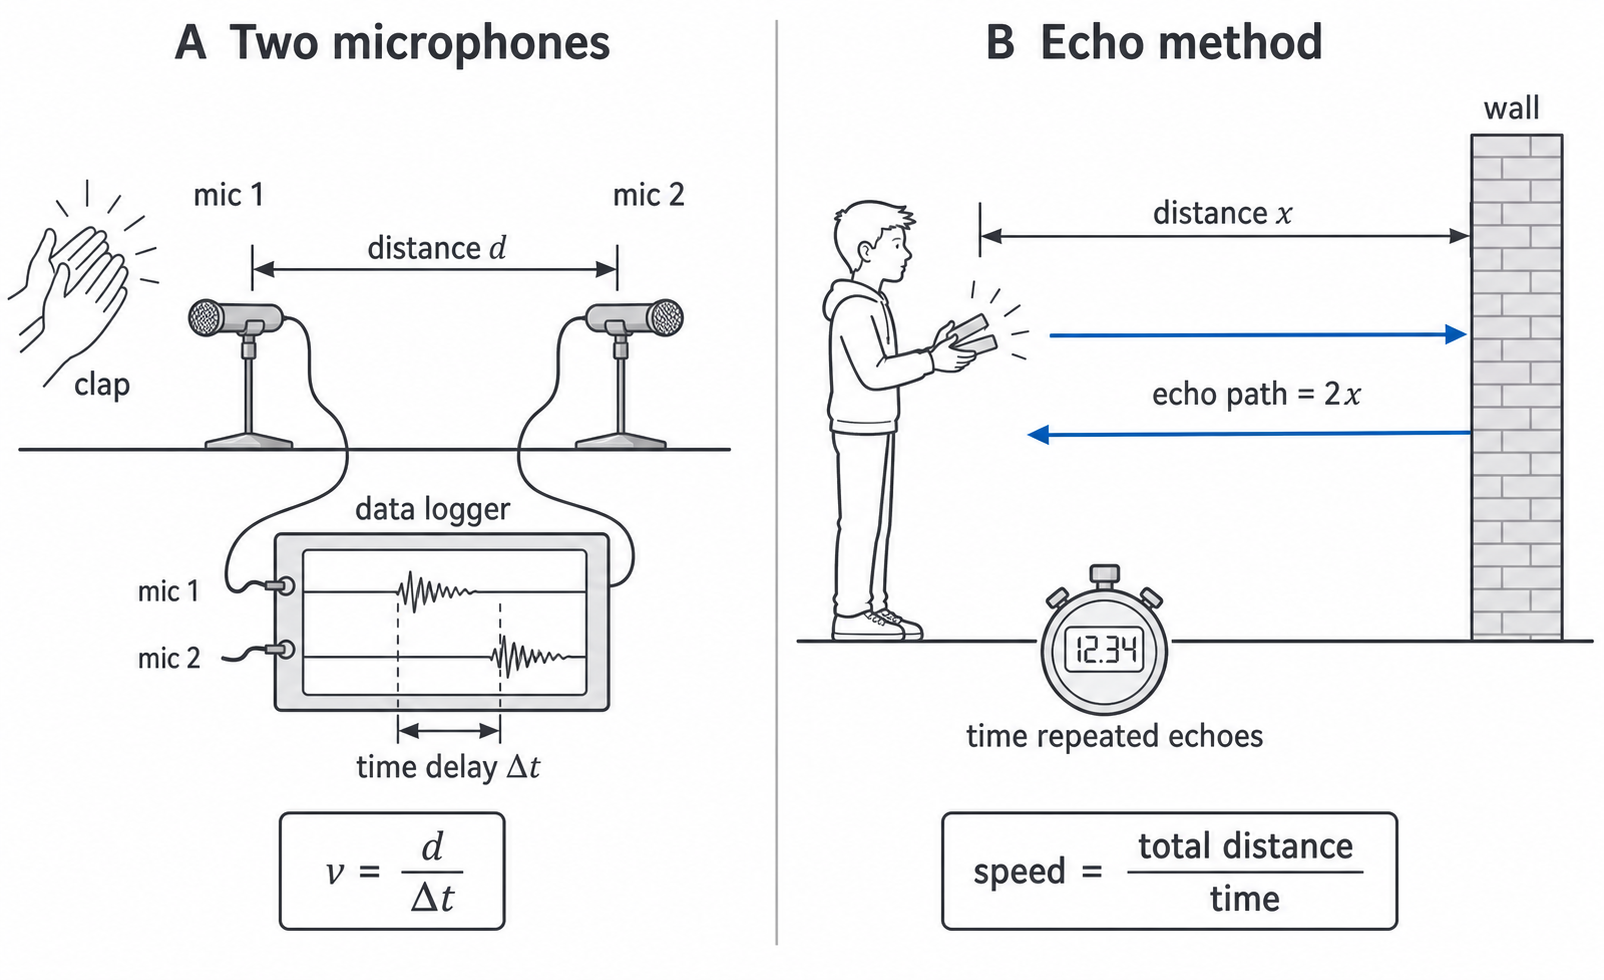
One accurate school method uses two microphones:
- Place two microphones several metres apart and measure the distance between them with a tape measure.
- Connect both microphones to a data logger or oscilloscope.
- Make a sharp sound, such as a clap from wooden blocks, next to the first microphone.
- Measure the time delay between the signal reaching the first microphone and the second microphone.
- Repeat the measurement and calculate a mean time delay.
- Calculate the speed of sound using
v = distance / time.
Example: the microphones are 4.8 m apart and the mean time delay is 0.014 s.
An echo method is also valid. Measure the distance to a large flat wall, make repeated claps in time with the echoes, and time many clap-echo cycles. The sound travels to the wall and back each time, so one echo journey is 2 × distance to wall. Timing many echoes reduces the percentage uncertainty from human reaction time.
A direct two-person method can work over a long measured distance, such as 100 m: one person claps blocks and the other starts timing when they see the clap and stops when they hear the sound. This is less accurate because human reaction time is a large fraction of the measured time, but repeats and a long distance make it more suitable.
Good answers about measuring sound speed should include:
- a measured distance for the sound to travel
- a measured time for that same sound journey
- repeat readings and a mean
- the calculation
speed = distance / time - an accuracy point, such as using a longer distance, timing many echoes, or using electronic timing
Required practical: ripple tank
Required practical 8 includes making observations to judge whether apparatus is suitable for measuring the frequency, wavelength and speed of waves in a ripple tank. The apparatus must make moving water waves visible enough to measure.
[DIAGRAM: asset_name: Measuring Wave Speed and Required Practical 8 - diagram 2; asset_slug: 085_4_6_1_2b_measuring_wave_speed_and_required_practical_8_diagram2; file: diagram_assets/085_4_6_1_2b_measuring_wave_speed_and_required_practical_8_diagram2.png; recommended_method: image_gen; description: Exact required-practical ripple tank apparatus layout. Show a shallow ripple tank with about 5 mm water depth, low-voltage motor and wooden dipper just touching the water, lamp above, white card or paper below the tank showing projected wavefront shadows, a metre ruler perpendicular to the wavefronts, a marked distance across five wavelengths, and a fixed point for counting waves over 10 s. Labels should identify frequency, wavelength, wave speed calculation, low-voltage supply, lamp, water depth, ruler and card.]
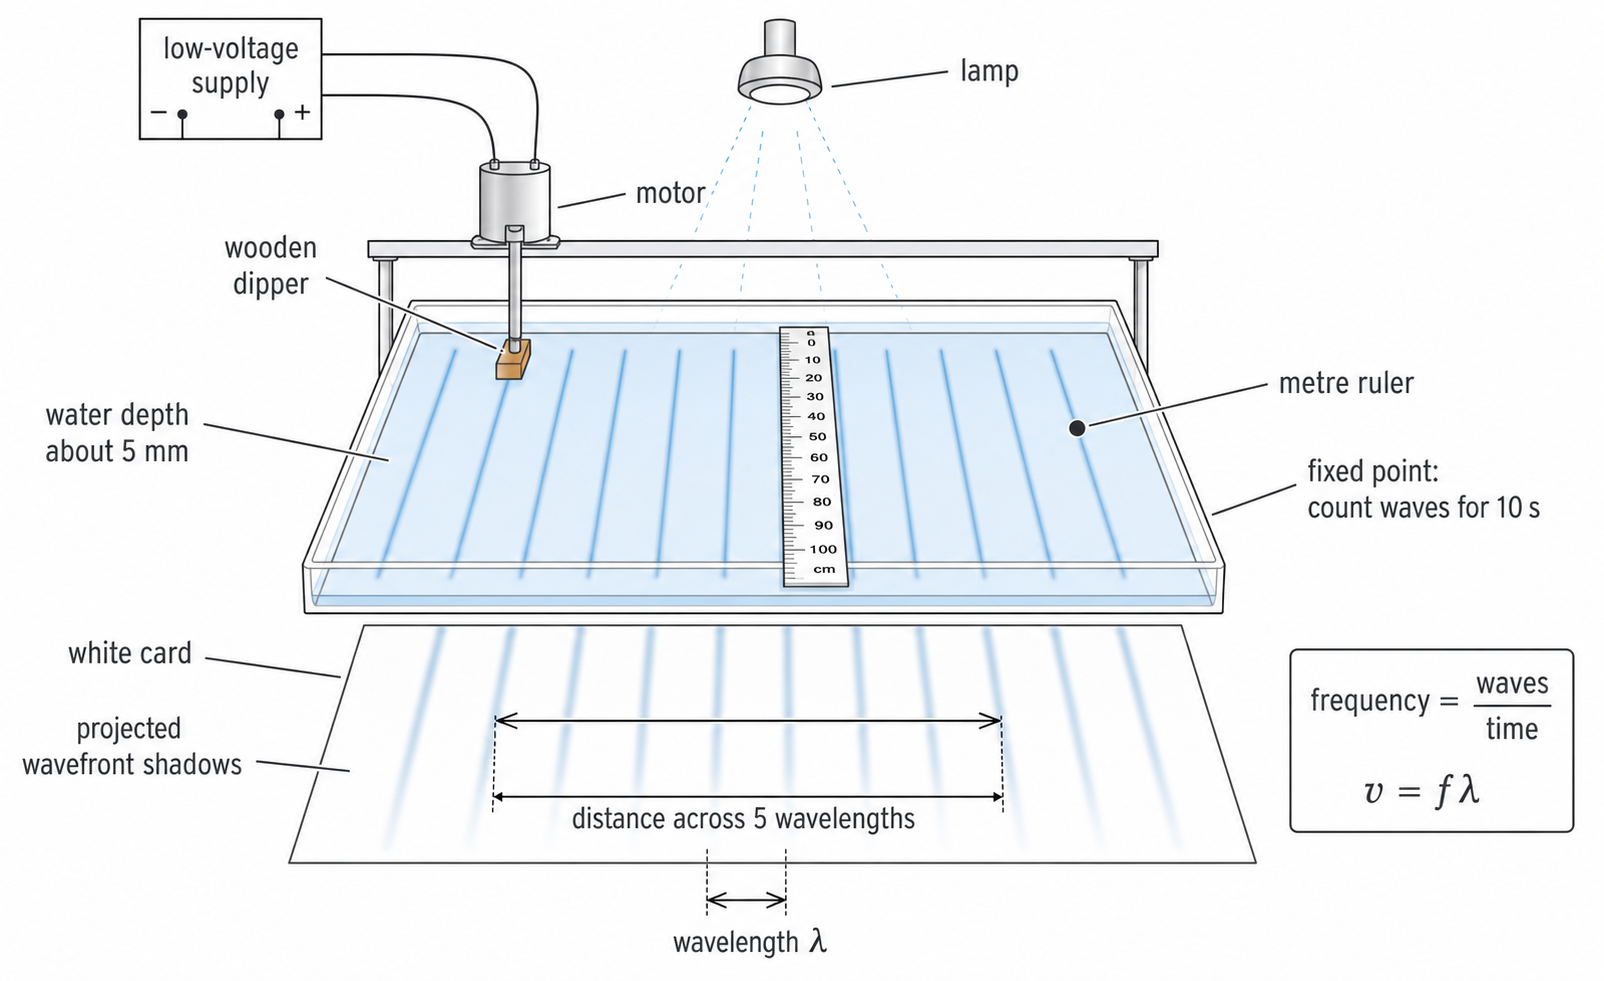
Core apparatus:
- ripple tank and accessories
- low-voltage supply and motor-driven dipper or wooden rod
- lamp above the tank
- white card or paper below the tank
- metre ruler
- stopwatch, or video/slow-motion recording if available
Method:
- Set up the ripple tank with a large sheet of white card or paper underneath.
- Add shallow water, about
5 mmdeep, so the waves are visible and reasonably regular. - Adjust the wooden dipper so it just touches the surface of the water.
- Switch on the lamp and low-voltage motor.
- Adjust the motor to produce a low-frequency wave pattern that is easy to observe.
- Adjust the lamp height until the wavefront shadows are clear on the white card.
- Place a metre ruler at right angles to the wavefronts.
- Measure across several wavelengths, then divide by the number of wavelengths measured.
- Count how many wavefronts pass a fixed point in a known time, for example
10 s. - Calculate frequency using
frequency = number of waves / time. - Calculate wave speed using
v = fλ. - Repeat the measurements and calculate mean values where appropriate.
The wording in step 8 matters. If you measure from the first crest to the sixth crest, you have measured 5 wavelengths, not 6. Measuring across several wavelengths reduces the percentage uncertainty caused by judging the position of one crest.
Example data:
| Trial | Distance across 5 wavelengths / m | Wavelength / m | Waves passing in 10 s | Frequency / Hz | Speed / m/s |
|---|---|---|---|---|---|
1 | 0.40 | 0.080 | 30 | 3.0 | 0.24 |
2 | 0.39 | 0.078 | 31 | 3.1 | 0.24 |
3 | 0.41 | 0.082 | 30 | 3.0 | 0.25 |
The table records enough information to check the calculation, spot anomalies, and judge repeatability. A final speed should usually be quoted to a sensible number of significant figures, not more precise than the measurements justify.
Keep the water depth, dipper position, timing method and viewing setup as consistent as possible. If the frequency is deliberately changed, record the new frequency and wavelength each time rather than assuming one of them stays the same.
Safety points are simple but important: use a low-voltage supply, keep electrical equipment away from spilled water, mop spills immediately, keep the floor clear, and stand up so you can react quickly if water spills.
Continue this lesson.
You’re previewing NovaLearn without an account. Create a free account to read the rest.
Create free account