4.6.2.5 - Lenses
Lenses form images by refracting light. In this Physics-only lesson you will use the AQA lens symbols, identify principal focus and focal length, construct ray diagrams for convex and concave lenses, and decide whether the image is real or virtual. You will also calculate magnification as a ratio, using image height and object height in the same units.
Lens symbols and focus
A lens changes the direction of light as the light enters and leaves the lens. For GCSE ray diagrams, the real curved glass shape is usually replaced by a simple vertical symbol so that the ray paths are easier to draw.
Convex lens
A convex lens is a converging lens. It brings parallel rays of light to a focus at the principal focus.
In AQA ray diagrams, a convex lens is represented by a vertical line with arrowheads pointing outwards at the top and bottom. A concave lens is represented by a vertical line with arrowheads pointing inwards at the top and bottom.
Concave lens
A concave lens is a diverging lens. It spreads parallel rays of light out so that they appear to have come from a principal focus on the incident-light side of the lens.
The principal axis is the straight reference line through the centre of the lens. The principal focus, labelled F, is the point on the principal axis linked to rays that are parallel before reaching the lens. The focal length is the distance from the centre of the lens to the principal focus.
[DIAGRAM: asset_name: Lenses - diagram 1; asset_slug: 097_4_6_2_5_lenses_diagram1; file: diagram_assets/097_4_6_2_5_lenses_diagram1.png; recommended_method: image_gen; description: Exact assessed ray and symbol comparison for convex and concave lenses. Shows the AQA convex symbol with outward arrowheads and parallel incident rays converging at the principal focus F on the far side, with focal length marked from lens centre to F. Also shows the AQA concave symbol with inward arrowheads, parallel incident rays diverging after the lens, dashed back extensions meeting at the principal focus F on the incident side, and the focal length marked. Image generation is used for the current regenerated PNG.]
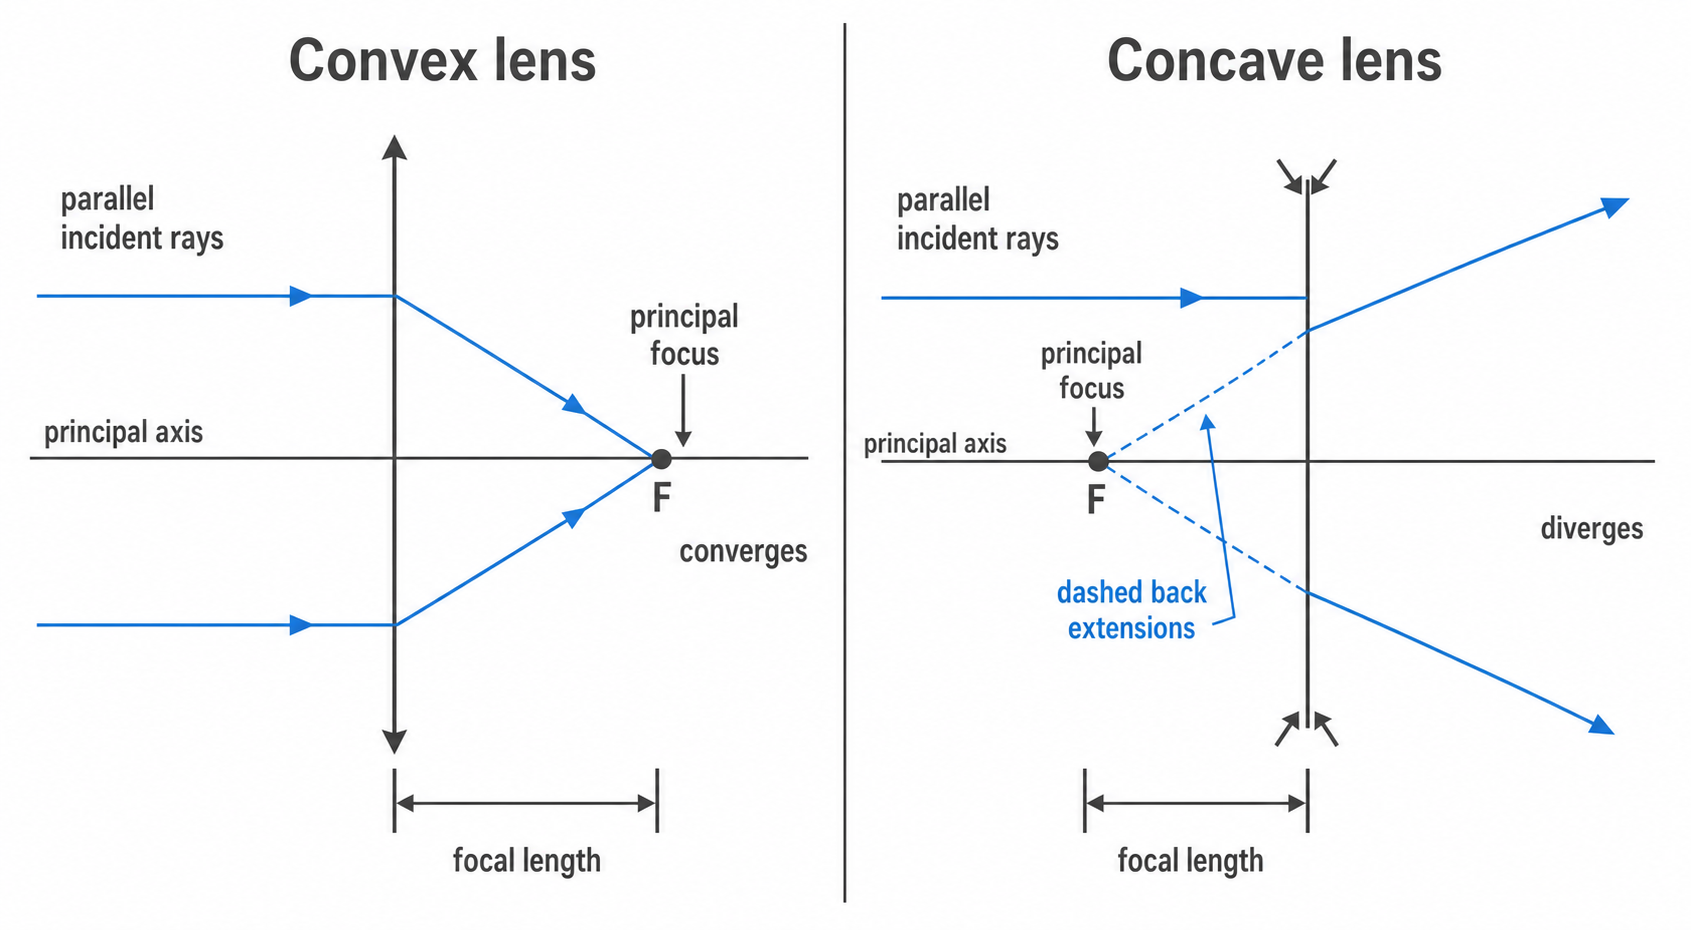
For a convex lens, the focus shown in a parallel-ray diagram is a real point where the refracted rays actually meet. For a concave lens, the rays do not actually meet at the focus; they only appear to have come from that point when the refracted rays are extended backwards.
Convex ray diagrams
To construct a ray diagram, start from the top of the object. Two accurate rays are enough to locate the top of the image.
For a convex lens with the object farther from the lens than the focal length:
- Draw the principal axis and the convex lens symbol.
- Mark the principal focus
Fon both sides of the lens, the same distance from the lens centre. - Draw a ray from the top of the object through the centre of the lens. It continues in a straight line.
- Draw a ray from the top of the object parallel to the principal axis. After refraction it passes through the principal focus on the far side of the lens.
- Where the refracted rays meet, draw the image.
[DIAGRAM: asset_name: Lenses - diagram 2; asset_slug: 097_4_6_2_5_lenses_diagram2; file: diagram_assets/097_4_6_2_5_lenses_diagram2.png; recommended_method: image_gen; description: Assessed convex-lens ray diagram for an object placed farther from the lens than the focal length. Shows principal axis, convex lens symbol, equal focal points F on both sides, upright object on the left, ray through lens centre continuing straight, ray parallel to the axis refracting through far F, and the real inverted image where the rays meet on the far side. Generated with the built-in Codex Image Gen tool for this regeneration.]
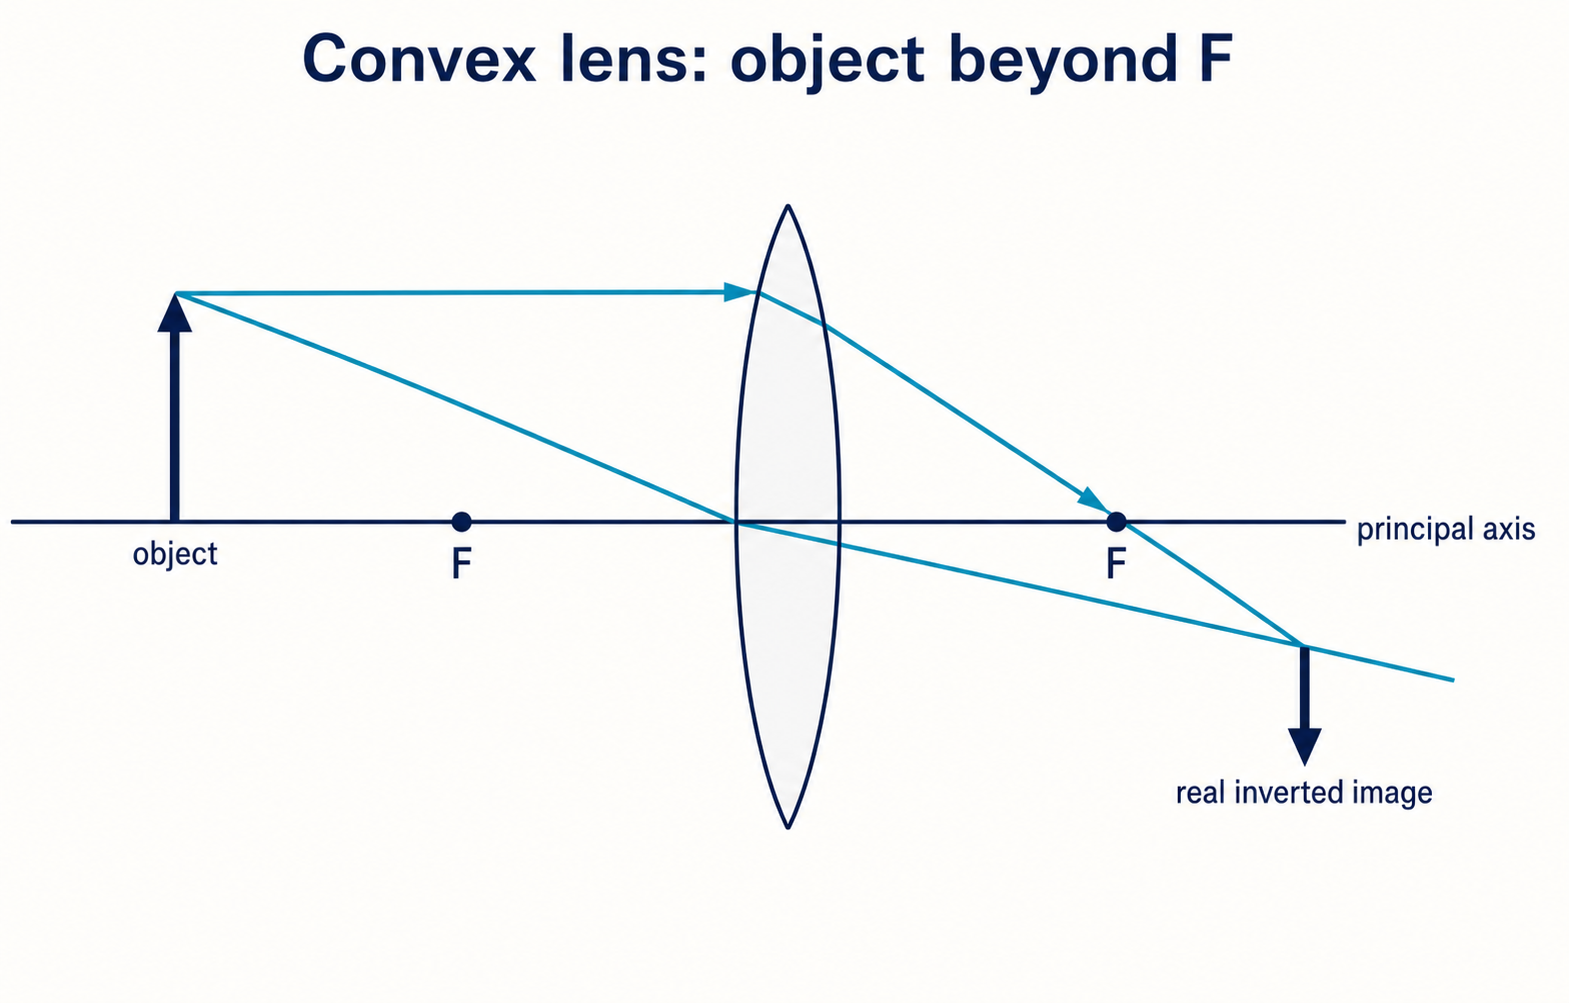
This image is real because the refracted rays actually meet on the far side of the lens. It is inverted because the image arrow is below the principal axis.
If the object is closer to a convex lens than the focal length, the outgoing rays diverge. The image is found by extending the outgoing rays backwards with dashed lines until the dashed lines meet.
[DIAGRAM: asset_name: Lenses - diagram 3; asset_slug: 097_4_6_2_5_lenses_diagram3; file: diagram_assets/097_4_6_2_5_lenses_diagram3.png; recommended_method: image_gen; description: Assessed convex-lens ray diagram for an object placed inside the focal length. Shows principal axis, convex lens symbol, focal points F, upright object between the left F and the lens, centre ray continuing straight, parallel ray refracting through far F, dashed backward extensions of outgoing rays, and a larger upright virtual image on the object side. Generated with the built-in Codex Image Gen tool for this regeneration.]
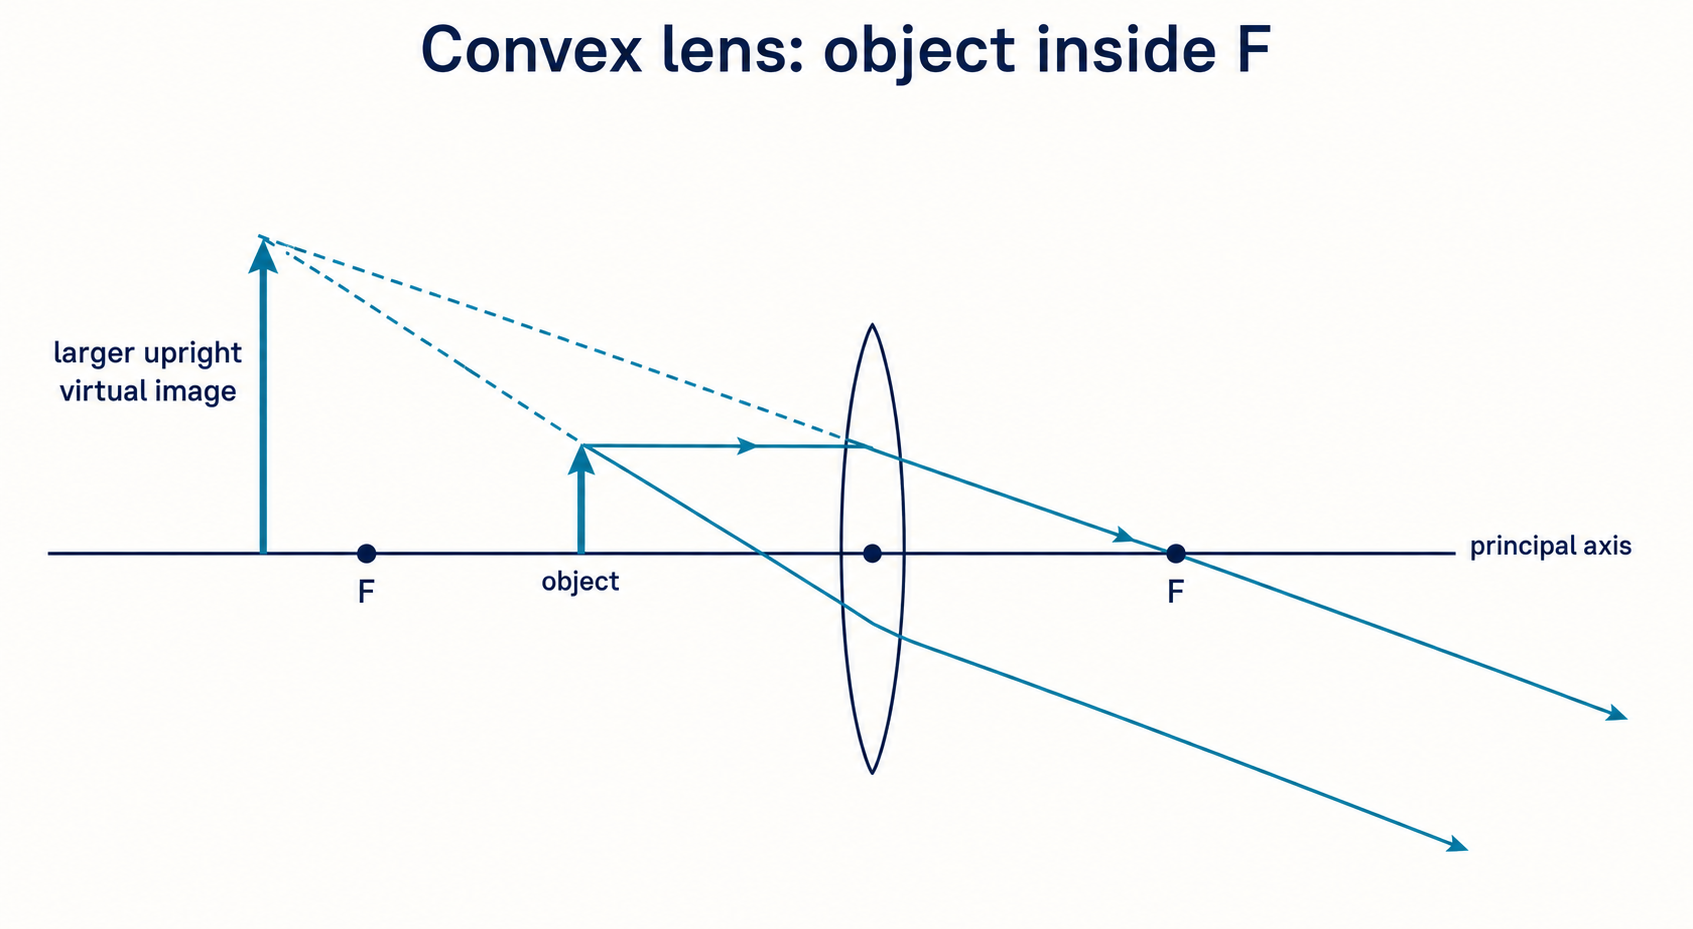
This time the light rays do not actually meet at the image position. The image is virtual, upright and magnified.
Concave ray diagrams
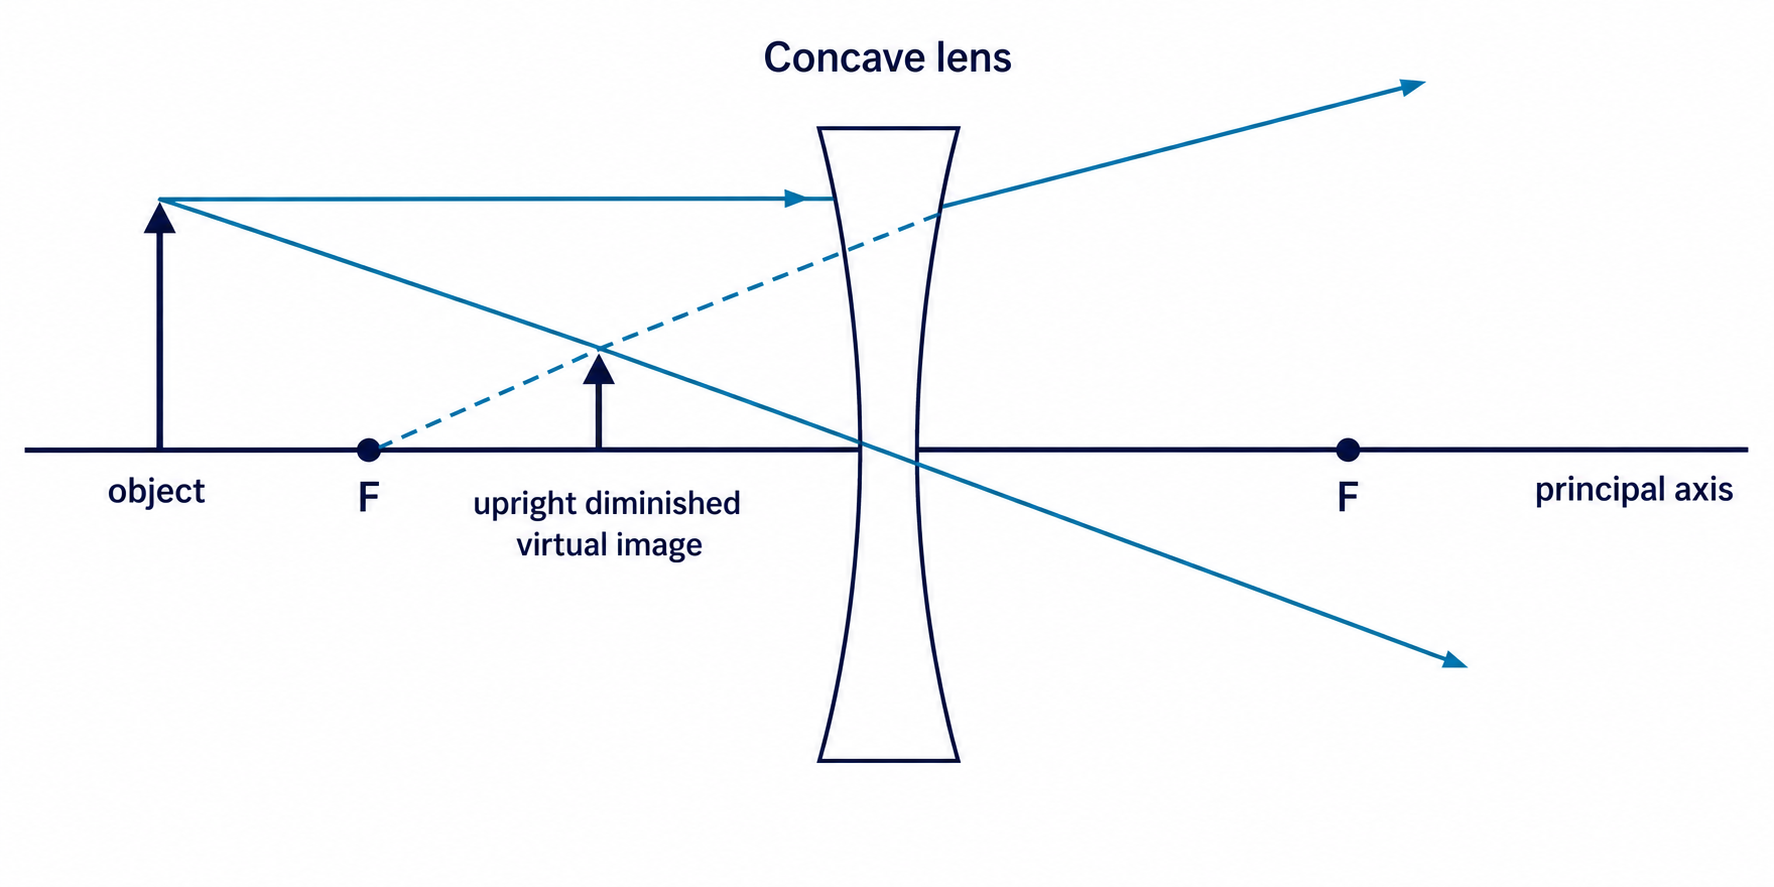
A concave lens is a diverging lens. Parallel rays spread out after passing through it, so the image is found by tracing rays backwards to where they appear to have come from.
For a concave lens:
- Draw the principal axis and the concave lens symbol.
- Mark the principal focus
Fon both sides of the lens. - Draw a ray from the top of the object through the centre of the lens. It continues in a straight line.
- Draw a ray from the top of the object parallel to the principal axis. After refraction it travels away from the axis as if it came from the principal focus on the object side.
- Extend the diverging ray backwards with a dashed line.
- Draw the image where the dashed backward line meets the centre ray.
[DIAGRAM: asset_name: Lenses - diagram 4; asset_slug: 097_4_6_2_5_lenses_diagram4; file: diagram_assets/097_4_6_2_5_lenses_diagram4.png; recommended_method: image_gen; description: Assessed concave-lens ray diagram. Shows principal axis, concave lens symbol, equal focal points F on both sides, upright object on the left, centre ray continuing straight, ray parallel to the axis refracting away from the axis as if from the near F, dashed backward extension to the near-side focus, and the upright diminished virtual image on the object side. Generated with the built-in Codex Image Gen tool for this regeneration.]
Continue this lesson.
You’re previewing NovaLearn without an account. Create a free account to read the rest.
Create free account