Core practical 9 - Antimicrobial plant extracts and asepsis
A clear patch around a plant extract can show that bacterial growth has been inhibited, but its size depends on the assay as well as the extract. Core practical 9 develops a safe, controlled investigation and shows how to measure, plot and interpret the results without claiming more than they demonstrate.
What the assay tests
A plant extract contains a mixture of substances, some of which may affect microorganisms. An investigation needs a measurable response and a comparison that isolates the proposed cause.
Antimicrobial
A substance or treatment that kills microorganisms or inhibits their growth.
In a disc-diffusion assay, an absorbent paper disc carries a measured volume of extract onto nutrient agar bearing an even bacterial lawn. Compounds diffuse out of the disc. Where conditions prevent visible bacterial growth, a clear zone of inhibition appears. Farther away, the concentration may be too low to prevent growth. The assay measures the extent of visible inhibition under these conditions; it does not directly measure the number of bacteria killed.
A testable question is: “Does increasing the concentration of this plant extract increase the inhibition-zone diameter for this approved teaching strain?” Concentration is the independent variable and zone diameter is the dependent variable. Alternatively, compare different plants at the same stated extract preparation and disc loading. Equal masses of starting plant material do not guarantee equal amounts of an active compound.
| Comparison or control | What it tells us |
|---|---|
| Extract discs | Whether a preparation produces visible inhibition under the assay conditions |
| Solvent-only disc, with the same solvent composition and volume as the extract discs | Whether the solvent or disc produces inhibition without plant compounds |
| Positive-control disc containing a teacher-approved antimicrobial known to inhibit this strain | Whether the assay can reveal inhibition; a failed positive control makes negative extract results difficult to interpret |
| An uninoculated medium control prepared by the teacher | Whether unintended growth has entered the medium or handling process |
Use the same strain, comparable starting cell density and inoculum volume, medium composition/pH/depth, disc material/diameter, loading volume, timing and incubation conditions. More bacteria or thicker agar can change the zone independently of extract action. A positive control is a check on the assay, not a calibration that makes unlike plant chemicals directly comparable.
Comparable extracts and dilutions
Extract preparation must be consistent because a change in extraction can change which compounds reach the disc. Record the plant species and part, fresh or dry condition, mass, solvent, final volume, extraction time and temperature. Obtain plant material legally, use modest quantities and avoid damaging rare plants. Check research claims against identifiable sources and record author or organisation, title, date, URL and access date; a claim about one preparation does not establish the properties of every extract from that plant.
For a supervised school comparison, the teacher supplies approved aqueous extracts prepared using the same mass of plant material per final volume. Tare a balance with the weighing container before recording tissue mass, measure the final liquid volume with suitable graduated apparatus, and record extraction time and temperature with a timer and thermometer. A preparation made from 5.0 g of starting tissue and made up to 50 cm³ has a starting-tissue equivalent of 0.10 g cm⁻³. This is a preparation description, not a measured concentration of the active chemical. Grinding exposes more tissue; filtration removes large solids but ordinary filter paper does not sterilise an extract. The teacher chooses a preparation that controls contamination without assuming that heating leaves plant compounds unchanged.
The supplied stock can be diluted without changing the identity of the plant extract. “50% of stock” means half the stock concentration, not 50% pure active compound. To make 10 cm³ at 50% of stock, mix 5.0 cm³ stock with 5.0 cm³ sterile water. Use a suitable graduated pipette or measuring device, read its scale at eye level and record its resolution. Never mouth pipette.
For a twofold serial dilution, place 5.0 cm³ sterile water in each labelled receiving tube. Transfer 5.0 cm³ stock into the first tube and mix, giving 50% of stock; transfer 5.0 cm³ of that mixed solution into the next water tube and mix, giving 25%. Use a new sterile tip or pipette at each transfer and keep vessels closed except during the transfer. Retain the same final disc-loading volume at every concentration: changing both volume and concentration changes the dose in two ways. If a non-aqueous solvent is approved, the solvent concentration must be matched in all treatments and controls rather than accidentally changing with the dilution.
For a simple dilution, , where is the final volume and concentration units are consistent.
For 8.0 cm³ of a 25%-of-stock preparation, of stock. Add water to a final 8.0 cm³, requiring 6.0 cm³ water. A label should identify the plant, concentration, solvent and preparation date.
Safe aseptic workflow
This investigation belongs in a supervised teaching laboratory using a centre-approved non-pathogenic teaching strain from a recognised supplier. Do not collect unknown bacteria from bodies or the environment, culture them at home or substitute a clinical isolate.
Aseptic technique
Practices that reduce the transfer of unwanted microorganisms into a culture, and reduce the escape of the culture into the surroundings.
Asepsis protects people and the validity of the result. A contaminant could form a different lawn, alter growth or produce its own inhibitory compounds. Treat cultures as potentially contaminated even when the supplied strain is approved.
A supervised plate method
- Follow the centre's risk assessment. Disinfect the bench before and after work, wash hands, cover cuts, tie back hair and use the specified protective clothing and eye protection. Keep food and drink away. Report spills immediately and follow the teacher's response procedure.
- Gather pre-poured sterile nutrient-agar plates of equal depth, sterile swabs or spreaders, sterile pipettes/tips, sterile equal-sized paper discs, sterile forceps, supplied culture, approved extracts and controls, labels, tape, ruler and a temperature record. Technical staff prepare and sterilise medium and equipment. Label each base, because lids can be exchanged. Mark treatment positions underneath, away from the measurement area.
- Use the same well-mixed, standardised culture suspension and measured inoculum volume for each plate. With sterile equipment and the lid raised only as far and as briefly as necessary, distribute the inoculum evenly over the agar to give a lawn. Avoid gouging the agar or generating splashes and aerosols. Close promptly. Uneven coverage leaves apparent clear patches unrelated to an extract.
- Load identical discs with equal measured volumes of each prepared extract or control, using sterile equipment and the centre's approved loading method. Handle discs with sterile forceps; use separate sterile equipment between preparations to avoid carry-over. Place discs far enough apart and from the edge that clear zones will not merge or be cut off. A preliminary teacher trial can establish suitable spacing; never assume that a crowded plate gives independent measurements.
- Keep the time between loading and incubation consistent. Repeat the comparison on independent plates; three plates per treatment provide a simple starting design, although the number should suit the question and resources. Randomise treatment positions between plates to reduce a consistent position effect. Several readings of one zone are not independent biological replicates.
- Secure each lid with two or four short pieces of tape. Do not seal the whole circumference before incubation: this restricts gas exchange and changes conditions. The teacher incubates plates inverted, so condensation is less likely to fall onto the lawn, at the approved school temperature and duration. A typical teaching arrangement is 20–25 °C for 2–3 days. Do not choose body temperature to speed up growth; the lower school temperature reduces the risk of inadvertently favouring human pathogens, but does not make handling risk-free.
- After incubation, keep plates closed. Observe and measure through the base/lid as directed. Do not touch or sample growth or reopen an unexpected culture. Report contamination, merged zones or an absent lawn; do not quietly replace the result with a preferred value.
- Return plates, broth and contaminated disposables for the centre's validated decontamination and disposal procedure, normally managed by trained technical staff. Do not take cultures away or put untreated cultures into ordinary waste or drains. Wash hands after work.
If the centre's trained aseptic method uses a Bunsen burner for instrument or vessel-neck treatment, follow the demonstrated procedure, including cooling a heated instrument before contact with culture. Alcohol and other flammable solvents must remain away from flames; pre-sterilised disposable equipment provides an alternative within the approved method. A flame does not sterilise an entire bench or eliminate the need to minimise opening.
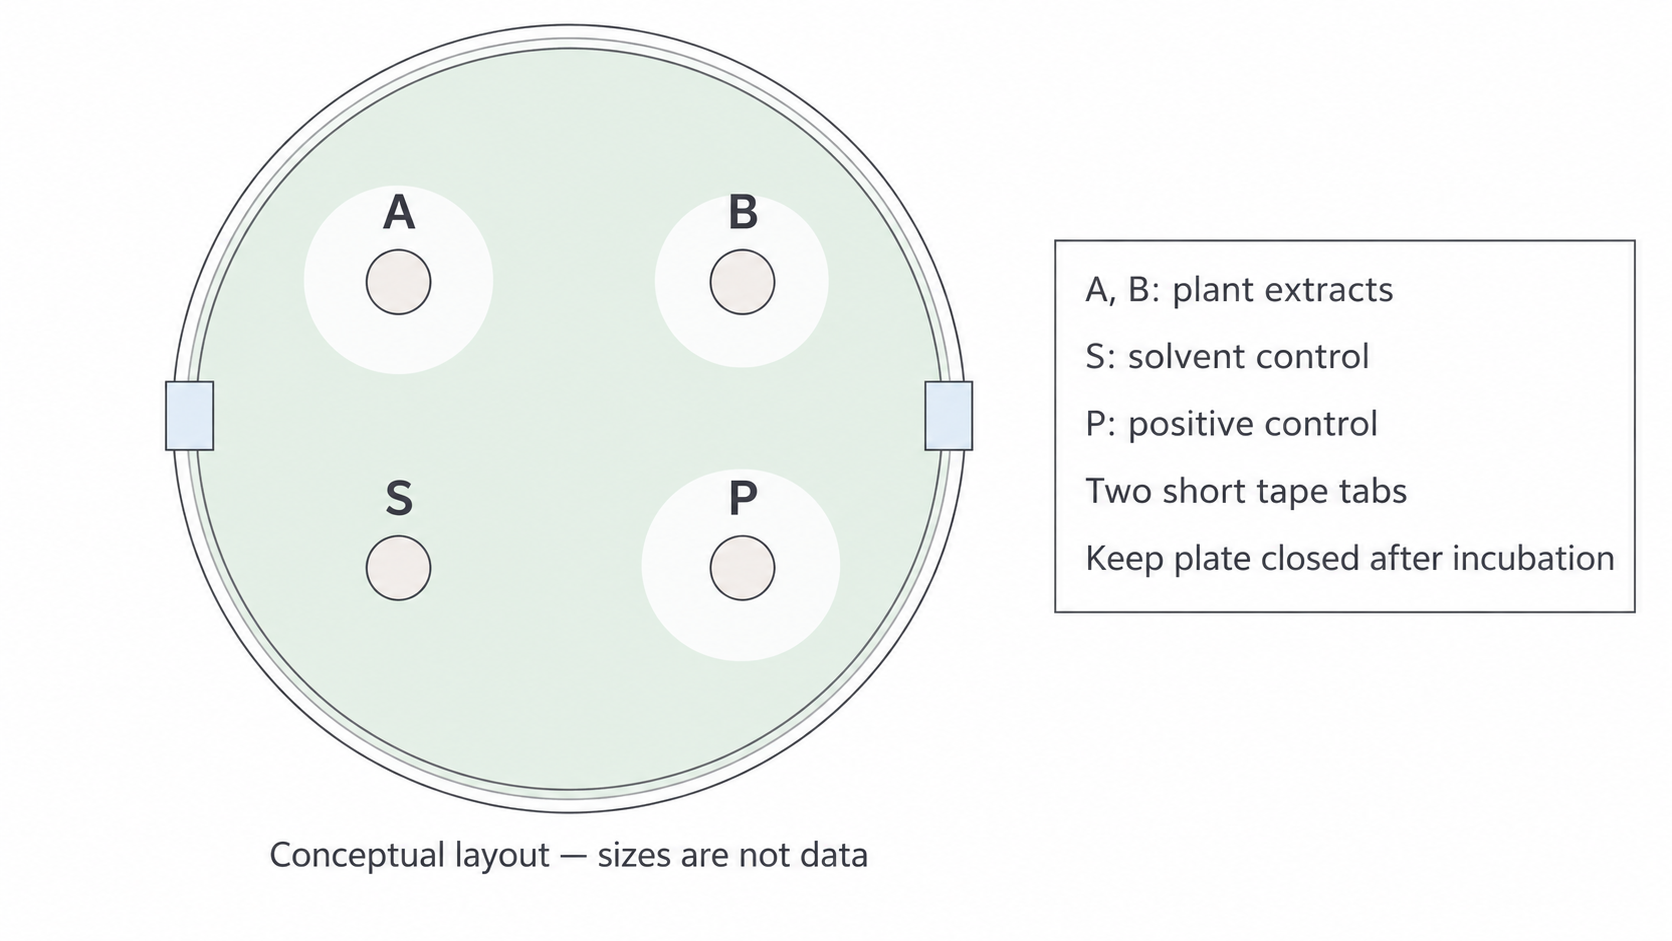
The conceptual plate separates treatment and control positions and leaves the lid partly unsealed during incubation. Zone sizes in this illustration are not results.
Recording the observation
A measurement is meaningful only when its boundary convention is clear. In this lesson, total inhibition-zone diameter means the distance from one visible outer clear-zone boundary to the opposite boundary, passing through the disc centre and including the disc. Measure in millimetres through the closed plate with the ruler aligned to minimise parallax.
Take two perpendicular readings through the disc centre and calculate their mean for that disc. For an approximately circular zone with readings 18 mm and 16 mm, the representative diameter is . Do not measure from the disc edge to the clear boundary and call that a diameter. With our convention, a 6 mm disc with no clearance beyond its edge has a total diameter of 6 mm; record “no surrounding inhibition” as well. A different protocol may define the clear ring width or the area excluding the disc, so always state the convention rather than swapping definitions midway.
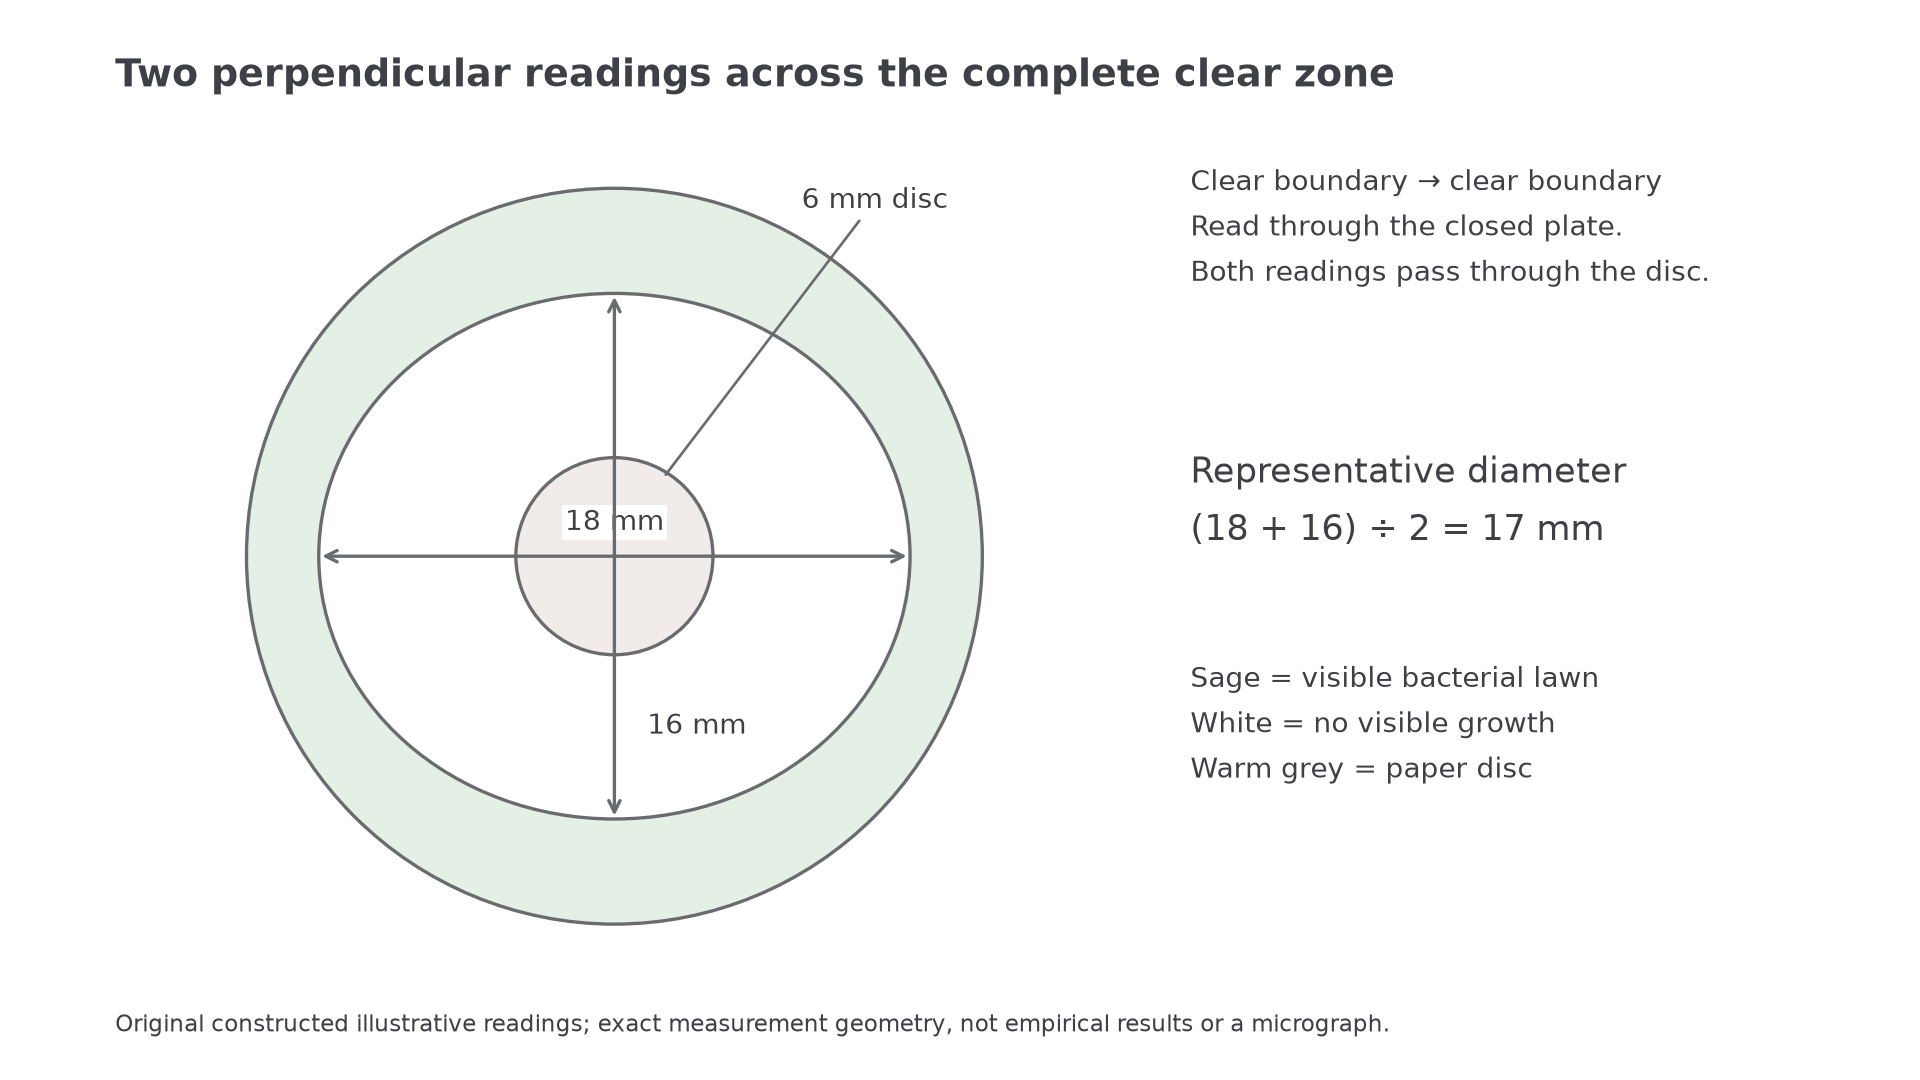
The two boundary-to-boundary readings include the disc. This is an original constructed illustration of measurement geometry, not empirical results or a micrograph.
Record the plate code, treatment, concentration, control outcomes, incubation time/temperature, both readings, units and instrument resolution. Also note a fuzzy edge, uneven lawn, unusual colonies, merging or edge truncation. Such a defect can invalidate a diameter rather than merely increase its decimal places. Photographing a closed plate with an appropriate scale can preserve an observation, but a photograph without calibration is not a valid source of length measurements.
Continue this lesson.
You’re previewing NovaLearn without an account. Create a free account to read the rest.
Create free account