Core practical 6 - Identifying tissues in stems
A stained stem section reveals how transport and support tissues fit together. In Core practical 6 you will prepare and examine thin sections, identify sclerenchyma fibres, phloem sieve tubes and xylem vessels, and record their locations. You will also calibrate measurements and make a proportioned scientific drawing from your own observations.
Preparing thin stem sections safely
A useful stem preparation preserves the relative positions of tissues while allowing transmitted light to pass through it.
Transverse section
A slice cut across an organ, perpendicular to its long axis. A longitudinal section runs along its long axis.
Use a fresh, soft young sunflower stem, or another teacher-selected stem that shows the required tissues. Identify the species, stem age and sampling position in your record. A supermarket celery stalk can be convenient for learning sectioning, but it is a leaf petiole: its bundle arrangement must not be reported as the arrangement of a typical stem. Avoid tough material that needs excessive cutting force.
The apparatus includes a compound light microscope, eyepiece graticule and stage micrometer, slides and coverslips, a white cutting tile, teacher-approved sharp blade, forceps, dropping pipettes, beaker of water, watch glass, dilute aqueous toluidine blue and eye protection. The centre selects the blade and staining procedure through its risk assessment. Prepare sections only under the required supervision.
- Support a short piece of stem on the tile. Following the demonstrated technique, keep fingers behind the cutting edge and cut away from them. Trim the end square, then cut several very thin transverse slices. Never cut against a finger or hold the material in your hand while slicing. Keep an unused blade flat in its designated safe place; the teacher manages blade changes and sharps disposal.
- Transfer slices gently with forceps into water so they do not dry. Select a thin, flat slice with intact vascular tissue. It need not be a complete circular slice to show one bundle, but a larger transverse section helps establish the location of bundles in the stem. Do not squash it: that would displace or crush the tissues whose arrangement you need.
- A suitable starting protocol is a two-minute water soak followed by one minute in 0.5% aqueous toluidine blue, then a water rinse to remove excess stain. These are starting conditions for a trial, not a universal optimum. Transfer using forceps between the small glass vessels. Use the teacher's stated concentration and timing; optimise with spare sections if the contrast is poor.
- Put a selected section flat in a drop of water on a clean slide. Lower a coverslip at an angle with a mounted needle or forceps so air is displaced rather than trapped. Blot excess liquid at the edge without pressing on the specimen.
Toluidine blue increases contrast and can distinguish lignified walls, commonly blue-green, from many unlignified walls, commonly pink-purple. Exact colours depend on preparation. It does not make every blue cell xylem: both xylem and mature sclerenchyma have lignified walls. The sunflower transverse photographs later show red lignified walls; their staining protocol is not specified, so do not transfer their colours to your toluidine-blue preparation.
Wear eye protection and avoid stain contact with eyes and skin; rinse splashes promptly as the centre directs. Use small quantities and keep liquid away from microscope electrics. Carry microscopes with support under the base. Handle glass at its edges, never force a coverslip down, and report breakages for collection with suitable tools rather than bare hands. Check plant allergies, wash hands, and do not taste material. Use cultivated material with permission, take only what is needed, and avoid protected or scarce wild plants. Reuse suitable teaching slides and dispose of stain and plant waste by the centre's procedure.
Locating tissues before inspecting cells
Start with the overall arrangement, then use cell features to test an identification.
Place the slide on the stage with the coverslip uppermost. Begin with the lowest-power objective, for example ×4. While looking from the side, bring the objective near the slide without touching it, then focus as directed for that microscope, increasing the lens–slide separation rather than driving the lens into the glass. Use coarse then fine focus at low power; adjust illumination and the diaphragm to obtain useful contrast. Scan the section and locate the outside edge, cortex, vascular bundles and central pith. Centre a clear bundle before moving to ×10 and, if the section supports it, ×40. Use fine focus only at high power, checking clearance and adjusting illumination. Increasing power reduces the field of view and working distance; a blurred thick section is improved by preparation, not by simply increasing magnification. With a ×10 eyepiece, ×4 and ×40 objectives give total optical magnifications of ×40 and ×400 respectively.
In a young sunflower stem, the bundles lie around the pith. Within each typical bundle, xylem is towards the pith, phloem is towards the outside, and a sclerenchyma fibre cap is outside the phloem. A narrow cambium region may separate xylem and phloem. Establish this orientation from the low-power view: the top of a screen is not inherently the outside of a stem. Arrangement varies with species and age; do not force every plant into this pattern.
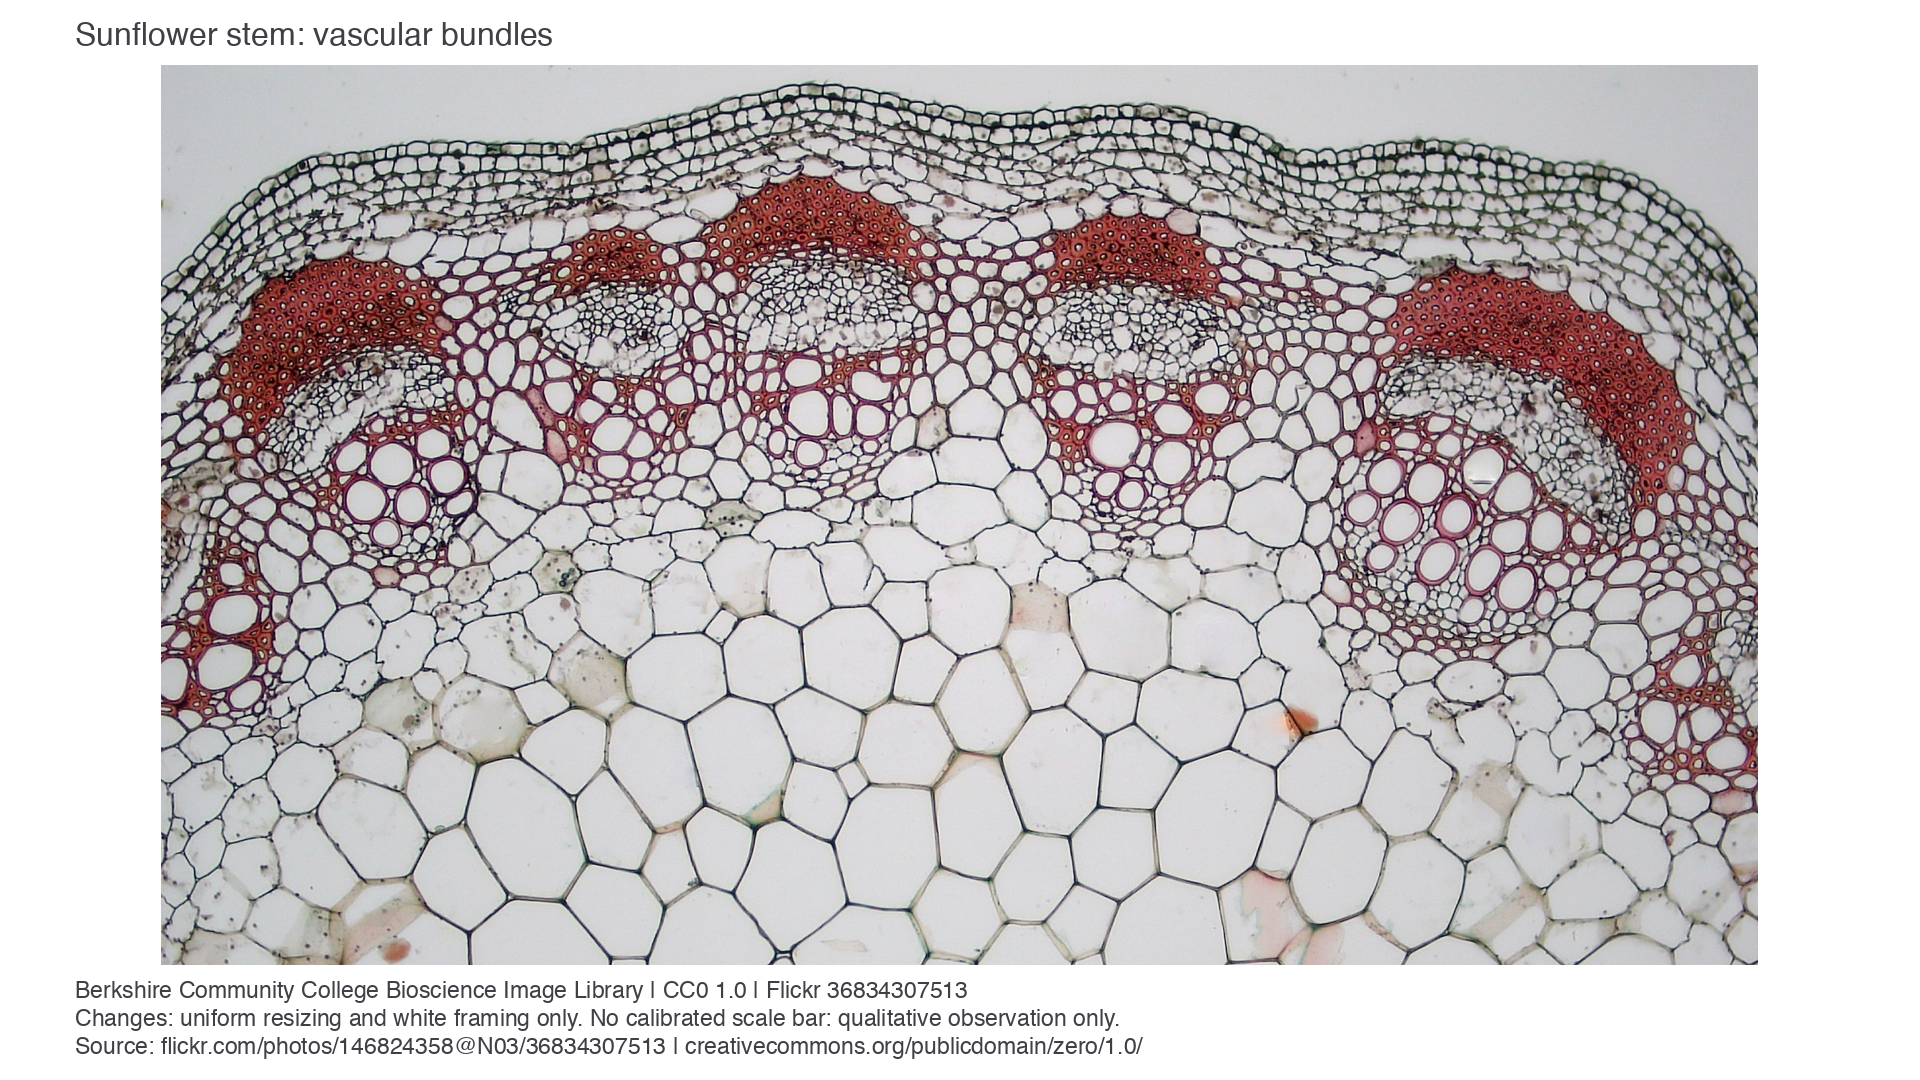
Genuine light micrograph: young sunflower stem, Berkshire Community College Bioscience Image Library, source photograph, CC0 1.0. Entire photograph uniformly resized and framed; no biological retouch. The outer surface is above the bundles and the large pith cells are below them. No calibrated scale bar is supplied: use this image for qualitative identification, not size calculations.
The large empty-looking circles in the inward part of a bundle are xylem vessel lumens. The red cap on the outward side contains many smaller thick-walled fibre profiles. Between them is the more delicate, mostly pale phloem region. These are observations about this preparation, not natural tissue colours. A light micrograph can show wall outlines and tissue position, but cannot resolve cellulose microfibrils.
Using cell features to test identification
A tissue name is a conclusion supported by position and structure, rather than by stain colour alone.
At high power, compare several neighbouring cells. A lumen is the internal space enclosed by a cell wall. Xylem vessels commonly have large lumens bounded by thick lignified secondary walls. Their wide bore provides a route for water and mineral ions, while wall thickening supports the stem and helps prevent vessel collapse. In a longitudinal view, vessel elements can show pits or patterned wall thickening and form long conducting tubes. The transverse view cannot by itself show a long tube or its end walls.
Sclerenchyma fibres are elongated support cells with thick lignified walls and relatively small lumens. In transverse view, the cap appears as a cluster of small profiles with a large wall-to-lumen proportion. In longitudinal view, long narrow fibres with tapering ends may be recognised. Both mature fibres and vessels are normally dead, but an empty-looking lumen alone does not demonstrate that a cell was dead: preparation can remove or obscure cell contents.
Phloem contains living sieve tube elements, their associated companion cells and other cells. Sieve tube elements form elongated tubes, with perforated sieve plates between successive elements. The elements have thin, unlignified walls and little cytoplasm; companion cells are smaller, nucleated cells alongside them. Locate the phloem region from the bundle arrangement first, then look for larger thin-walled sieve tube profiles among smaller cells. Not every cell in that region is a sieve tube element.
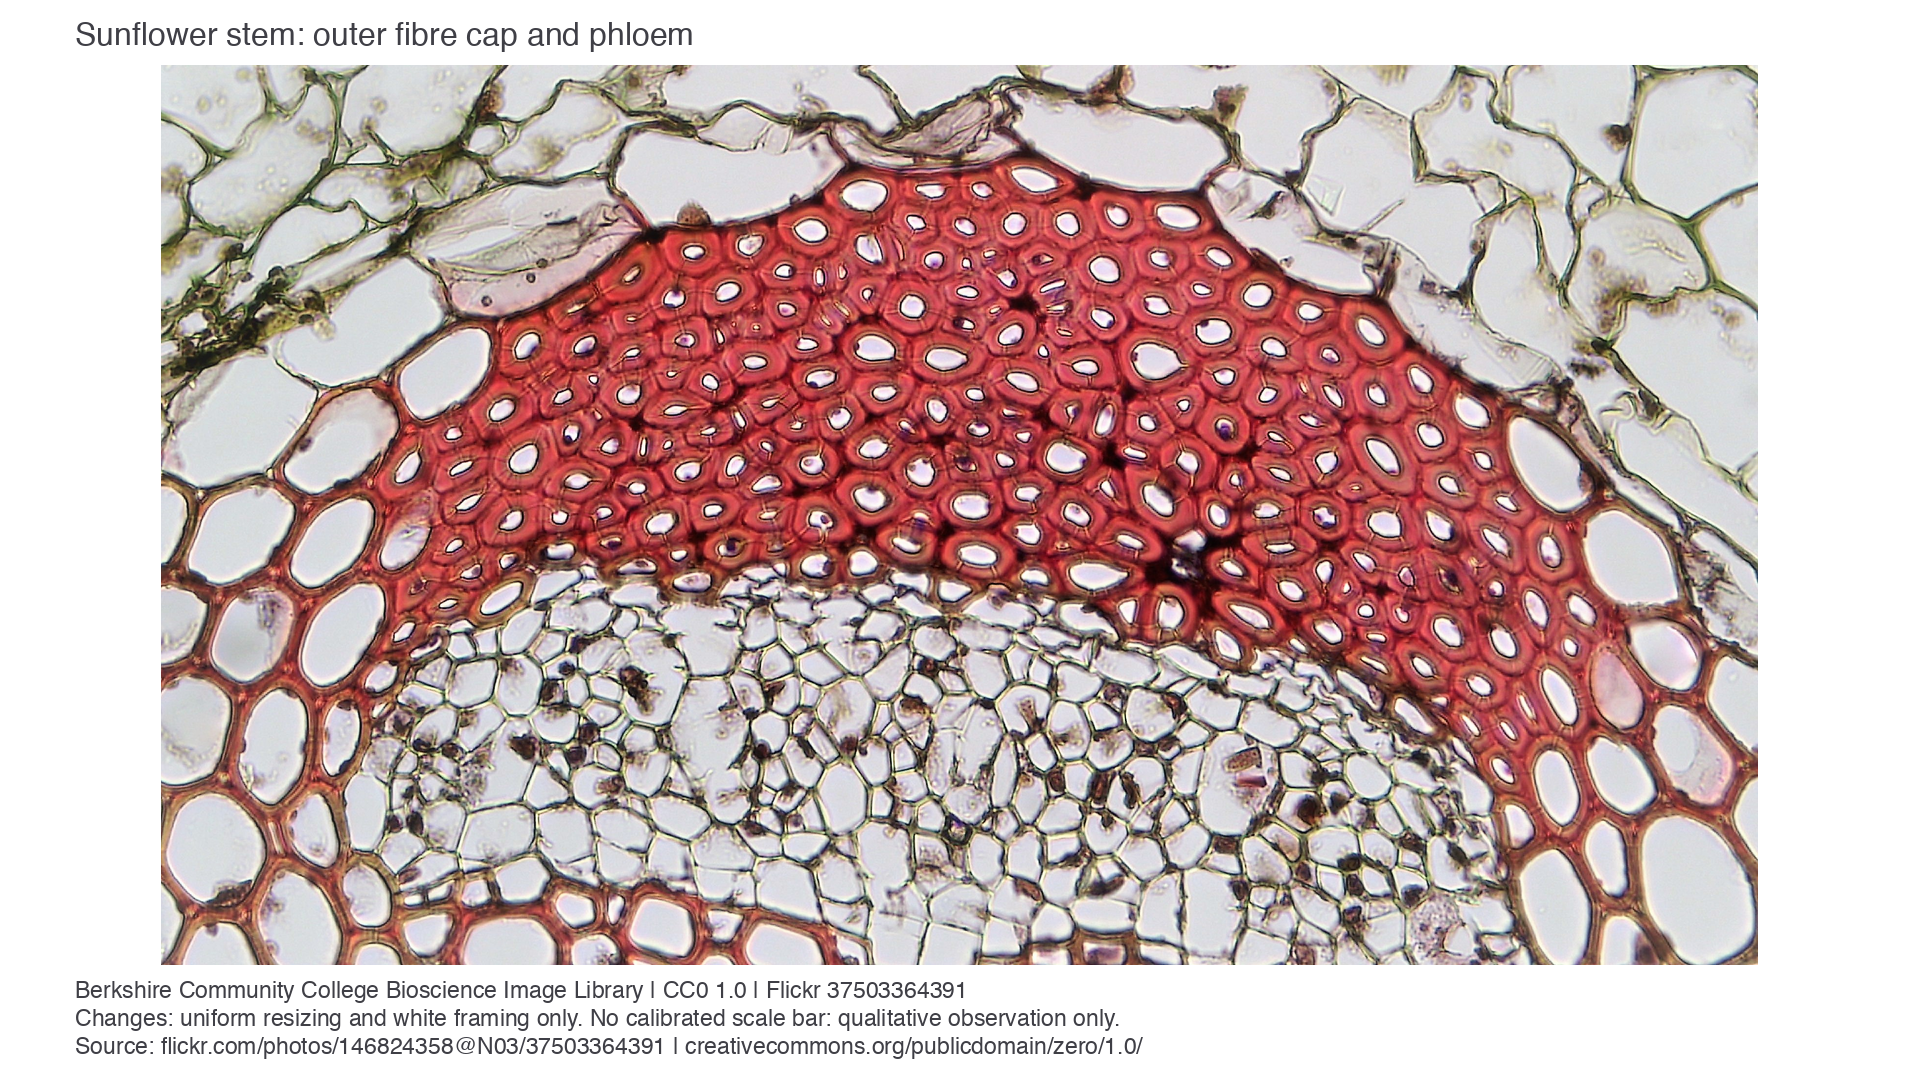
Genuine light micrograph: sunflower sclerenchyma cap and phloem, Berkshire Community College Bioscience Image Library, source photograph, CC0 1.0. Entire photograph uniformly resized and framed, with no calibrated scale bar. The broad red, thick-walled cap is above the paler phloem region. Colour, wall thickness and relative position support tissue identification; this transverse view does not demonstrate sieve plates.
To confirm sieve tube structure, the teacher can supply a good longitudinal stem section as well as a transverse one. Prepare such a section with the same supervised blade, staining and mounting precautions, cutting parallel to the stem axis, or use a prepared slide. Look for an end wall with visible sieve pores joining thin-walled elements and an associated companion cell when resolved. A dark line between cells is not automatically a sieve plate; it may be an ordinary wall, a fold or an overlapping cell. If the preparation cannot resolve the plate or companion cell, record the phloem region confidently but qualify the individual cell identification. Do not draw unseen pores or claim that a missing nucleus proves the cell type.
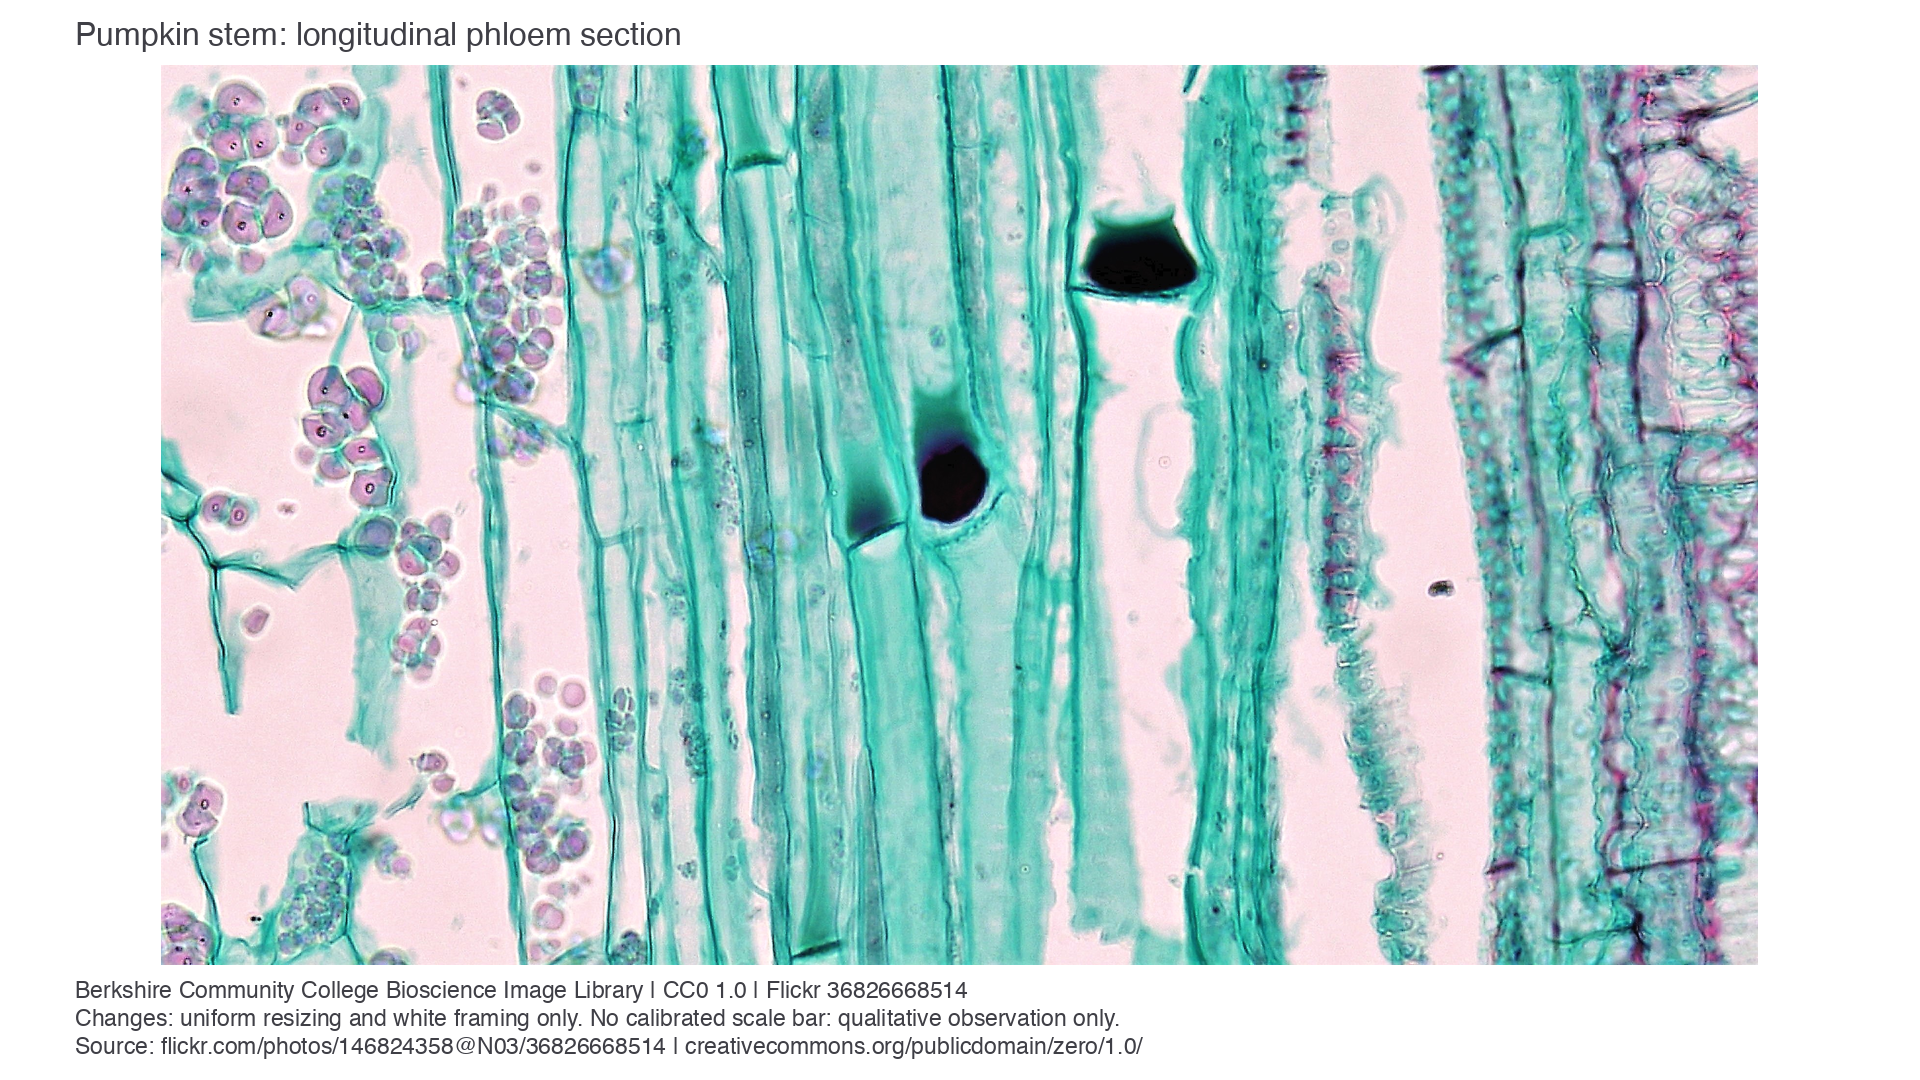
Genuine light micrograph: pumpkin (Cucurbita) stem phloem, Berkshire Community College Bioscience Image Library, source photograph, CC0 1.0. Entire photograph uniformly resized and framed; uncalibrated qualitative evidence. The elongated clear sieve tube elements include conspicuous dark plugs near end-wall junctions around the centre of the image. The creator identifies these as P-protein deposits associated with injury: they can help locate junctions but can obscure the sieve plate. Individual sieve pores are not resolved here. The plugs are not evidence that normal sap contains solid stoppers. This longitudinal pumpkin image teaches cell recognition; it does not establish the sunflower bundle arrangement.
Continue this lesson.
You’re previewing NovaLearn without an account. Create a free account to read the rest.
Create free account