6.14, Core practical 15 - Antibiotics and bacterial inhibition
An antibiotic can prevent a bacterial population from increasing without killing every cell. In 6.14 you will distinguish bacteriostatic from bactericidal action; in Core practical 15 you will use a controlled school disc comparison to investigate inhibition, measure the results and decide what they can establish.
Bacteriostatic and bactericidal action
Antibiotics interfere with bacterial processes, but their effect on population growth must be distinguished from their effect on cell survival.
Bacteriostatic and bactericidal
A bacteriostatic antibiotic inhibits bacterial growth and multiplication. A bactericidal antibiotic kills bacteria, reducing the number of viable cells under the stated conditions. A viable cell is capable of surviving and reproducing under suitable conditions.
For example, an antibiotic that prevents synthesis of a protein needed for division can stop a population increasing while cells remain viable. Disrupting essential cell-wall formation can lead to cell death. These are explanatory examples, not a rule that every protein-synthesis inhibitor is always static or every cell-wall inhibitor kills every bacterium. The observed action depends on the bacterium, drug exposure and conditions.
With bacteriostatic action, viable cells may resume multiplication after the inhibitory exposure ends. With bactericidal action, killed cells cannot resume growth. In a person, immune defences can help clear bacteria whose multiplication has been inhibited; the word “static” does not mean clinically useless. These classifications alone do not select a treatment.
A patch of agar with no visible growth could contain dead cells, viable non-multiplying cells, or too little growth to see. Therefore an inhibition zone is evidence about visible growth, not a direct count of viable cells. Demonstrating killing requires separate validated viability evidence. Students must not reopen or sample an incubated teaching plate to try to obtain that evidence.
Designing a fair disc comparison
A disc assay compares growth around supplied antibiotic discs on a uniform bacterial lawn, a continuous surface layer of bacterial growth. Antibiotic dissolves and diffuses outwards through the agar. Its concentration generally falls with distance from the disc; where exposure prevents visible growth, a clear zone appears.
The school question is: how do the different supplied antibiotic discs compare in their inhibition of one approved teaching strain under the same conditions? Antibiotic identity is the independent variable; a defined zone diameter or area is the dependent variable. Use teacher-supplied, approved non-pathogenic teaching bacteria from a recognised educational source. The teacher selects suitable discs and a standardised inoculum, the measured suspension added to each plate. This investigation does not use clinical samples, unknown environmental cultures or pathogens.
Equal-sized discs do not necessarily contain equal amounts of different drugs. Record each supplied disc's identity and stated content. Keep content fixed for every replicate of a given antibiotic and use the comparison specified by the teacher. If equal stated contents are chosen for an educational comparison, diffusion and molecular activity can still differ. The outcome compares those disc preparations, not an intrinsic universal ranking of the drugs.
| Factor or control | How it makes the comparison interpretable |
|---|---|
| Same strain, starting cell density and measured inoculum volume | Unequal starting populations can change lawn density and apparent inhibition. |
| Same agar formulation, pH and depth; same plate size | These affect bacterial growth and diffusion through the medium. |
| Fixed disc size/content, spacing and application-to-incubation interval | These reduce differences in delivery, overlapping zones and pre-incubation diffusion. |
| Same incubation temperature, duration and orientation | Growth and diffusion both depend on conditions; compare matched endpoints. |
| Inoculated plate with a matched antibiotic-free disc | Tests whether the carrier/handling itself causes clearance; a solution-loaded disc needs the same solvent without antibiotic. |
| Teacher-approved positive-control disc known to inhibit the strain | Shows that the assay can display inhibition under these conditions. |
| Uninoculated medium control handled as directed | Unexpected growth suggests contamination of medium or handling. A clear control cannot rule out every contamination elsewhere. |
Three independently prepared replicate plates for each condition give a simple classroom comparison. Where several treatments share each plate, repeat the whole plate and vary the allocated positions systematically or randomly, while maintaining adequate separation. Several measurements of one disc are repeated readings, not independent plate replicates. Keep all treatment identities traceable.
Use pre-poured sterile plates, sterile swabs/spreaders, sterile pipettes and tips, sterile forceps, supplied discs, labels and tape. Graduated pipettes or a calibrated micropipette deliver equal inoculum volumes; choose a range that includes the required volume and read a glass pipette's meniscus at eye level with a pipette aid, never by mouth. Broth is liquid nutrient medium: the supplied inoculum may arrive in a capped broth tube, kept in a rack and opened only for the demonstrated aseptic transfer. Trained staff prepare/sterilise medium and cultures.
Glassware and measured transfers matter because a vaguely described “drop” need not deliver a reproducible volume. If the teacher's approved preparation uses a serial dilution to standardise an inoculum, each step transfers a measured aliquot into a measured sterile diluent with mixing and a fresh sterile tip. Two successive tenfold dilutions give a hundredfold dilution overall. This explains the concentration control; the class uses the supplied standardised suspension and does not devise a culture or antibiotic-dose optimisation experiment.
A supervised aseptic workflow
Aseptic handling protects the culture from contamination and reduces transfer of microorganisms to people or surroundings. Sterilisation removes or destroys viable microorganisms from materials; disinfection reduces microbial contamination on a surface and does not necessarily sterilise it. An approved non-pathogenic strain still requires careful handling because contaminants can enter and cultures contain many cells.
This is preparation for work in a supervised school laboratory under the centre's current risk assessment and demonstrated method.
- Check the supplied strain and antibiotic labels with the teacher. Identify relevant allergies or health restrictions privately through the centre's procedure. Wear the required protective clothing and eye protection, cover cuts, tie back hair, wash hands and disinfect the bench as instructed. No food, drink, tasting or smelling cultures is permitted.
- Label each plate base with identity, date, treatment positions and replicate number. The base stays with the agar if lids move. Keep writing clear of the zone-measurement area. Use the same well-mixed supplied inoculum and measured volume on each matched plate.
- Open a plate only as far and as briefly as needed. Using the demonstrated sterile swab or spreader method, distribute the inoculum evenly over the agar without gouging it. Close promptly. An uneven lawn can create clear patches unrelated to an antibiotic. Avoid splashes and aerosols; keep culture-tube caps in the teacher's specified aseptic arrangement.
- Use sterile forceps to place each supplied disc flat against its labelled area, following the approved layout. Avoid carry-over between discs, merged zones and zones cut off by the plate edge. The teacher establishes suitable separation for the selected materials. Do not slide a disc around after placing it or add extra antibiotic to “improve” the result.
- Secure the lid with two or four short tape strips, as the teacher directs. Do not tape around the entire circumference during incubation: restricting oxygen changes conditions and can favour anaerobic contaminants. The teacher incubates plates inverted so condensation is less likely to drip onto the lawn. Follow the approved school temperature and endpoint; a common school arrangement is 20–25 °C for 2–3 days. Do not choose human body temperature to accelerate growth. Record actual temperature and elapsed time rather than assuming the incubator setting proves both.
- After incubation, keep the plate closed. View and measure through the transparent base/lid as instructed. Report unexpected growth, an absent lawn or merged zones without opening the plate. Never transfer colonies, investigate survivors, repeat exposures to select resistance, or take cultures home.
- Return every plate, tube and contaminated disposable for the centre's validated decontamination and disposal procedure, managed by trained staff. Untreated cultures do not go into ordinary waste or drains. Report spills immediately and follow the teacher's response; do not improvise cleanup. Disinfect the work area and wash hands after work.
Pre-sterilised disposable equipment can reduce the need for flame handling. Where the centre uses a flame-based aseptic technique, use only the demonstrated method and cool heated equipment before contact with culture. Keep alcohol and other flammables away from flames; a burner is not a substitute for sterile equipment or brief opening.
These choices also make ethical sense: use only the approved organism and the material needed to answer the educational question, prevent release and avoid unnecessary exposure. Centre observation and contemporaneous records authenticate practical competence. Reading this lesson or answering a written method question cannot award the separately reported practical endorsement.
Measuring and recording zones
A valid measurement needs a stated boundary convention. Here, total zone diameter runs from one outer boundary of visible clearance to the opposite outer boundary through the disc centre and includes the disc. Measure in millimetres through the closed plate with a ruler close to the base, looking perpendicular to the scale to reduce parallax.
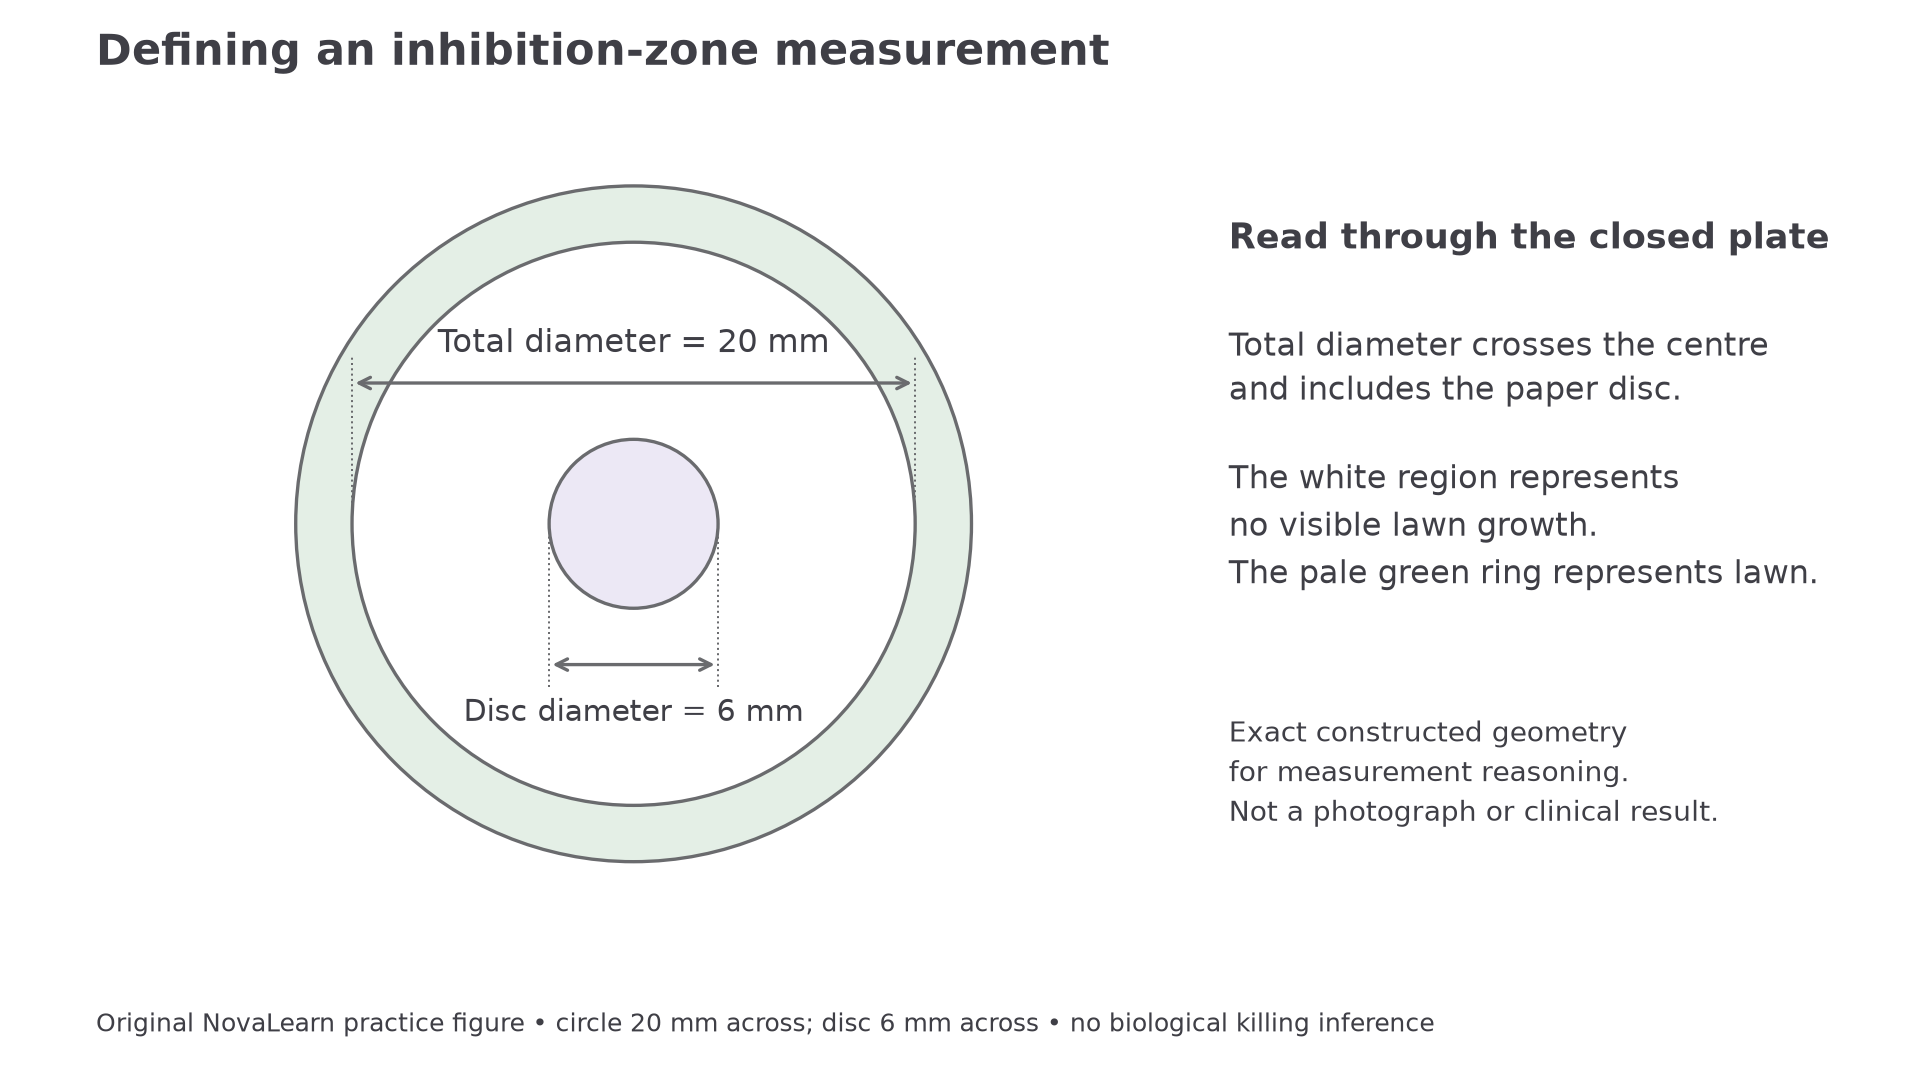
The dimension lines project the boundary positions onto the arrows. This original constructed figure defines a 20 mm total diameter and a 6 mm disc; it is not a plate photograph or evidence of killing.
Take two perpendicular total-diameter readings for each zone and calculate their mean, giving one representative diameter per disc. For 19 mm and 21 mm, the representative value is . A markedly irregular or merged zone should be recorded and discussed rather than forced into an unjustified circular measurement. If a 6 mm disc has no clear margin outside it, our convention records 6 mm and “no surrounding inhibition”. Recording zero while other values include the disc would mix definitions.
Continue this lesson.
You’re previewing NovaLearn without an account. Create a free account to read the rest.
Create free account