1.2.2(a)-(e) - Measurement apparatus and accuracy
In this lesson you learn how the specification expects you to choose and use basic measuring apparatus. The focus is not just naming the instrument: it is reading it properly, reducing avoidable error, and explaining why one method gives a better measurement than another. These skills appear throughout practical physics, from measuring a wire diameter to timing an oscillating mass.
Choosing apparatus for the quantity
Choose an instrument that measures the required quantity over a suitable range. Start by asking two questions:
- What quantity is being measured?
- What scale and resolution are needed for that quantity?
This 1.2.2(a) and (b) boundary expects you to use both analogue apparatus and digital instruments. Analogue apparatus has a physical scale, pointer or meniscus. Digital apparatus gives a numerical display.
Analogue apparatus
An analogue measuring instrument is read from a continuous scale, pointer, mark or meniscus. Examples include a metre rule, thermometer, pressure gauge, newton meter, protractor and measuring cylinder.
Analogue readings often require judgement between scale markings. If the pointer lies halfway between 4.2 and on a force meter, you should not simply write "between the marks"; you estimate a sensible interpolated value such as if the scale allows that reading.
[DIAGRAM: asset_slug: measurement_apparatus_and_accuracy__diagram_01; caption: The force scale reads 4.65 N. Viewing perpendicular to the scale avoids parallax.; description: Analogue force scale with ten equal divisions per newton and a 4.65 N reading; perpendicular viewing avoids parallax.]
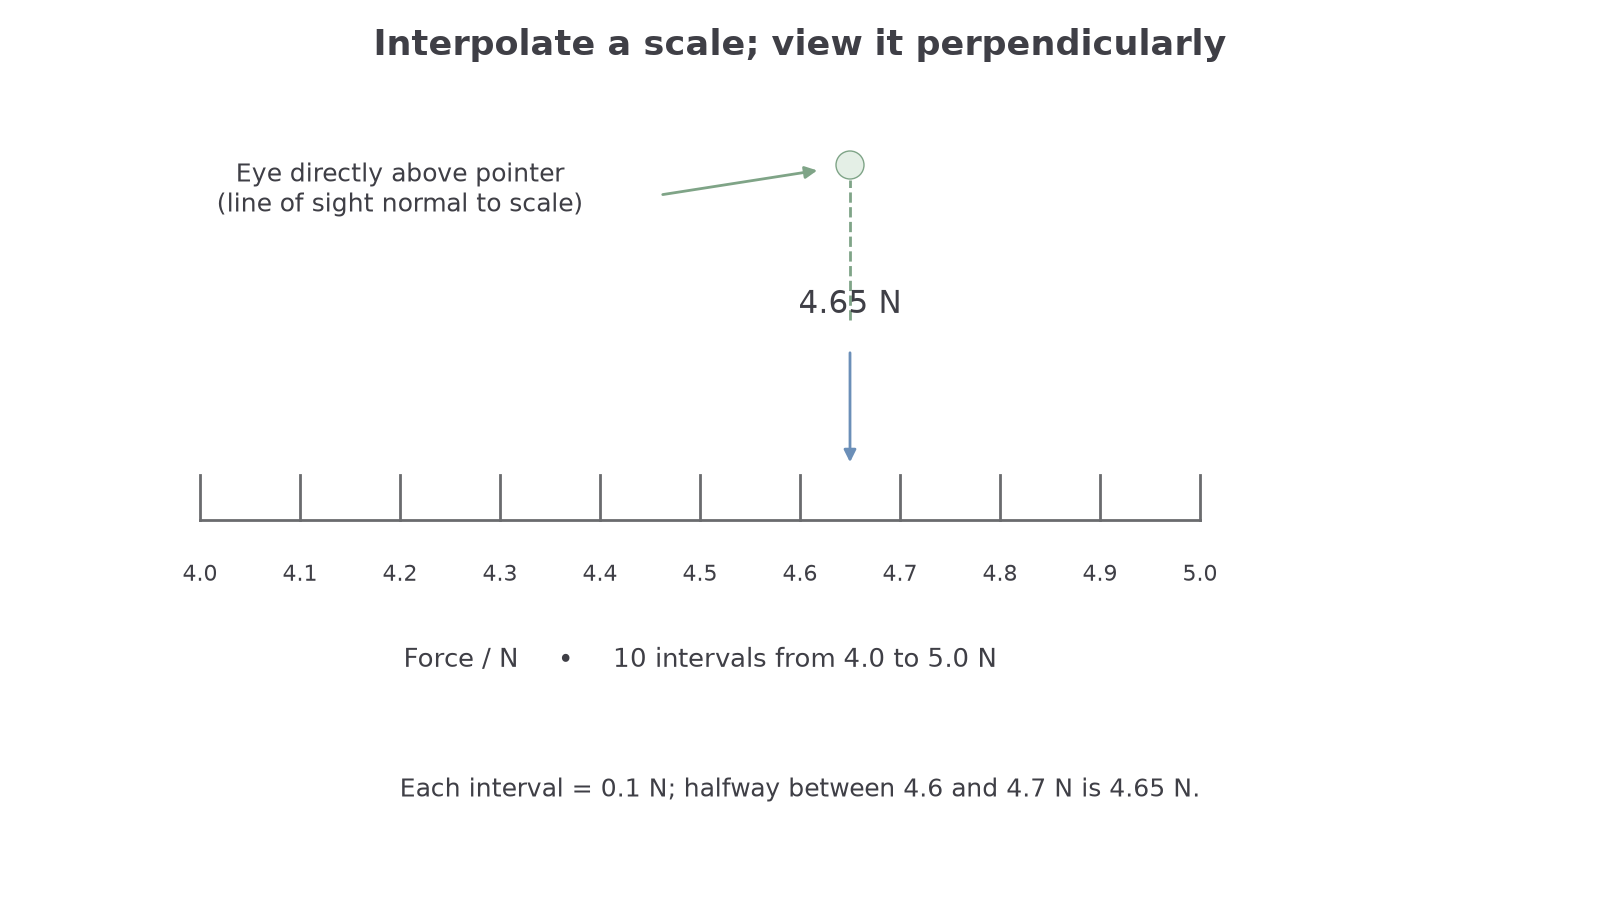
Digital instruments are usually easier to read because there is no interpolation between marks. A mass balance, digital stopwatch, light-gate timer and digital multimeter all display numbers. The display resolution, however, is not the whole story.
Resolution
Resolution is the smallest change in a quantity that an instrument can detect or display. A stopwatch displaying to has a display resolution of .
A digital multimeter is included here because it can measure current, voltage and resistance. You still need to select the correct function and range, connect the meter appropriately in the actual practical, and record the unit. This lesson does not cover constructing circuits; it only treats the multimeter as a digital measuring instrument.
Worked example: choosing apparatus
A student needs to measure these quantities:
- the diameter of a thin wire;
- the mass of a trolley;
- the angle between two strings;
- the time for a trolley to pass a point.
Suitable choices are:
- wire diameter: micrometer or vernier/digital calipers, because the distance is small;
- mass: digital balance, because mass is a digital measurement in the specification list;
- angle: protractor, read as an analogue scale;
- time: stopwatch or light gate, depending on whether manual reaction time is acceptable.
Notice that the best answer usually includes the reason. "Micrometer" is weaker than "micrometer because the diameter is small and needs a smaller resolution than a metre rule".
Reading analogue scales accurately
Analogue apparatus can give good measurements only if the reading technique is controlled. The most common student mistakes are reading from an angle, forgetting units, and recording more digits than the scale justifies.
Parallax error
Parallax error is an apparent shift in a reading caused by viewing a scale from the wrong angle. It is reduced by placing the eye perpendicular to the scale or pointer.
For a metre rule, protractor, thermometer, pressure gauge, force meter or measuring cylinder, use this routine:
- Check the zero and the unit.
- Place the eye level with the scale or perpendicular to the pointer.
- Interpolate only when the scale markings make this reasonable.
- Record the value with its unit.
- Repeat if the reading can vary because of alignment, judgement or the object shape.
The measurement technique depends on the quantity:
| Quantity and apparatus | How to take the reading |
|---|---|
| Length: ruler | Align the object with the scale and project its ends perpendicularly using a set square; use two intact marks if the end is worn. |
| Temperature: thermometer | Put the bulb/probe in good thermal contact with the substance, avoid contact with the container wall when measuring a liquid, and wait for a steady reading. |
| Pressure: analogue gauge | Use a suitable pressure range, check the reference/zero, connect without leaks and wait for a steady pointer. |
| Force: newton meter | Zero in its working orientation, load along its axis and let the pointer settle. |
| Angle: protractor | Put its centre at the vertex and baseline along one arm; use the scale that starts at zero on that arm. |
| Volume: measuring cylinder | Stand it vertically on a level surface and view the meniscus at eye level; for water, read the bottom of the meniscus. |
For a digital balance, tare an empty container and keep it level. For a multimeter, choose the correct function, input sockets and range. Current is measured in series and p.d. in parallel; measure resistance with the component isolated from a powered circuit. Do not switch a meter to current mode while it remains connected across a supply.
Accuracy is about closeness to the true value. Precision is about the agreement, or spread, of repeated measurements. Resolution is the smallest change an instrument can detect and is a separate instrument property.
Accuracy
Accuracy describes how close a measured value is to the true value.
Precision is a different idea, even though the two words are often confused in practical answers.
Precision
Precision is the closeness of agreement between independent measurements obtained under the same conditions; a smaller spread means greater precision.
Do not write that a digital instrument is automatically more accurate than an analogue one. A digital display can still have a zero error, poor calibration, wrong range or poor alignment in the method.
Worked example: interpolating a scale
A force meter has labelled marks at and , with ten equal small divisions between them. The pointer is halfway between the and marks.
Each small division is:
The reading is halfway between and , so a sensible interpolated value is:
The value should not be recorded as because the scale cannot resolve that many digits.
Methods that improve accuracy
The specification names several practical methods that improve measurement accuracy. These methods reduce a specific source of error; they are not magic phrases to add to every answer.
Timing over multiple oscillations is used when one period is short compared with human reaction time. If a pendulum takes about for one oscillation, a start/stop reaction delay of a few tenths of a second is large. Timing 20 oscillations makes the same start/stop delay a much smaller percentage of the total measured time.
Mean time per oscillation
Here is the mean period of one oscillation, is the measured time for complete oscillations, and is the number of oscillations timed.
Worked example: timing multiple oscillations
A pendulum completes 20 oscillations in .
If the student had timed only one oscillation, the stopwatch reaction-time uncertainty would be a much larger fraction of the time. Timing many oscillations and dividing by the number of oscillations reduces the percentage uncertainty in the period.
A fiducial marker is a fixed reference mark used to judge exactly when an object passes a position. For an oscillating pendulum, a vertical mark behind the equilibrium position makes the timing point consistent from one oscillation to the next.
Alternatively, a light gate at the equilibrium position or a motion sensor connected to a data logger can determine the period electronically, provided the system is set to measure a complete oscillation.
Fiducial marker
A fiducial marker is a fixed reference mark used to make position or timing judgements repeatable.
Set squares and plumb lines solve alignment problems. A set square can help measure a length perpendicular to a surface or align an object with a ruler. A plumb line gives a vertical reference, useful for judging whether a ruler, pendulum or falling path is vertical.
Take care with the word "repeat". Repeated measurements reveal the spread and possible anomalies, allowing precision and repeatability to be assessed. Repeatability refers to precision over a short timescale when the same person or group uses the same equipment in the same place. Reproducibility instead refers to precision over a wider timescale when different people use equivalent equipment in different, but equivalent, places. If the variation is random, calculating a mean reduces its influence on the final estimate. Neither step removes a systematic error such as a zero error or a misaligned ruler, so a better method also identifies and reduces specific sources of error.
Stopwatches and light gates
A stopwatch is simple and useful when an event lasts long enough that reaction time is a small part of the total time. The display may read to , but the person pressing the button usually causes a larger uncertainty than the display resolution.
A light gate is a timing sensor. It has a transmitter and receiver; when an object or interrupt card breaks the beam, the timer starts, stops or records how long the beam is blocked.
Light gates reduce the human reaction-time part of the uncertainty because the timer is triggered electronically. They are often better for fast motion, repeated trials and short time intervals. They still require careful alignment: the interrupt card must pass cleanly through the beam, the distance between gates or the card length must be measured accurately, and the timer must be set to the correct mode.
Worked example: using a light gate to time a moving trolley
A trolley has a rectangular interrupt card of length attached to it. A light gate records the time for which the beam is blocked as .
The light gate has directly measured the time taken for the card length to pass the beam. If this is used to find speed, first convert the length:
Then:
[DIAGRAM: asset_slug: measurement_apparatus_and_accuracy__diagram_02; caption: A fixed reference helps count complete pendulum cycles. An interrupt card triggers the aligned light gates.; description: Timing methods: a fixed pendulum reference counts complete cycles; a trolley interrupt card triggers aligned light gates electronically.]
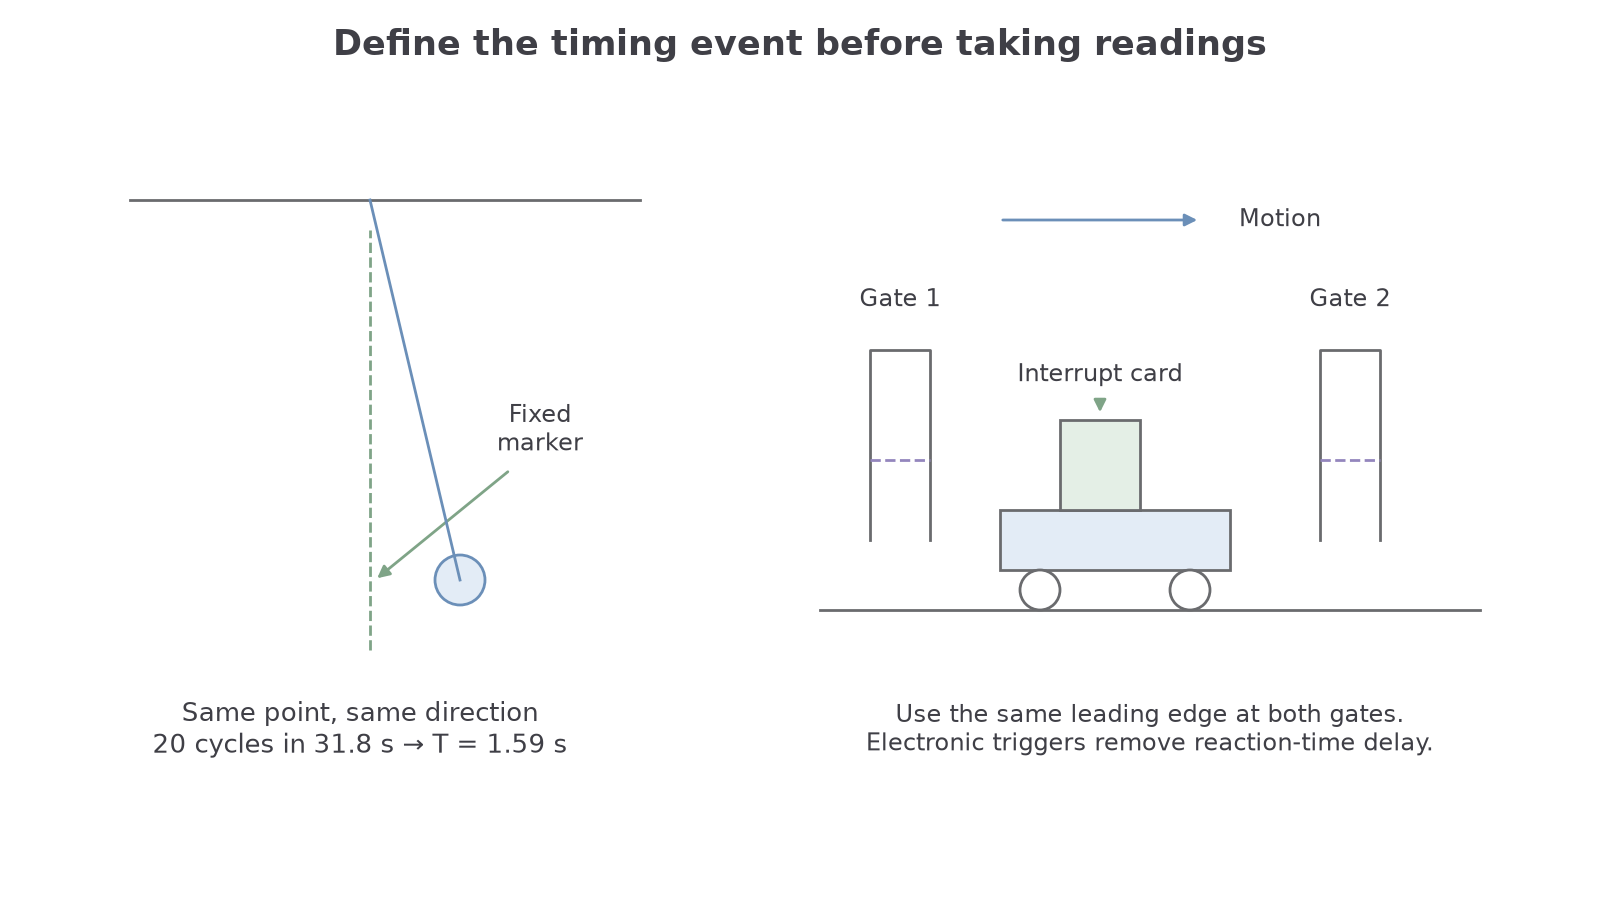
The speed calculation is not the main point of this lesson. The main point is that the light gate gives a repeatable timing trigger without a person deciding exactly when to press a stopwatch.
Calipers and micrometers
Calipers and micrometers are used for small distances where a metre rule would give too large a percentage uncertainty. This boundary includes digital or vernier scales, so you should be comfortable with both the instrument choice and the reading technique.
Vernier calipers can measure external diameters, internal diameters and depths. A vernier scale lets you read a fraction of the main-scale division by finding which vernier mark lines up with a main-scale mark. Digital calipers remove the scale-reading step but not the need to zero the instrument and hold it square to the object.
A micrometer screw gauge is usually better for very small thicknesses or wire diameters. It uses a screw thread, a sleeve scale and a rotating thimble scale. The ratchet should be used so the object is gripped consistently and not crushed.
[DIAGRAM: asset_slug: measurement_apparatus_and_accuracy__diagram_03; caption: The vernier scale reads 12.4 mm and the micrometer reads 5.78 mm.; description: Vernier and micrometer scale readings: 12.4 mm and 5.78 mm, with aligned divisions and datum line.]
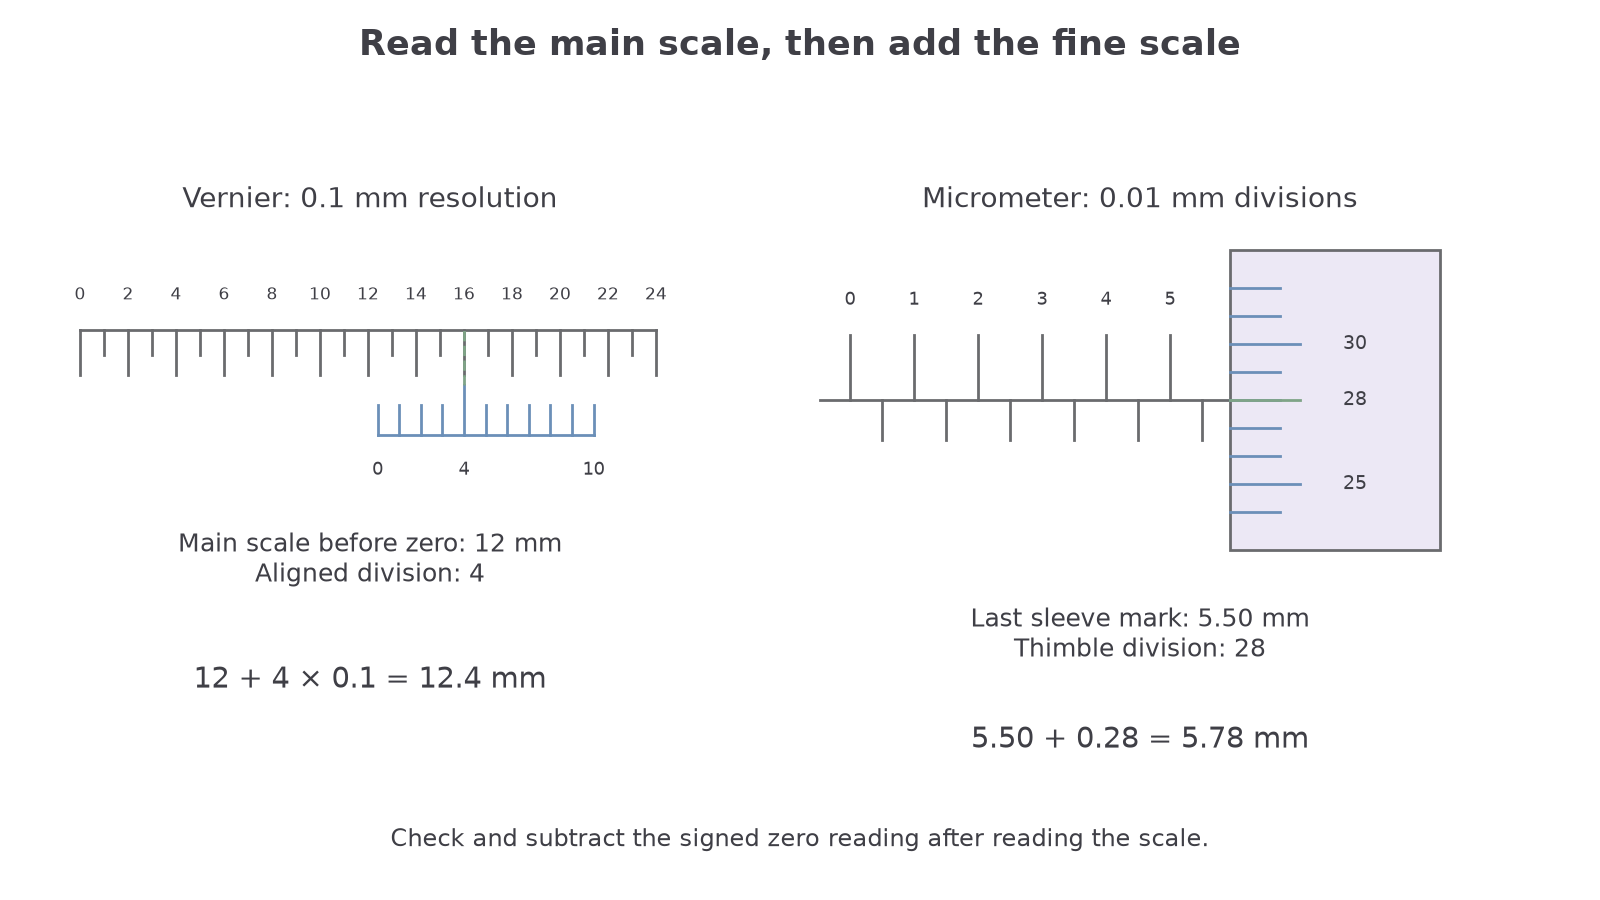
For a vernier, first read the main-scale mark immediately before the vernier zero. Add the number of the aligned vernier division multiplied by the vernier resolution. With main scale , aligned division 4 and resolution , the reading is . The aligned mark is not the main-scale reading.
For a micrometer, add the last visible sleeve mark (including a visible half millimetre) to the thimble contribution. A sleeve reading and thimble division 28 at per division give . Then subtract the signed zero reading: a positive zero error makes the uncorrected result too large.
Good small-distance technique includes:
- close the jaws first and check for zero error;
- hold the jaws square to the object;
- use the micrometer ratchet rather than over-tightening the thimble;
- repeat at different positions and orientations if the object may not be uniform;
- record the unit and use a sensible number of decimal places for the instrument.
Worked example: repeated diameter readings
A wire diameter is measured with a digital micrometer at four different positions:
, , ,
The mean diameter is:
The range of the readings is:
The range describes the spread, so it is useful when judging precision and repeatability. OCR’s Practical Skills Handbook does not require a statistical uncertainty estimate from the spread of repeats; it uses apparatus and method characteristics for the elementary estimate. The spread still matters when judging whether that estimate is realistic, and a stated uncertainty in a question takes priority. Use a stated instrument uncertainty where one is given. If none is given, OCR assumes an uncertainty of plus or minus the resolution in each digital reading. For example, if this micrometer has a resolution of , the assumed apparatus uncertainty in each reading is . State the assumption used. OCR also accepts a correctly stated half-resolution convention in assessment when an uncertainty is not supplied; a stated instrument or question uncertainty takes priority.