1.1.1 - Planning experiments
Design experiments that turn a physical question into measurable evidence. Choose variables, apparatus, a useful range and a method of analysis, then check whether the plan can answer the question safely.
The Purpose Of A Practical Plan
An experimental plan is not just a list of apparatus. It is a chain of decisions that links a practical question to evidence. You need to show that you can use appropriate methodology to solve a practical problem, then evaluate whether the method is suitable for the outcome you expect.
Experimental Design
Experimental design is the planned choice of apparatus, equipment, techniques, variables and procedure used to answer a practical question.
A useful planning sentence often has this shape:
“I will vary [independent variable], measure [dependent variable] using [apparatus/technique], keep [control variables] constant, and use the results to test [expected relationship].”
That sentence is powerful because it gives the examiner the whole logic of the experiment. It says what you will change, what you will measure, how you will measure it, what could otherwise interfere, and what the data are meant to show.
For example, suppose the task is to investigate how the length of a pendulum affects its period. A weak plan says "set up a pendulum and time it". A better plan says:
- vary the length of the pendulum from the pivot to the centre of the bob
- measure the time for several complete oscillations and divide by the number of oscillations to find the period
- keep the same bob, small starting angle and release method
- repeat timings for each length and use mean periods to look for the expected trend
The better plan does not need to teach the whole pendulum topic. It shows that the student understands how a practical method would answer the practical question.
A plan should make the experiment answer one clear question, not just make some measurements.
Variables And Controls
Most planning questions begin with variables. The independent variable is the one deliberately changed. The dependent variable is the one measured as the outcome. Control variables are other quantities that could affect the dependent variable and therefore need to be kept constant, monitored, or made irrelevant by the design.
Independent Variable
The independent variable is the variable deliberately changed by the experimenter.
Once the independent variable is chosen, the rest of the plan should make it possible to see its effect clearly.
Dependent Variable
The dependent variable is the variable measured to see the effect of changing the independent variable.
Do not write "control all variables". That is too vague and not always possible. Name the specific variables that matter in the context, and say how each is controlled.
Worked example: planning variables for a pendulum
A student investigates how pendulum length affects period.
- Independent variable: length from pivot to the centre of the bob.
- Dependent variable: period, found from the time for a fixed number of complete oscillations.
- Control variables: same bob, same small release angle, same release method, same timing point.
The small release angle matters because changing it may change the motion being tested. The same bob matters because changing mass or size may introduce extra effects such as air resistance. The same timing point matters because timing from different positions can introduce inconsistent reaction-time errors.
A common mistake is to name the variable being investigated as a control variable. In this example, length must not be controlled because length is the independent variable.
Apparatus And Techniques
Planning questions often reward apparatus choices only when the choice is suitable for the measurement. "Use a ruler" may be correct for measuring a length of , but poor for measuring a diameter of . "Use a stopwatch" may be acceptable for a slow oscillation, but poor for timing a trolley crossing a short distance.
Choose apparatus by asking four questions:
- What quantity must be measured?
- What range of values is likely?
- What resolution or response time is needed?
- What technique reduces avoidable error?
Resolution is the smallest change an instrument can detect or display. A micrometer has better resolution than a metre rule for small diameters. A light gate is better than a hand-operated stopwatch for short time intervals because it reduces reaction-time effects.
Worked example: choosing a timing technique
A student wants to measure the time taken for a trolley to pass between two points apart on a track. The time is likely to be much less than one second.
A hand stopwatch is not a good choice because human reaction time may be a large fraction of the measured time. A better technique is to use two light gates connected to a timer or data logger. The light gates define the start and finish positions consistently, and the electronic timer records the short time interval with much smaller timing uncertainty.
This is a planning answer, not a full implementation answer. You do not need to describe every button press on the timer. You do need to justify why the chosen apparatus fits the measurement.
Judging Whether The Method Is Appropriate
The specification does not only ask you to design a method. It also asks you to evaluate whether the method is appropriate to meet the expected outcomes. At the planning stage, this means asking whether the method is fit for purpose.
A method is usually appropriate when it:
- changes the intended independent variable and no other important variable at the same time
- measures the dependent variable directly, or calculates it from suitable measurements
- controls relevant variables where appropriate
- uses apparatus with a suitable range and resolution
- includes enough readings over a suitable range to test the expected relationship
- uses a sensible data treatment, such as comparing means or checking whether a graph would show the expected trend
- is safe for the apparatus, materials and conditions involved
Do not overreach here. Detailed uncertainty propagation, gradient calculation and full error analysis are later practical skills. In this lesson, the key question is simpler: would this plan let the student find out what they claim to be investigating?
Worked example: evaluating a proposed method
A student wants to test whether the extension of a spring depends on the load. Their method is:
"Hang a spring from a clamp. Add one mass. Measure the total length of the spring. Record the value."
This method is not appropriate yet. It uses only one load, so it cannot test a relationship. It measures total length rather than extension unless the original length is also measured. It does not say how the load is varied, how readings are repeated, or how the spring is prevented from moving while the reading is taken.
An improved planning evaluation would say:
"The method should use several different loads, measure the original length of the spring before loading, then calculate extension as loaded length minus original length. The same spring and scale position should be used each time, and the reading should be taken when the spring is stationary. This makes the method more suitable because the data can show how extension changes with load."
From a model to a measurement plan
A physical model tells you which measurements to collect and how to test the result. For a spring within its elastic range, the proposed relationship is , where is load, is extension and is constant. A graph of against should therefore be a straight line through the origin. This is a stronger test than saying that extension merely increases with load.
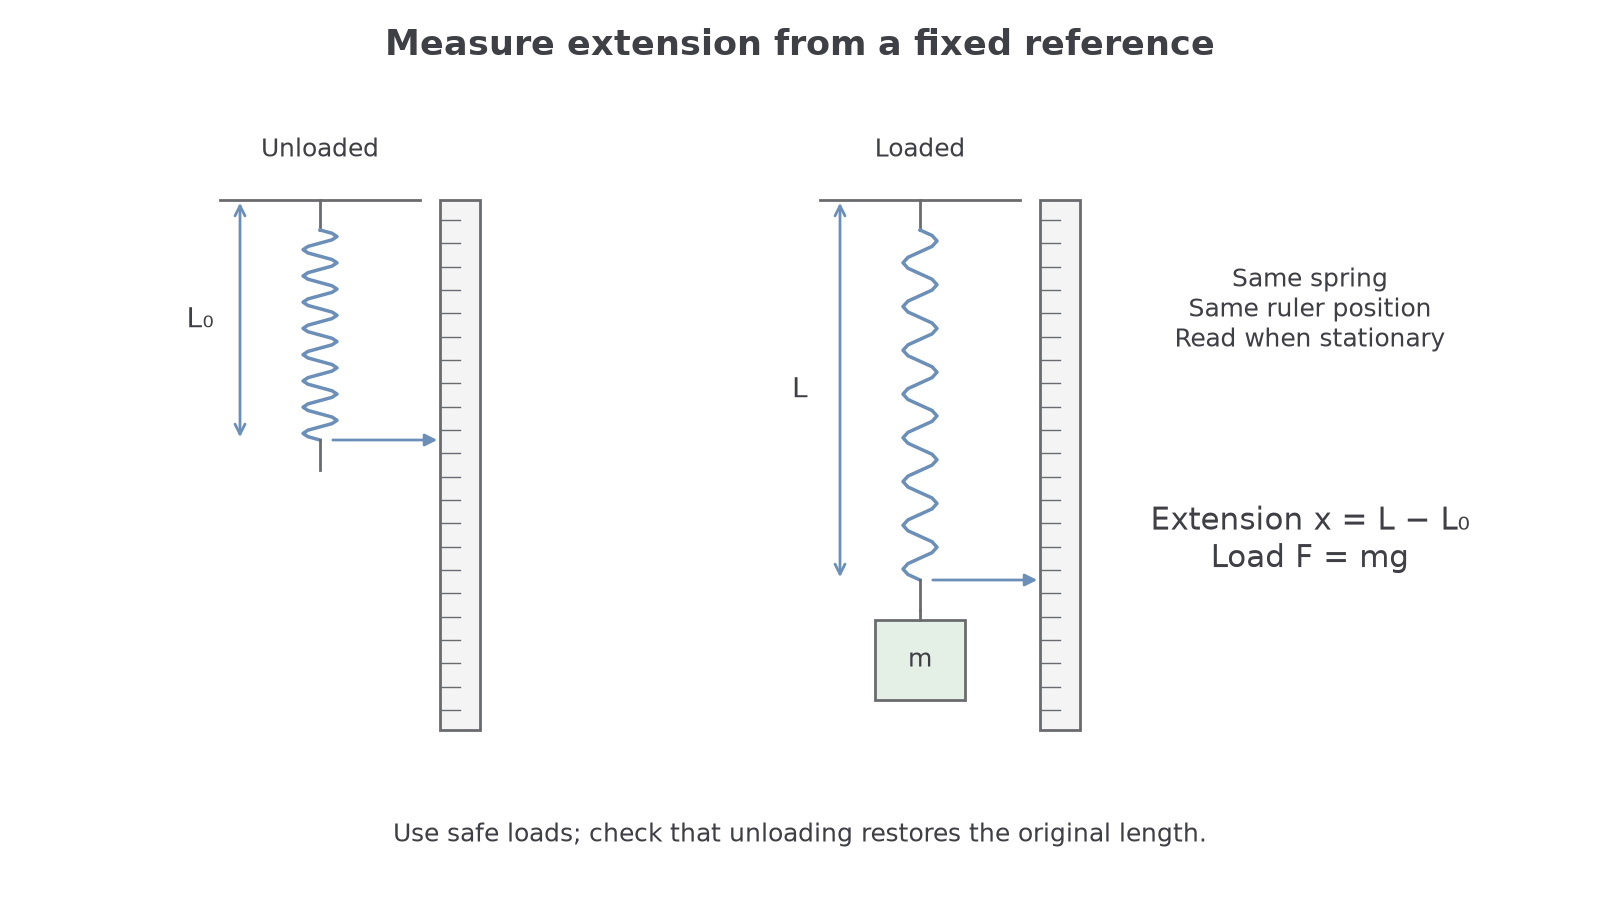
Measure the unloaded spring length , then its stationary loaded length . Calculate ; calculate the load from the total suspended mass, including the hanger, using . Fix the ruler vertically beside a pointer on the spring so the reading position is clear. Clamp the stand securely and keep hands and feet clear of falling masses.
Use a short pilot trial to choose loads that produce clearly measurable extensions without permanently stretching the spring. Take at least five well-spaced loads over that safe range, including a low-load reading to reveal an intercept. Repeating each reading helps reveal scatter; unloading and checking whether the spring returns to its initial length tests whether the assumed elastic behaviour still holds. Keep the same spring and ruler position, and wait for oscillations to stop at each load.
[DIAGRAM: asset_slug: planning_spring_measurements; caption: Unloaded and loaded spring lengths share one fixed scale. Their difference is the extension.; description: Spring measurement plan: unloaded and loaded lengths use the same fixed scale; extension is the difference.]
Do not force a line through the origin merely because the model predicts it. Compare the observed trend with that prediction: curvature may indicate that the tested range is unsuitable, while a non-zero intercept may suggest a zero or reference-length problem. A plan should state this analysis before data collection, so the chosen readings can distinguish the possibilities.