4.5 - Drawing and constructing shapes
Learn to measure and draw accurately, then use given lengths and angles to construct triangles and other shapes. Work on paper with a sharp pencil, a ruler marked in millimetres, a protractor and compasses.
Measure and draw to the nearest millimetre
How can you place the third corner of a triangle when you know only its three side lengths? We will build a triangle with sides , and . First, make its base accurate: a small error here moves every later corner.
You already know
There are in . A right angle is , and the middle letter in names its vertex, .
The ruler's zero graduation may lie inside its physical end. Align that graduation with the first endpoint, keep the measuring edge along the line and look straight down at the scale. Thin pencil marks make the endpoint easier to read.
Nearest millimetre
Report the closest whole number of millimetres. For example, rounds to ; does not. At an exact halfway value, round up.
If the line does not start at zero, its length is the difference between its endpoint readings. This also lets you use a ruler whose zero end is damaged.
[DIAGRAM: asset_slug: m063_ruler_measure; caption: Endpoint readings of 2.3 centimetres and 8.7 centimetres give a 64 millimetre line; description: Ruler ticks represent 1 mm; subtract the starting reading from the finishing reading; the displayed size is schematic; file: m063_ruler_measure.png; recommended_method: matplotlib]
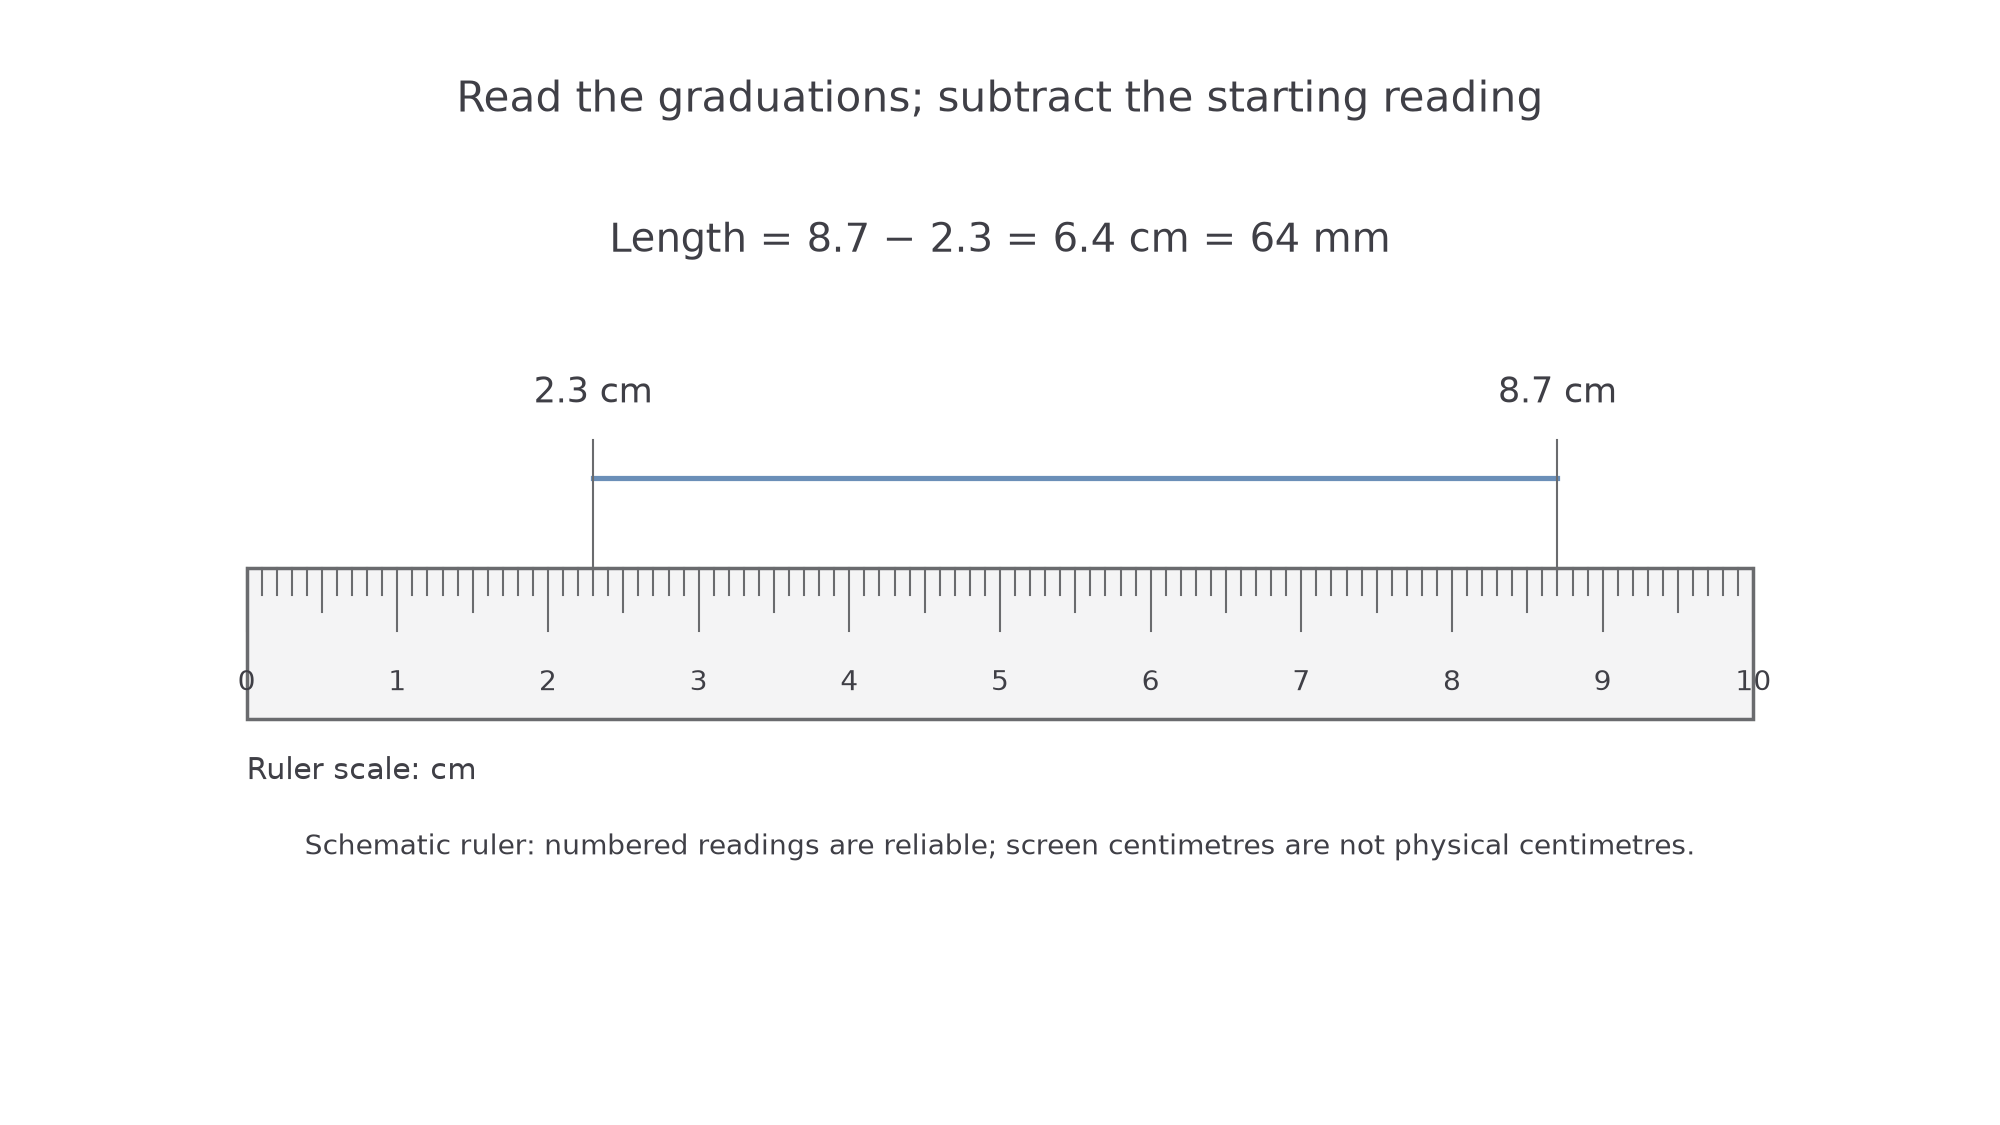
Worked example 1: subtract ruler readings
Question. A line starts at and ends at on a ruler. Find its length in millimetres.
Plan. Subtract the readings, then convert centimetres to millimetres.
Why subtract? The finishing reading includes the unused length before the first endpoint.
Answer. .
Check. , recovering the finishing reading.
Change only the finishing reading next. It now lies between millimetre marks, so keep the precise difference until the rounding step.
Worked example 2: round the measured length
Question. A line starts at and ends at . Find its length to the nearest millimetre.
Plan. Find the difference in millimetres, then round once.
Why convert first? Rounding centimetres to a whole number would lose far too much detail.
Answer. .
Check. is from and from .
Drawing reverses the process. To draw , mark a first endpoint, put zero there and mark the second at . Rule the line, label its ends and reposition the ruler to check the distance. Draw this line on paper now; screen centimetres change with zoom and are unsuitable for this check. These instrument procedures are not supplied on either tier's formulae sheet.
Watch out
Wrong: “The length is .” That is an endpoint reading. With a start at , the correction is .
Try a different finishing reading. State the unit as well as the rounded number.
Use angles to locate a triangle vertex
A protractor fixes a direction; a ruler or compass fixes a distance along that direction. Make a small labelled sketch first so that the given angle is at the correct corner.
Construction
An accurate drawing whose vertices satisfy the given lengths and angles. A rough sketch can help you plan, but it is not the finished construction.
For two sides and their included angle, draw one side as a base. Put the protractor's centre at the angle's vertex and its zero line along the base. Read the scale that begins at zero on that base. On a double scale, the other reading gives the supplementary angle.
[DIAGRAM: asset_slug: m063_sas_steps; caption: A 6 centimetre base and a 60 degree ray locate C 4 centimetres from A; description: Ruler base AB, protractor ray at A and compass arc of radius 4 cm from A; join BC after locating C; file: m063_sas_steps.png; recommended_method: matplotlib]
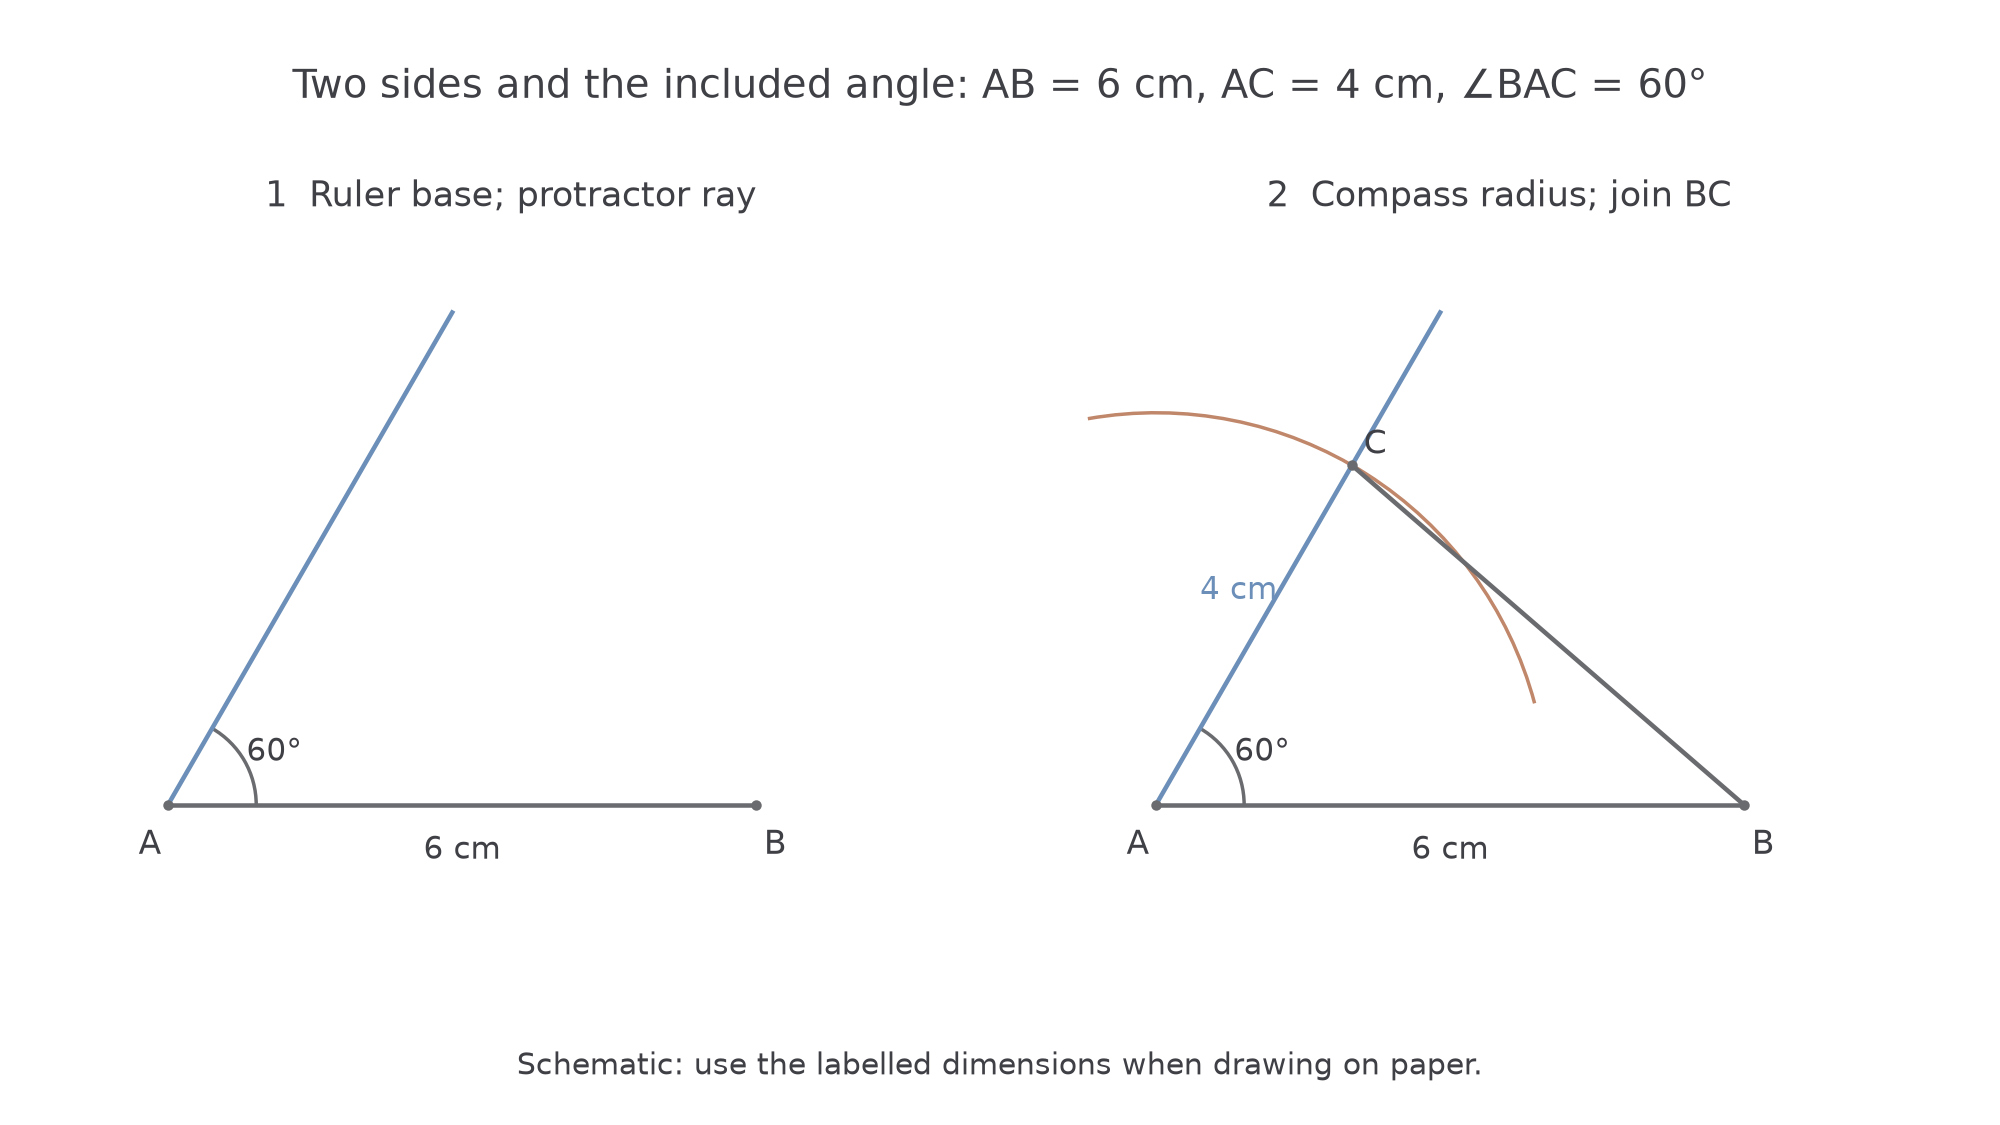
Worked example 3: two sides and their included angle
Question. Construct with , and .
Plan. Draw the base, make the angle at , then mark at its required distance.
Set the compass opening against the ruler, keep its point at , and label the arc–ray intersection . Rule .
Why an arc from ? Every point on that arc is from ; its crossing with the ray satisfies both conditions.
Answer. The triangle formed by joining , and , with the locating arc retained.
Check. Re-measure , and the angle at independently. On paper they should match the stated values within instrument accuracy.
Change only the included angle. The compass opening stays the same, but its intersection with the new ray moves.
Worked example 4: move the angle ray
Question. Construct with , and .
Plan. Repeat the base-and-arc method with a different ray direction.
Draw the ray, mark its crossing with the arc as , and join .
Why keep the radius unchanged? Only the angle has changed; the given side has not.
Answer. A triangle with the two given side lengths and a included angle.
Check. The angle is larger than before while and have the same lengths.
If instead one side and the angles at its two ends are given, neither distance to is known. Use two rays: their crossing fixes .
[DIAGRAM: asset_slug: m063_asa_steps; caption: Angle rays at the two ends of AB meet at C; description: AB is 6 cm; the ray at A makes 50 degrees with AB and the ray at B makes 60 degrees with BA; both rays lie above the base; file: m063_asa_steps.png; recommended_method: matplotlib]
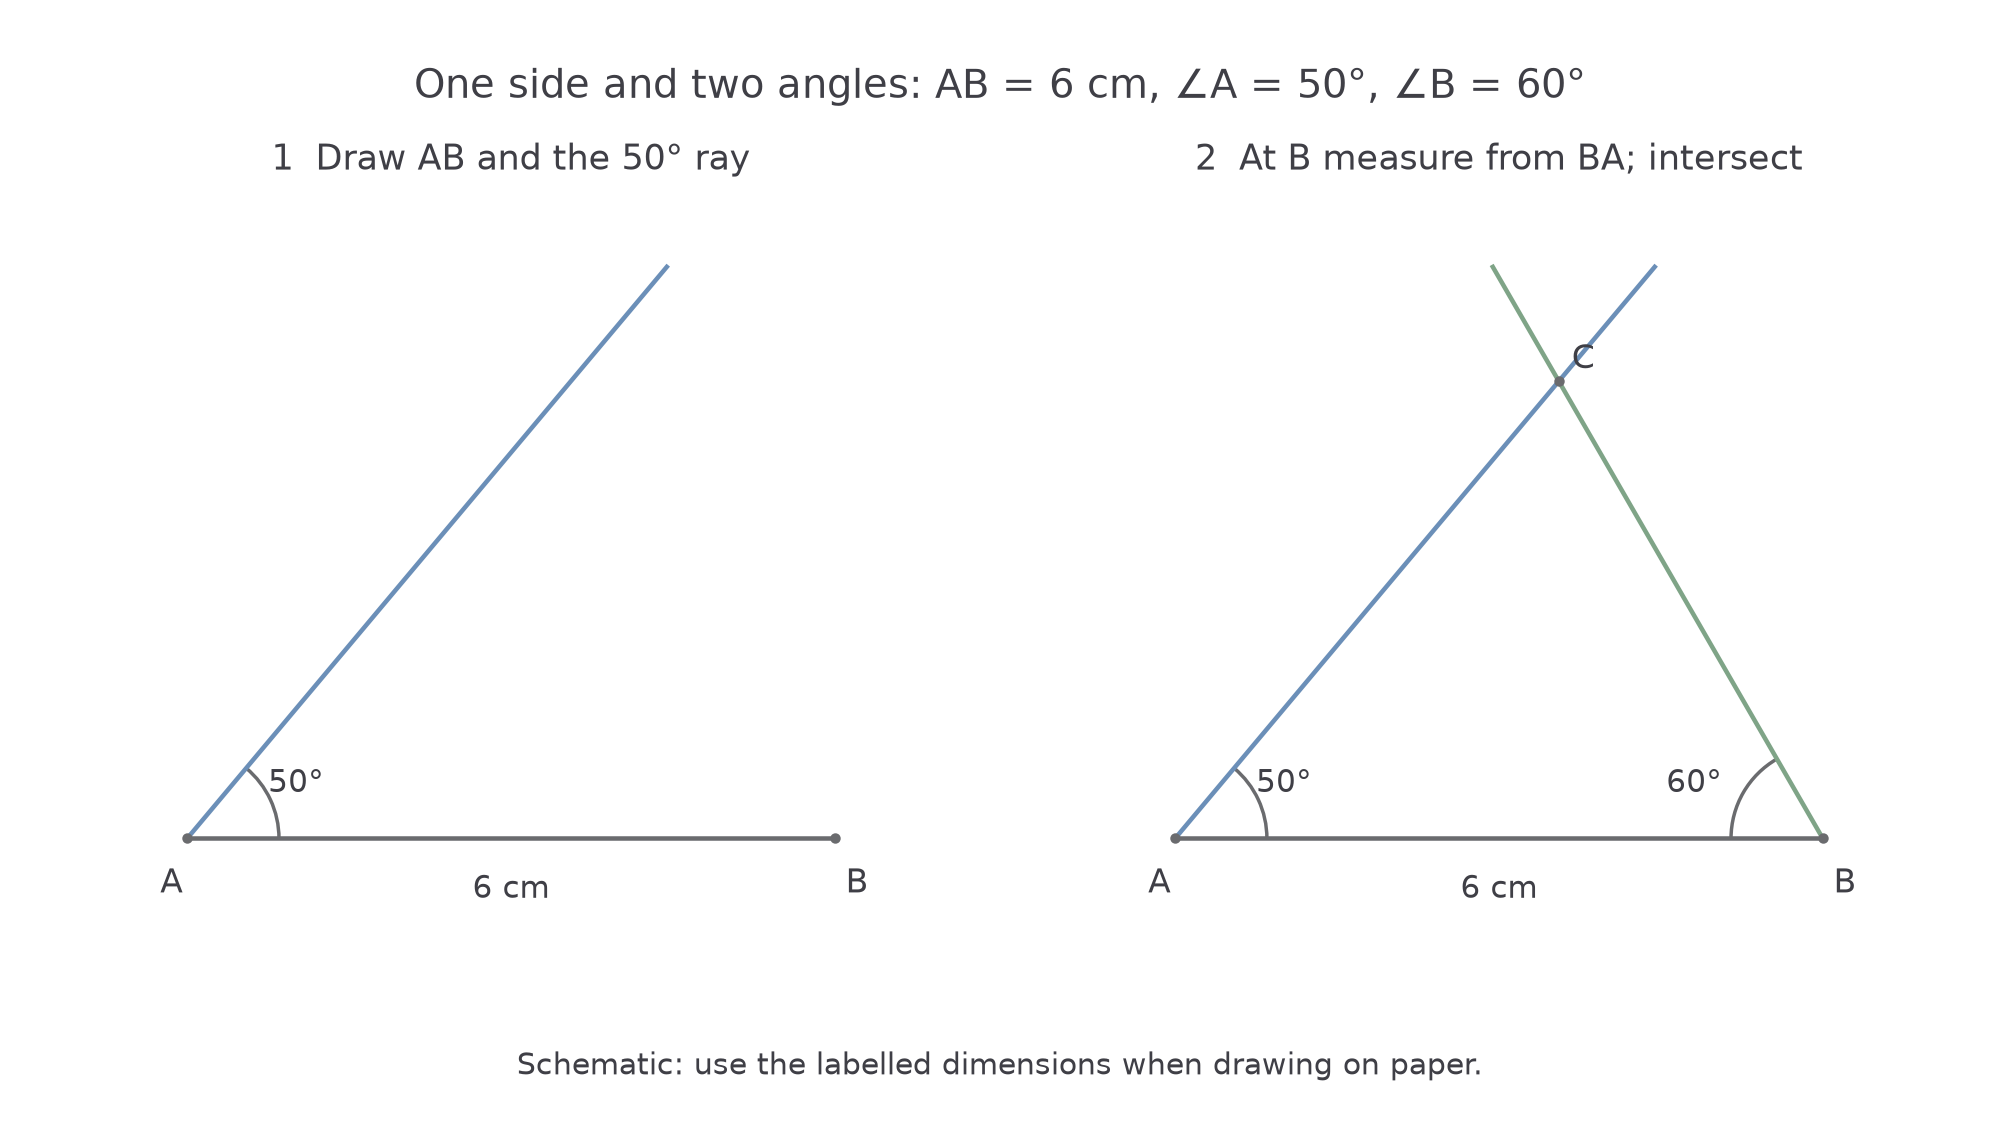
Worked example 5: one side and two angles
Question. Construct with , and .
Plan. Draw the base and intersect the two angle rays on the same side of it.
Extend the rays until they cross, then label the crossing .
Why start the second angle from ? At , the triangle's base points back towards .
Answer. The triangle bounded by and the two rays.
Check. Measure the third angle: it should be about .
Change only the angle at . Its ray turns, so the third angle must change too.
Worked example 6: a different second angle
Question. Construct with , and .
Plan. Keep the base and first ray; replace the second ray.
Why intersect rays? The third vertex must lie on both prescribed directions.
Answer. The triangle with at their crossing.
Check. The three angles total .
The angle-sum result and these construction instructions are absent from both tier formulae sheets. Learn the instrument positions, rather than the appearance of one triangle.
Watch out
Wrong: using the outer scale's when the required angle is . The correct scale starts at along the chosen baseline; check that scale before marking the ray.
Now describe the ray that moves and check the resulting third angle.
Continue this lesson.
You’re previewing NovaLearn without an account. Create a free account to read the rest.
Create free account