S1 - Modelling supports and tipping
Use moments to decide whether a supported body can stay at rest and find the boundary at which it tips or slips. You will check contact forces, compare tipping with sliding, and model a stationary ladder using horizontal and vertical forces.
Admissible support reactions
How far can someone stand beyond a beam's support before it tips? The first clue is a reaction that would have to act in an impossible direction. Solving equilibrium equations is only the start; the supports must be able to supply the resulting forces.
You already know
A static rigid body needs balanced horizontal forces, vertical forces and moments. Its weight is ; a uniform rod's weight acts at its midpoint. A rough contact supplies friction up to , with equality only at limiting friction. These results are not in the formula booklet: learn them.
A beam resting unfastened on a support underneath it can be pushed upwards. That contact cannot pull down. If is defined upwards, the model requires . A negative answer rejects the assumed two-contact equilibrium; taking its absolute value changes the force and breaks the balance.
| Connection | Permitted force in the model |
|---|---|
| Smooth horizontal support underneath | Upward normal reaction; no friction |
| Rough horizontal floor | Upward normal reaction and horizontal friction, with magnitude at most |
| Light taut vertical string or chain | Vertical tension, pulling towards its other end; never a push |
| Pin or fastening | May push or pull in permitted directions; check the stated connection |
An upward reaction can even exceed the total weight if a separate vertical chain pulls the beam down. For example, a downward total load and a downward chain tension need a upward reaction. The force balance permits this; the attachment and moments must permit it too. A signed negative force is not automatically impossible for every type of connection.
Worked example 1: an admissible pair of reactions
Question. A uniform horizontal beam of length weighs . Let measure metres from its left end. Smooth unfastened supports are at , where , and , where . A downward load acts at . Find the reactions and check the contacts.
Plan. Take moments about , then balance vertical forces and check both signs.
Why check signs afterwards? The equations describe candidate forces; nonnegative values are needed for these unfastened supports.
Answer. , , both upwards. Both contacts are admissible.
Check. About , , and .
Worked example 2 changes only the end load from to . The equations still have a solution, but the contact model changes the verdict.
Worked example 2: a negative contact reaction
Question. Use the same beam and supports with a downward load at . Find the candidate reactions and decide whether both contacts can remain in equilibrium.
Plan. Repeat the two balances without forcing the answer to be positive.
Why retain the negative sign? It identifies the downward pull that would be required at , which this contact cannot provide.
Answer. The candidates are , . The unfastened two-contact static configuration is impossible.
Check. The signed candidates sum to , the downward load. Replacing by would give , breaking force balance.
For a general nonnegative end load, with , and measured in newtons, the same equations give
Thus both reactions are nonnegative exactly when . These are derived equations for this particular beam, not formula-booklet results. At , the left reaction is zero: the boundary we use next.
Watch out
Wrong: , so report a upward reaction. Reversing the force does not preserve equilibrium. Right: report the signed candidate and explain that an unfastened lower support cannot supply its required downward pull.
The check changes only the end load again. Test the candidate forces against the actual support model.
Limiting contact and beam tipping
At the boundary of tipping, the support about to lose contact has zero reaction; the remaining support still carries the total load.
Limiting tipping
Limiting tipping is the boundary between an admissible static contact configuration and one requiring an impossible contact force. At that boundary, force and moment equilibrium still hold, but the reaction at the contact being lost is zero.
When a person moves towards a right-hand overhang, the left reaction decreases to zero and the right support becomes the tipping pivot. Take moments about that remaining support: its reaction also has zero moment, leaving just the loads. Moving left can instead cause loss of the right contact. Check both ends when asked for an interval.
Worked example 3: the full interval for a person on a beam
Question. A uniform horizontal beam has length and mass . Unfastened smooth supports and lie and from its left end. A person of mass is modelled as a particle at position , where . Find the exact interval permitting static equilibrium.
Plan. Find the two zero-reaction boundaries, then check both reactions throughout the interval.
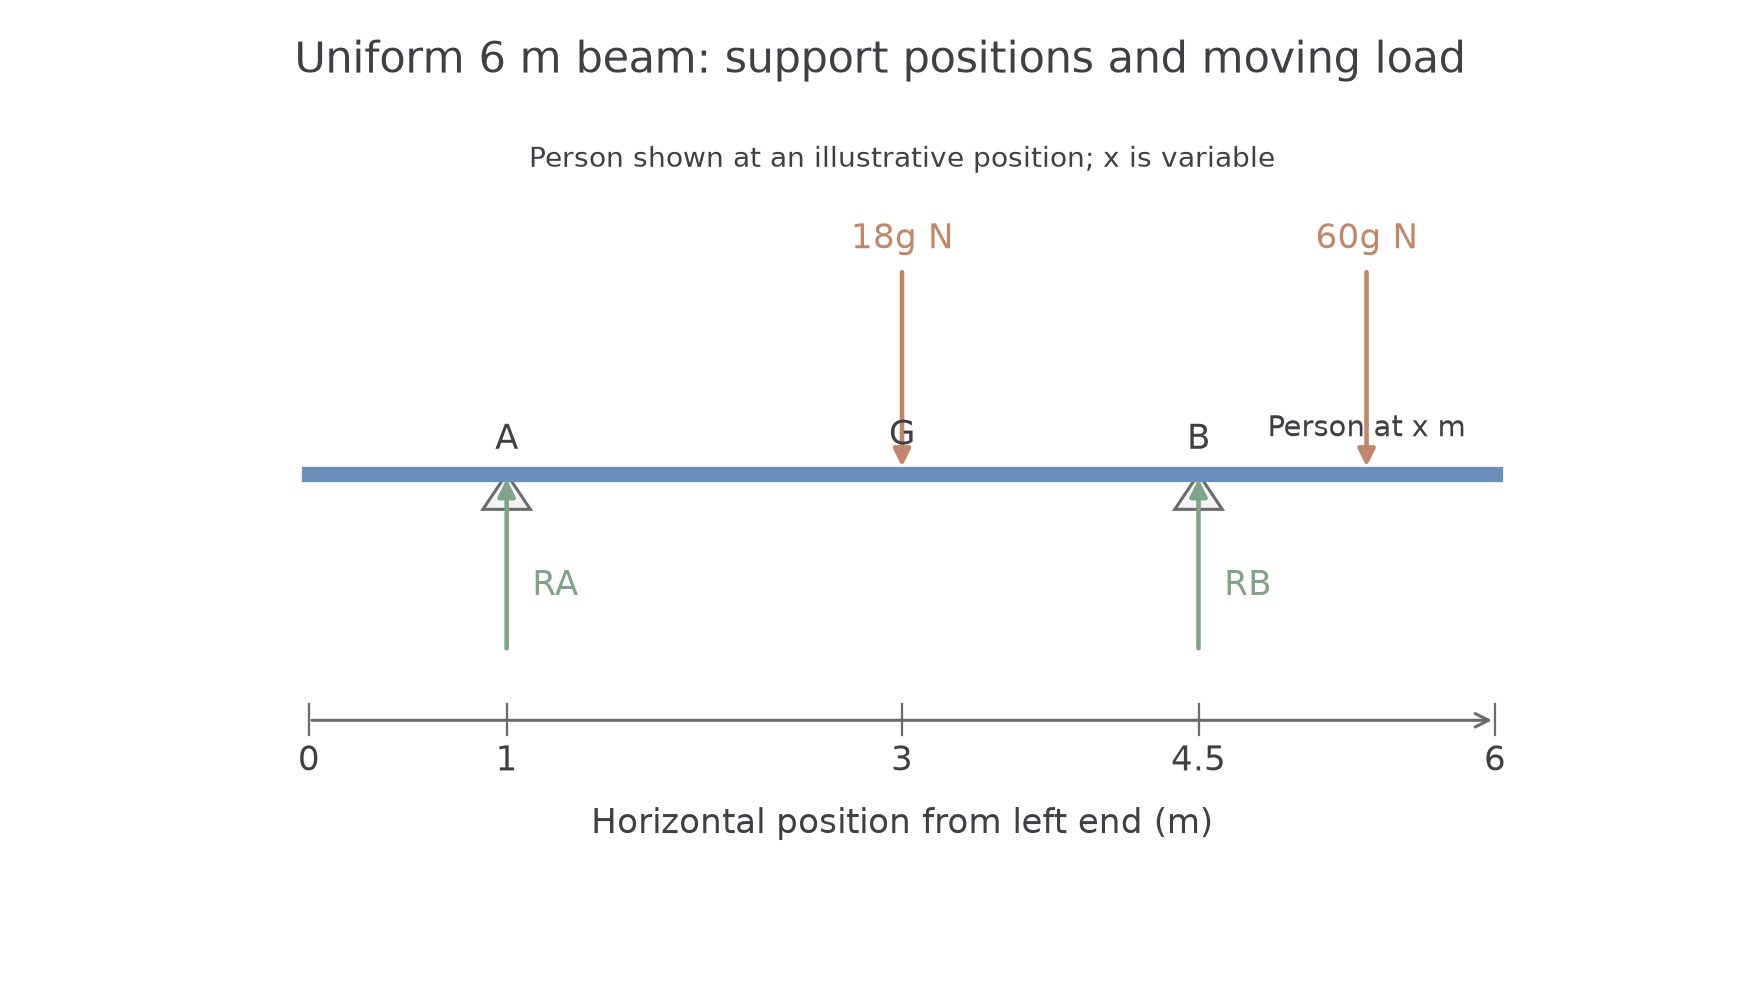
The person is drawn at one sample position; is variable. The beam's weight acts at .
For a general , moments about and vertical balance give
Why find the general reactions? Their signs confirm every interior position, rather than just checking the endpoints.
Answer. , measured in metres from the left end. The endpoints are limiting positions; both reactions are positive strictly inside.
Check. Each boundary has one zero reaction and the other equal to , the total weight. The common cancels from the position equations.
Worked example 4 changes only the person's mass to . This time one algebraic tipping boundary lies beyond the physical beam, so the given position range matters.
Worked example 4: a boundary outside the beam
Question. For the same beam and supports, replace the person by a person. Find the exact interval of positions permitting static equilibrium.
Plan. Obtain both sign restrictions and intersect them with .
Why reject as an endpoint for standing? It solves a reaction equation, but lies outside the given domain on the beam.
Answer. . The left end itself is admissible; only the right endpoint is limiting tipping.
Check. At , and . At , and .
The same method handles a fixed end load. For a uniform beam of weight , supported at and , a downward load at becomes limiting when , giving . Force balance then gives the remaining reaction . These are model-specific derived results, absent from the formula booklet.
Watch out
Wrong: set both reactions to zero at tipping. The weight still needs an upward force. Right: set only the reaction at the contact being lost to zero, and take moments about the contact that remains.
For the next question, only the person's mass changes again. Keep the same beam and physical position range.
Lamina tipping and sliding
A rectangular body pushed horizontally may tip or slide, so compare both boundaries before predicting how static equilibrium first fails.
Model its side view as a uniform rigid rectangular lamina on a rough horizontal floor. Its weight acts at the geometric centre. A horizontal push to the right needs friction to the left; vertical balance gives . As the push increases, the line of action of the normal contact resultant moves towards the right base edge. At limiting tipping it passes through that edge.
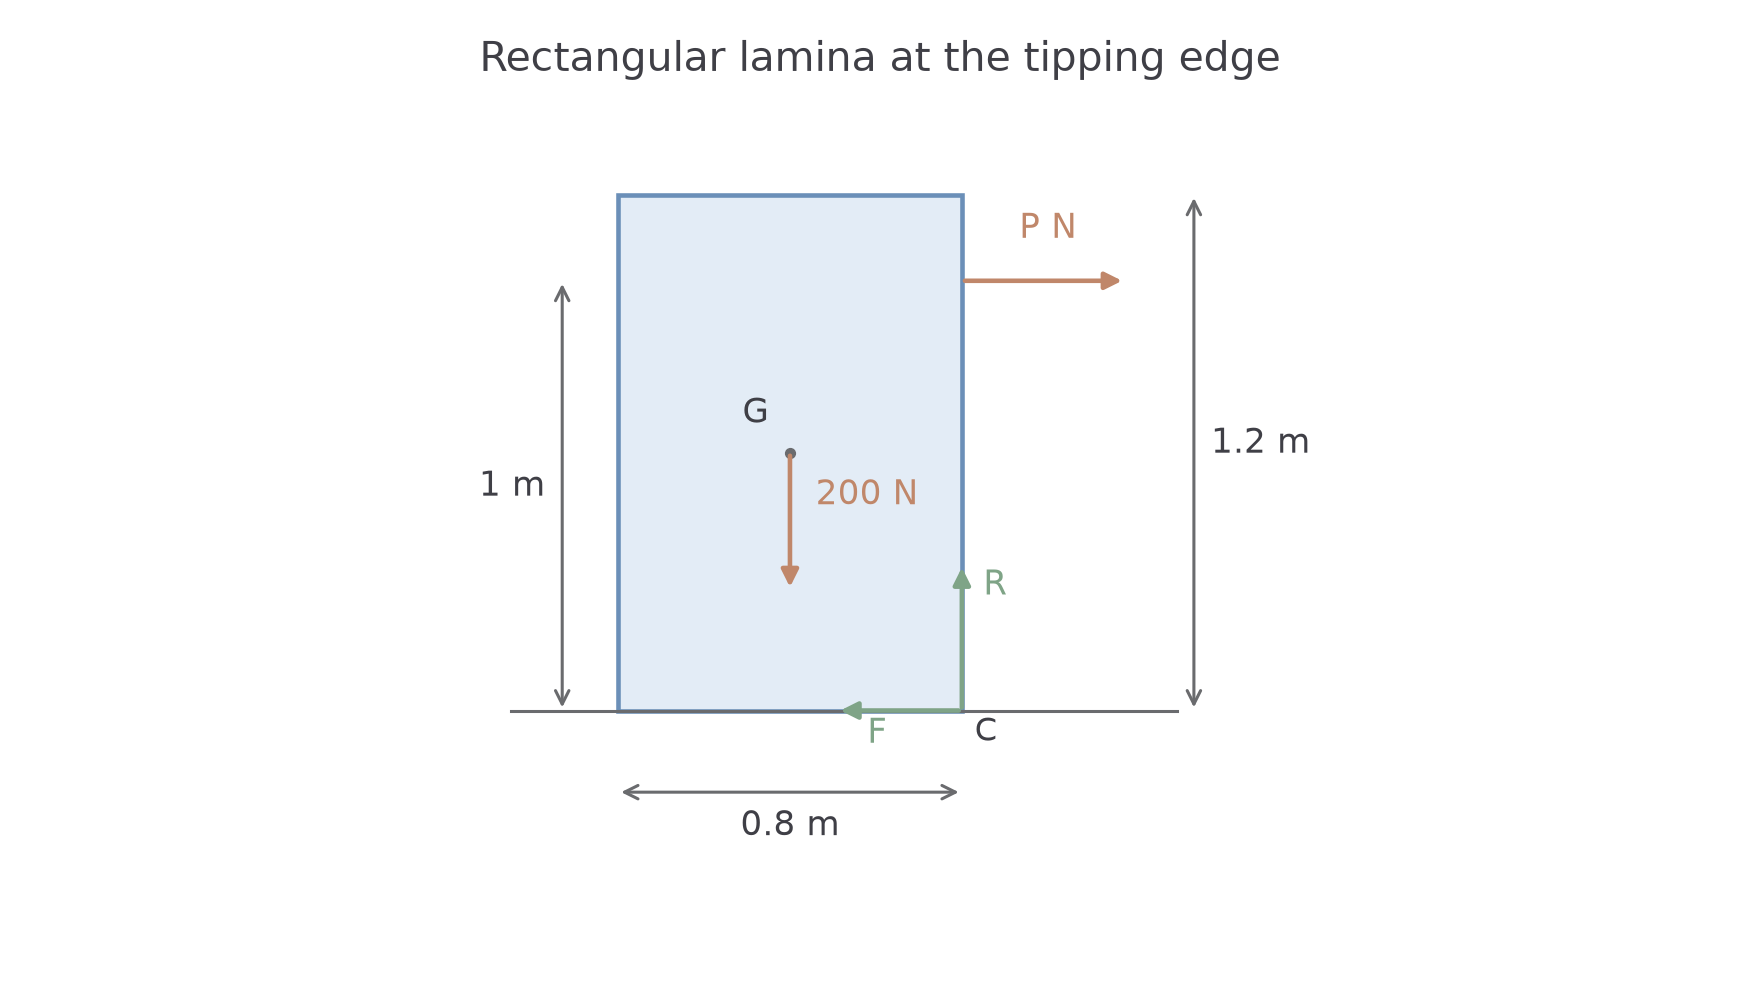
The diagram shows the tipping boundary, not the normal reaction's location for every smaller push. About the right edge, the horizontal push has vertical arm ; the weight has horizontal arm . Both contact forces have zero arm there.
Competing static boundaries
For base width , push height and weight ,
The smaller threshold is reached first as increases slowly. Equal thresholds mean simultaneous limiting tipping and sliding. The tipping candidate is physically reachable only if friction can supply the required force.
Not in the formula booklet: learn it.
These formulae come from and , rather than two unrelated rules. Keep the restoring and overturning moments distinct.
Worked example 5: tipping comes first
Question. A uniform rectangular lamina weighs , has base width and height , and stands on a rough horizontal floor with . A horizontal push acts to the right at height . As it increases slowly, determine the first loss of static equilibrium.
Plan. Calculate the tipping and sliding candidates independently, then compare them.
Why compare before concluding? Moment balance alone assumes enough friction to maintain the proposed tipping configuration.
Answer. Tipping occurs first, at , because .
Check. At tipping the required friction is , below its maximum. Both contact force directions are admissible.
Worked example 6 changes only the coefficient of friction to . The tipping candidate stays the same.
Continue this lesson.
You’re previewing NovaLearn without an account. Create a free account to read the rest.
Create free account