R2, G15 - Scale drawings, maps and bearings
Scale drawings preserve length proportions while bearings specify directions from north. You will convert map distances, construct and measure scale diagrams on paper, and use clockwise bearings to place points and interpret routes.
Scale factors and map distances
How can a journey of finish only from its starting point? A map can show both the route travelled and the direct distance between its ends. Its scale turns drawing lengths into real lengths.
You already know
Equivalent ratios scale both terms equally. Convert comparable lengths into the same unit before using a ratio such as .
You can use a ratio scale only after deciding which length belongs to the drawing.
Scale drawing
A scale drawing represents every real length using the same multiplicative factor. A drawing-to-real scale means one unit on the drawing represents of the same unit in reality. Angles keep their size.
A scale can be stated in mixed units, but a ratio cannot: “1 cm represents 2 m” is , since . A model can be larger than its object: makes each model length five times the actual length. Say which direction the scale describes. Scale conversions are not on the formula sheet: derive them using equal ratios.
Worked example 1: map to real distance
Question. A path measures on a map. Find its real length in kilometres.
Plan. Find the real distance represented by one map centimetre, then scale up.
Why this step? The scale's two numbers refer to the same unit, rather than centimetres and kilometres.
Answer. .
Check. A little over six map centimetres represents a little over .
Change only the direction of the question: recover the drawing length from that real length.
Worked example 2: real distance to map distance
Question. At the same scale, what map length represents ?
Plan. Convert the real length to centimetres, then divide by the scale denominator.
Why this step? A map is smaller than reality, so its length must be the real length divided by the large scale factor.
Answer. .
Check. .
Resizing a map changes its numerical scale. Doubling all printed lengths of a map gives . A scale bar resized with the map remains useful, since the bar grows with the drawing. For a winding path, measure the path itself rather than the straight line between endpoints.
Watch out
Wrong: . This mixes kilometres and centimetres. Correct: first write , then divide to obtain .
Change the real distance and keep the map scale.
Constructing and measuring scale diagrams
A scale construction places points using measured lengths and angles. A rough sketch helps you plan, but its appearance is not measurement evidence.
To measure a line, align the ruler's zero with one endpoint and read the other along the ruler edge. The plastic edge need not be the zero. To measure an angle, centre the protractor at its vertex, align zero with the starting arm and read the scale that starts at that zero. A clockwise turn above can be found by measuring the remaining turn and subtracting it from .
[DIAGRAM: asset_name: Rectangular room scale construction; asset_slug: 1ma1_m38_scale_room; caption: At 1 cm to 2 m, an 8 m by 6 m room is drawn as a 4 cm by 3 cm rectangle.; description: A labelled rectangle ABCD has AB 4 cm representing 8 m and AD 3 cm representing 6 m, right-angle markers and diagonal AC 5 cm representing 10 m. The image supports a paper construction and is not a physically calibrated ruler.]
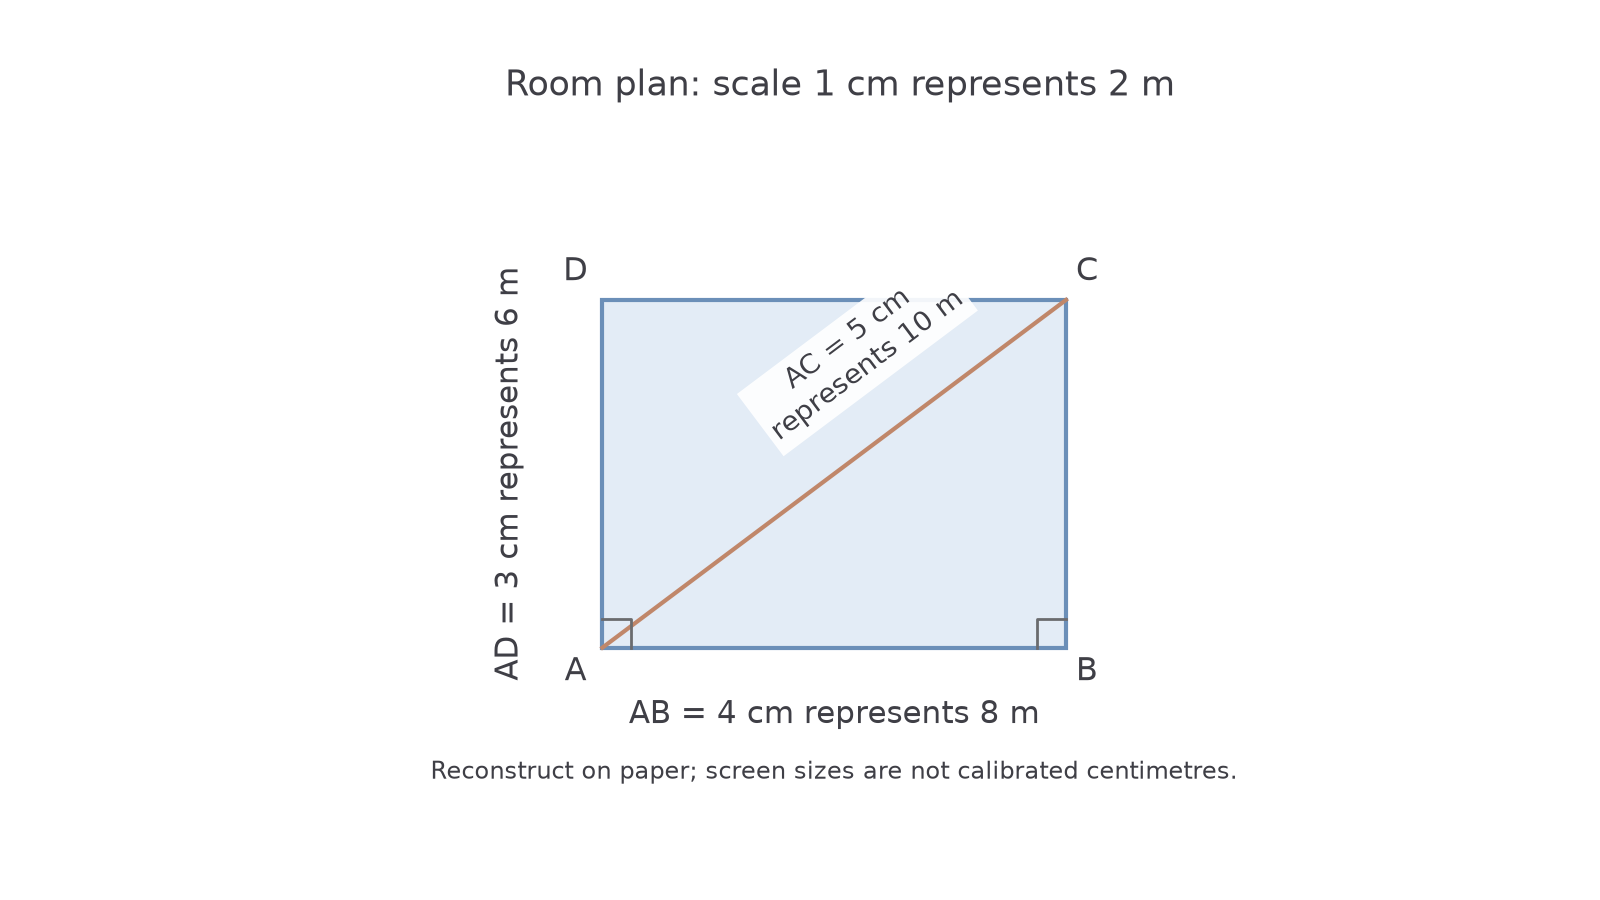
The image shows the proportions. Reconstruct the stated centimetre lengths on paper: a screen or printer may resize the displayed picture.
Worked example 3: constructing a room plan
Question. Draw a rectangular by room at 1 cm to 2 m. Measure its diagonal and angle BAC.
Plan. Convert the sides, construct the rectangle with right angles, then measure the diagonal and angle.
Draw AB with a ruler. At A, place the protractor centre on A and its zero along AB; mark and draw AD of length . At B draw BC of length , perpendicular to AB on the same side. Join C to D, then draw AC. A set square is also suitable for the perpendiculars.
Why this step? The right angles fix the room's shape; correct side lengths alone could produce a sloping parallelogram.
Answer. A by rectangle, diagonal about , representing ; angle about .
Check. CD measures , opposite sides are parallel and the corners are right angles.
Change only the drawing scale to make the same room larger on paper.
Worked example 4: changing a construction's scale
Question. Draw that room at 1 cm to 1 m, then measure its diagonal.
Plan. Use the new scale for both sides and repeat the perpendicular construction.
Draw AB, construct sides AD and BC of on the same side, then join CD and AC.
Why this step? Every drawing length doubles, but the represented room stays the same.
Answer. An by rectangle; diagonal about , representing .
Check. Angle BAC is still about : a scale change preserves angles.
Different given information can locate a point by intersecting rays. For a triangular garden with base and base angles and , use 1 cm to 2 m: draw a base, draw the two angle rays on the same side, and mark their intersection as the third vertex. Angles in a triangle sum to , so the remaining angle is . This angle-sum fact is not on the formula sheet: learn it. Multiply any measured side in centimetres by 2 to obtain metres.
Watch out
Wrong: a resized screen diagonal looks , so use the old scale on that length. Resizing breaks the physical centimetre calibration. Correct: reconstruct the stated lengths on paper, or use the supplied original measurement or a correctly resized scale bar.
Continue this lesson.
You’re previewing NovaLearn without an account. Create a free account to read the rest.
Create free account