G2 - Ruler and compass constructions and loci
Compass arcs turn equal distances into accurate lines and shapes. You will construct bisectors and perpendiculars, build figures from given measurements, and combine loci to find every point satisfying a set of conditions.
Perpendicular and angle bisectors
Where could you put a lamp so that it is equally far from two doors, yet exactly from one of them? Start by constructing all the points equally far from two fixed points.
You already know
Perpendicular lines meet at . A midpoint divides a segment into equal lengths. Matching ticks record equal distances.
In a standard ruler-and-compass construction, the ruler joins points as a straightedge and the compass transfers a distance. Keep the construction arcs visible. Measuring an answer with a protractor afterwards checks it; it does not replace a requested compass method.
Bisectors
A perpendicular bisector crosses a segment at its midpoint and at right angles. An angle bisector divides an angle into two equal angles.
To construct the perpendicular bisector of , choose a compass radius greater than half . Draw arcs above and below the segment from , then from with the same radius. Join their two intersections . Both points are equidistant from ; the matching triangles force their joining line to cross at its midpoint and at . Every point on this line is equally far from the endpoints.
To bisect , draw an arc centred at the vertex cutting its rays at . Draw equal-radius arcs from meeting at inside the angle, then join . Triangles have , , and common , so their corresponding angles at are equal. The later congruence lesson names this three-side test.
[DIAGRAM: asset_name: Compass constructions of two bisectors; asset_slug: 1ma1_m47_bisectors; caption: Equal compass radii determine a perpendicular bisector and an angle bisector.; description: Left panel shows segment AB, equal-radius arcs centred at A and B meeting at P and Q, and perpendicular bisector PQ through midpoint M. Right panel shows angle ABC, an arc from B marking X and Y, equal arcs from X and Y meeting at P, and bisector BP. Construction arcs are clay and completed bisectors sage.]
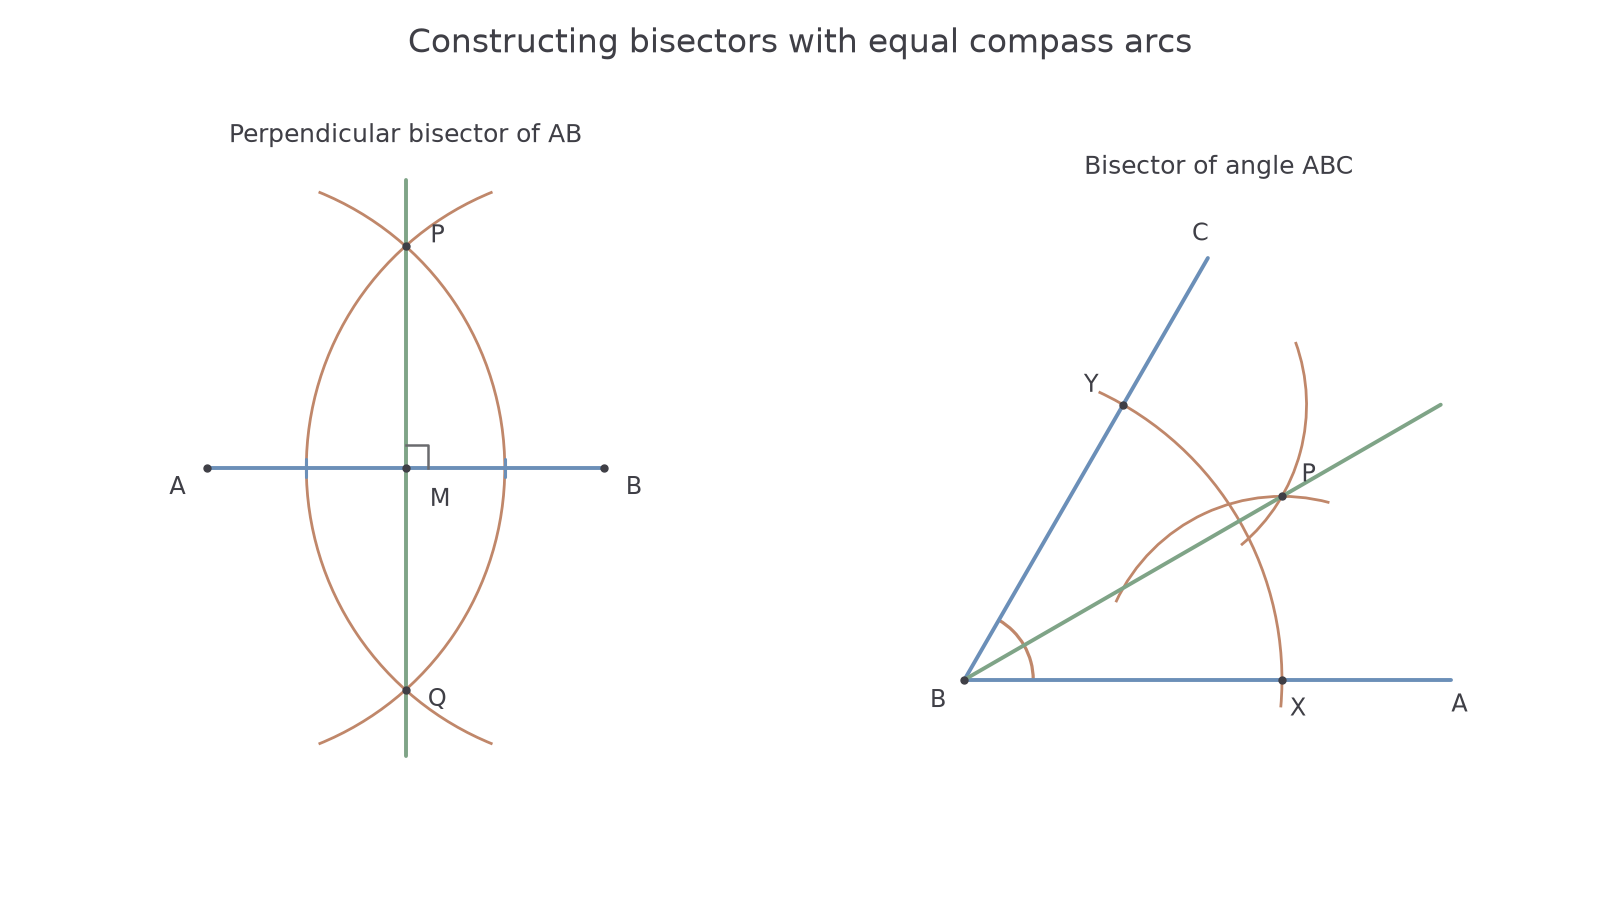
The equal-radius requirement applies to each pair of endpoint arcs. The initial arc from an angle's vertex can use a different setting from the later pair.
Worked example 1: bisecting an 8 cm segment
Question. Construct the perpendicular bisector of using endpoint arc radius . State the midpoint distances.
Plan. Use two equal-radius arc intersections to locate the bisector.
Why use both intersections? Their joining line gives the full perpendicular bisector, rather than an estimated midpoint.
Answer. Draw ; it gives and a right angle at .
Check. Measure both halves and check only after constructing; keep the arcs.
Change only the segment length to . The same arc radius still exceeds half the segment.
Worked example 2: a longer segment
Question. Construct the perpendicular bisector of , using endpoint radius . State the midpoint distances.
Plan. Keep the compass setting equal at both endpoints and join the two intersections.
Why check the radius again? A radius that works for one segment may be too short for a longer one.
Answer. Joining gives the perpendicular bisector; both halves are .
Check. , and the completed line should meet at .
Practise both constructions on paper. For an angle of , a radius- vertex arc locates ; equal arcs from them locate the bisector. Each resulting angle is . You may use a protractor to draw the original angle and check the answer, while the bisection itself uses compass arcs.
Watch out
Wrong: use radius from each end of a segment. The circles cannot meet because . Use equal radii greater than . Exactly gives only one contact point.
Change only the segment length once more to test whether the same radius still works.
Perpendiculars from and at a point
You can make a perpendicular by first choosing two points on a line that are equally far from your given point.
For outside line , draw an arc centred at cutting at . Increase the radius if it meets only once. Now . Draw equal arcs from meeting at on the other side of , and join . Both are equidistant from , so is their perpendicular bisector. It passes through the required original point .
For on , use an arc centred at to mark on opposite sides, so . Equal arcs from , with radius greater than , meet at off the line. Join . Since is already the midpoint of , this gives the perpendicular at . A second intersection below the line helps extend it accurately.
[DIAGRAM: asset_name: Perpendicular compass constructions; asset_slug: 1ma1_m47_perpendiculars; caption: Choosing equal-distance points on a line turns each perpendicular construction into a bisector construction.; description: Left panel has external point P, an arc centred at P cutting line l at A and B, equal arcs from A and B meeting at Q below the line, and line PQ with a right-angle square at its foot. Right panel has P on line l, equally distant A and B either side, equal arcs crossing at Q above, and perpendicular PQ.]
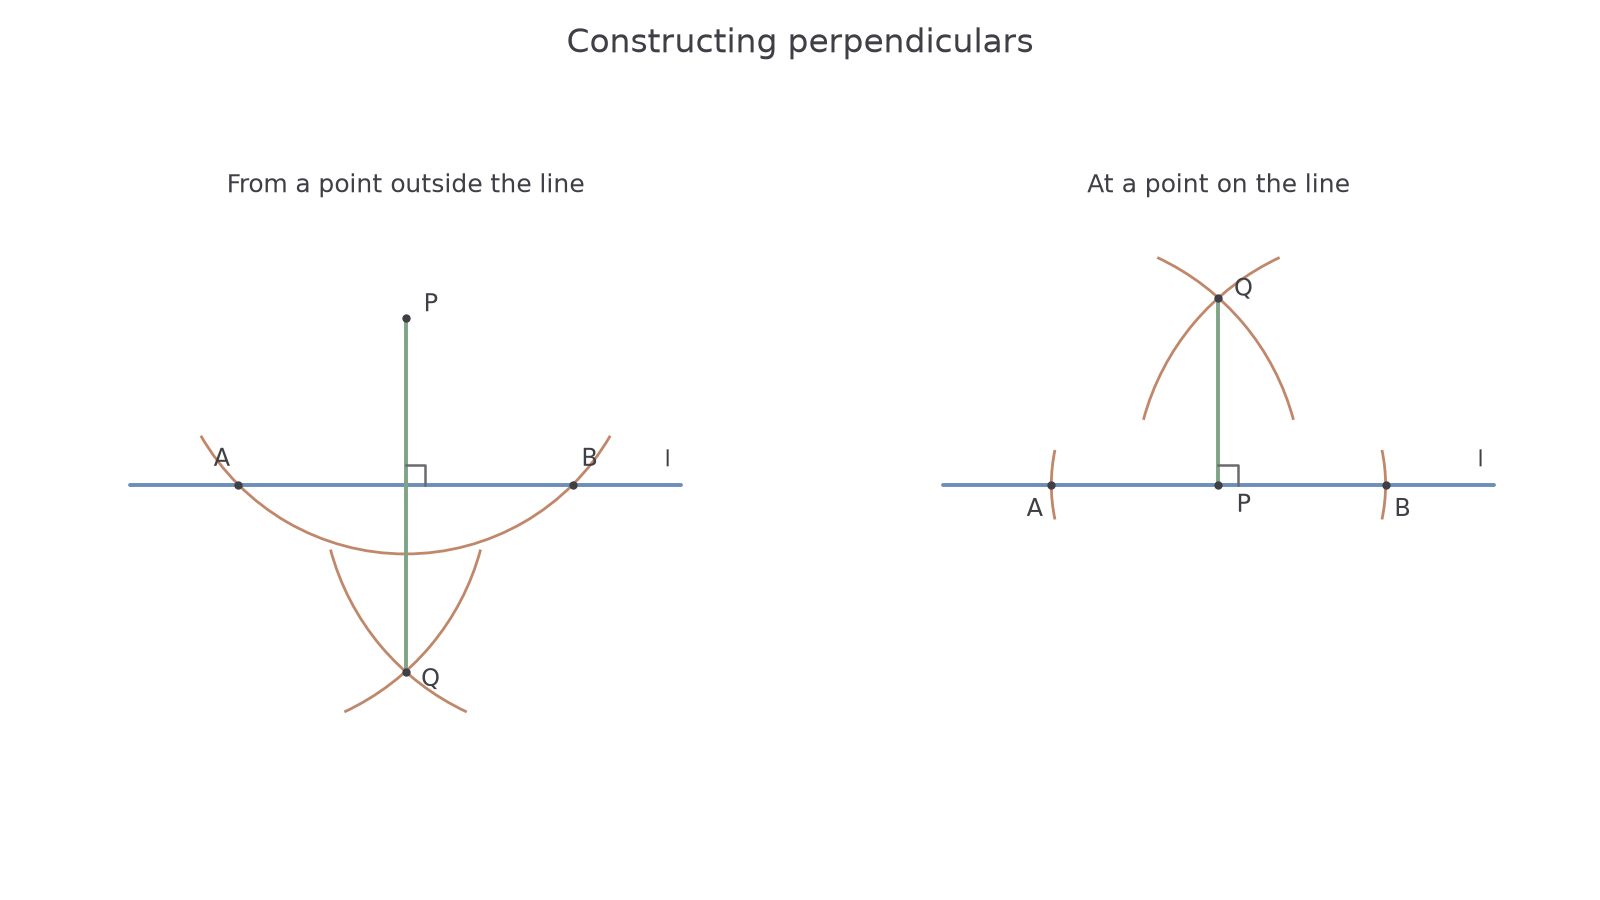
The same equal-distance idea works whether starts on or outside the line.
Worked example 3: a perpendicular at a point
Question. lies on line . Construct the perpendicular at , taking and equal endpoint arc radii .
Plan. Make the midpoint of , then locate another point on its perpendicular bisector.
Why join to ? They both lie on the perpendicular bisector of .
Answer. Draw line ; it meets at at .
Check. Leave arcs visible and check the completed angle with a protractor.
Change only the initial distance from to each marked point to . The endpoint radii still cross.
Worked example 4: wider initial marks
Question. Construct the perpendicular at on , using and endpoint arc radii .
Plan. Repeat the bisector construction with wider-spaced points.
Why retain equal ? That makes , rather than a different point on , the foot of the perpendicular.
Answer. Join to obtain the perpendicular at .
Check. is halfway between , and the completed angle is .
For an external-point practice drawing, place above a line. A radius- arc from cuts it twice; equal radius- arcs from those intersections locate below. Join , and check that the completed line passes through .
Watch out
Wrong: choose , , then join to an equal-arc intersection. is not the midpoint of . Use equal distances on opposite sides of before constructing the bisector.
Now choose the next pair of distances and check the radii yourself.
Perpendicular distance as the shortest distance
The distance from a point to a line means its shortest distance to that line, measured along the perpendicular.
Let be the foot of the perpendicular from to line . For any other point on , triangle is right-angled at . Its sloping side is the hypotenuse and is longer than . The equality case occurs only when .
Right-triangle distance comparison
For the right triangle ,
This is Pythagoras' theorem, with the hypotenuse. On the formula sheet (2026 version; the 2027 sheet will have the same content).
If , then , so and . The next lesson explains this theorem using areas. For example, and give , but the point-to-line distance is still .
Worked example 5: choosing the correct distance
Question. From to a line, the perpendicular segment is , while a sloping segment is . State the distance from to the line.
Plan. Identify the perpendicular segment rather than choosing an arbitrary segment reaching the line.
Why choose ? The perpendicular reaches the nearest point on the line.
Answer. .
Check. The chosen distance is shorter than the sloping alternative.
Continue this lesson.
You’re previewing NovaLearn without an account. Create a free account to read the rest.
Create free account