3.4.2.2 - The Young Modulus
When we compare the stiffness of different materials, we need a property that does not depend on the dimensions of the sample. A thick steel cable and a thin steel wire are made of the same material, yet the cable is much harder to stretch. The Young modulus strips away the influence of length and cross-sectional area, giving us a single number that characterises how stiff a material is. In this lesson you will learn how to define, calculate, and measure the Young modulus, and how to extract it from a stress--strain graph.
1. What Is the Young Modulus?
Recall from the previous lesson that tensile stress is the force per unit cross-sectional area acting on a material, and tensile strain is the fractional change in length. For a material that obeys Hooke's law up to its limit of proportionality, stress is directly proportional to strain. The constant of proportionality is the Young modulus.
Young Modulus
The Young modulus of a material is the ratio of tensile stress to tensile strain, measured in the region where the material obeys Hooke's law. It is a measure of the stiffness of a material. The symbol used is , and the SI unit is the pascal (Pa).
Because stress has units of Pa and strain is dimensionless, the Young modulus also has units of Pa. Typical values are very large: for example, steel has a Young modulus of about Pa (210 GPa), while rubber has a Young modulus of only about GPa. A higher Young modulus means a stiffer material -- it requires more stress to produce a given strain.
Young Modulus
In the formula above, (sigma) is the tensile stress in Pa, and (epsilon) is the tensile strain (no units). This is the key definition to keep secure because it links the stiffness of a material to measurable quantities.
2. Deriving the Expanded Form
Starting from the definition:
Dividing by a fraction is equivalent to multiplying by its reciprocal:
Young Modulus (Expanded Form)
Where:
- = the applied force (tension) in N
- = the original length of the material in m
- = the cross-sectional area in m
- = the extension (change in length) in m
This expanded form is particularly useful because experiments typically measure , , , and directly. You can rearrange it to find any one of these quantities if the others are known.
3. Finding the Young Modulus from a Stress--Strain Graph
A stress--strain graph plots tensile stress () on the -axis against tensile strain () on the -axis. For a material that obeys Hooke's law, the initial portion of this graph is a straight line passing through the origin. In the graph below, notice that the gradient triangle is drawn only on the straight-line region, because that gradient gives the Young modulus before the curve bends away from proportionality.
[DIAGRAM: asset_name: 4.2.2 - The Young Modulus - Diagram 1; asset_slug: 4.2.2 - The Young Modulus - Diagram 1; recommended_method: retained_png; description: A stress--strain graph. The y-axis is labelled "Stress / Pa" and the x-axis is labelled "Strain (no units)". A straight line extends from the origin to a point labelled "Limit of proportionality", after which the curve bends. A dashed triangle is drawn on the straight-line section showing vertically and horizontally, with an annotation "Gradient = Young modulus".]
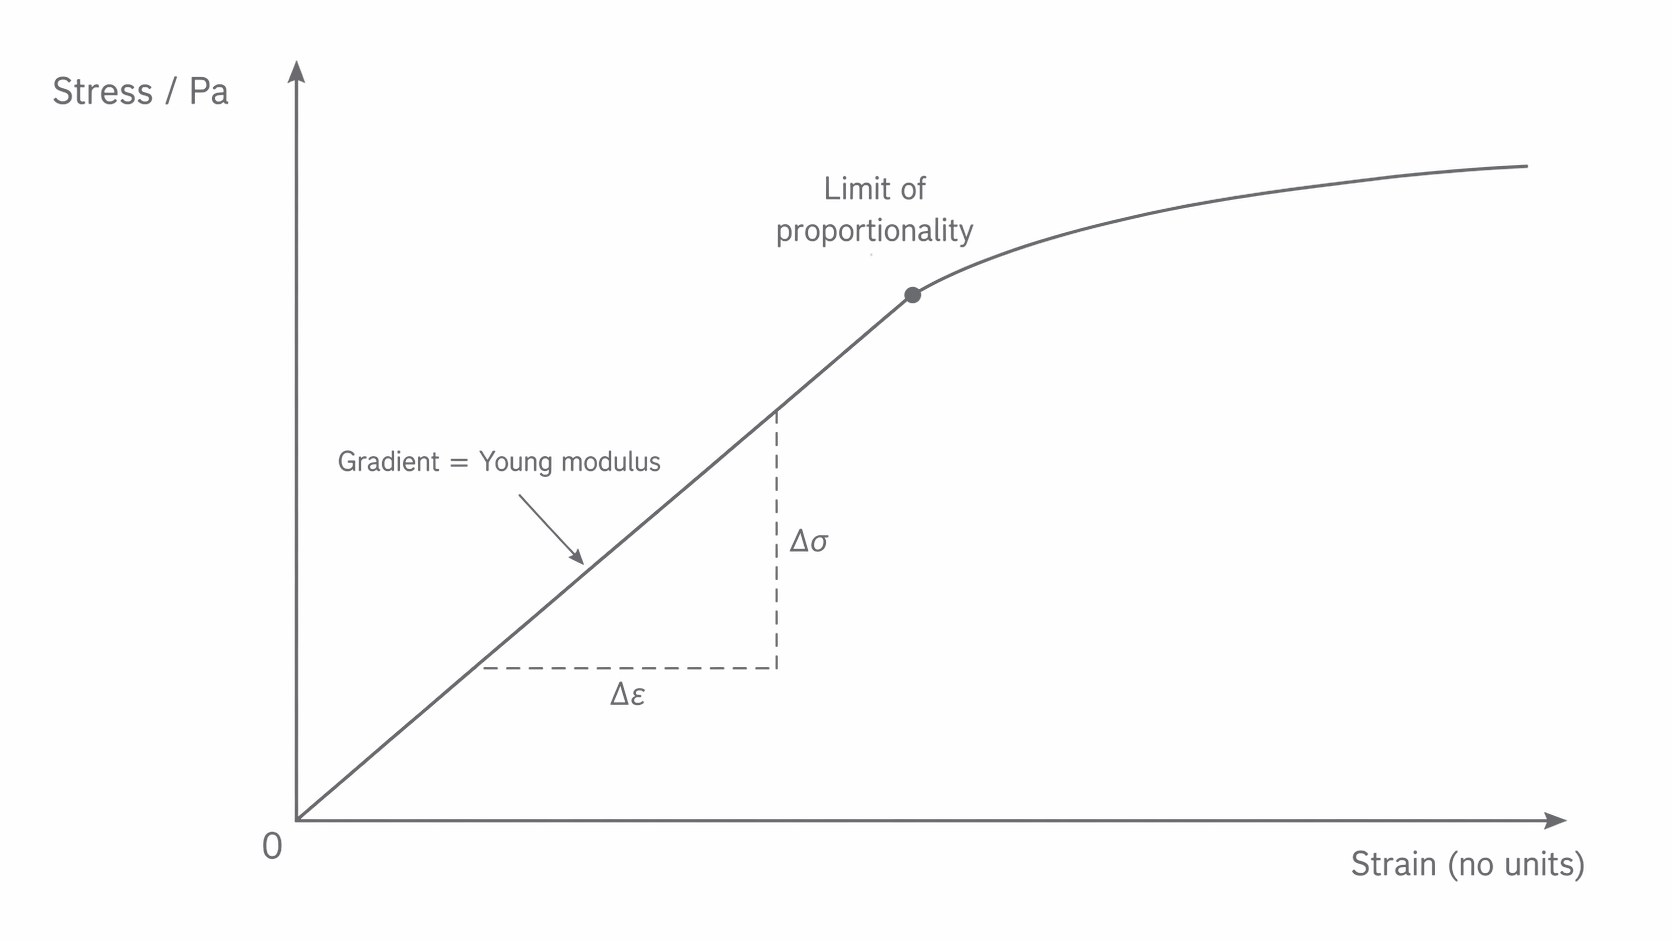
Since , the gradient of the straight-line section of the stress--strain graph equals the Young modulus.
When reading off values for the gradient:
- Choose two points that are far apart on the straight-line section to minimise percentage error.
- Do not use points beyond the limit of proportionality -- the relationship no longer holds there.
The Young modulus equals the gradient of the linear region of a stress--strain graph. This is often the most accurate way to determine because it uses many data points rather than a single measurement.
It is important to distinguish a stress--strain graph from a force--extension graph. A force--extension graph depends on the dimensions of the particular sample, whereas a stress--strain graph characterises the material itself, regardless of sample size. This is what makes the Young modulus a material property rather than a property of a specific object.
4. Measuring the Young Modulus of a Wire
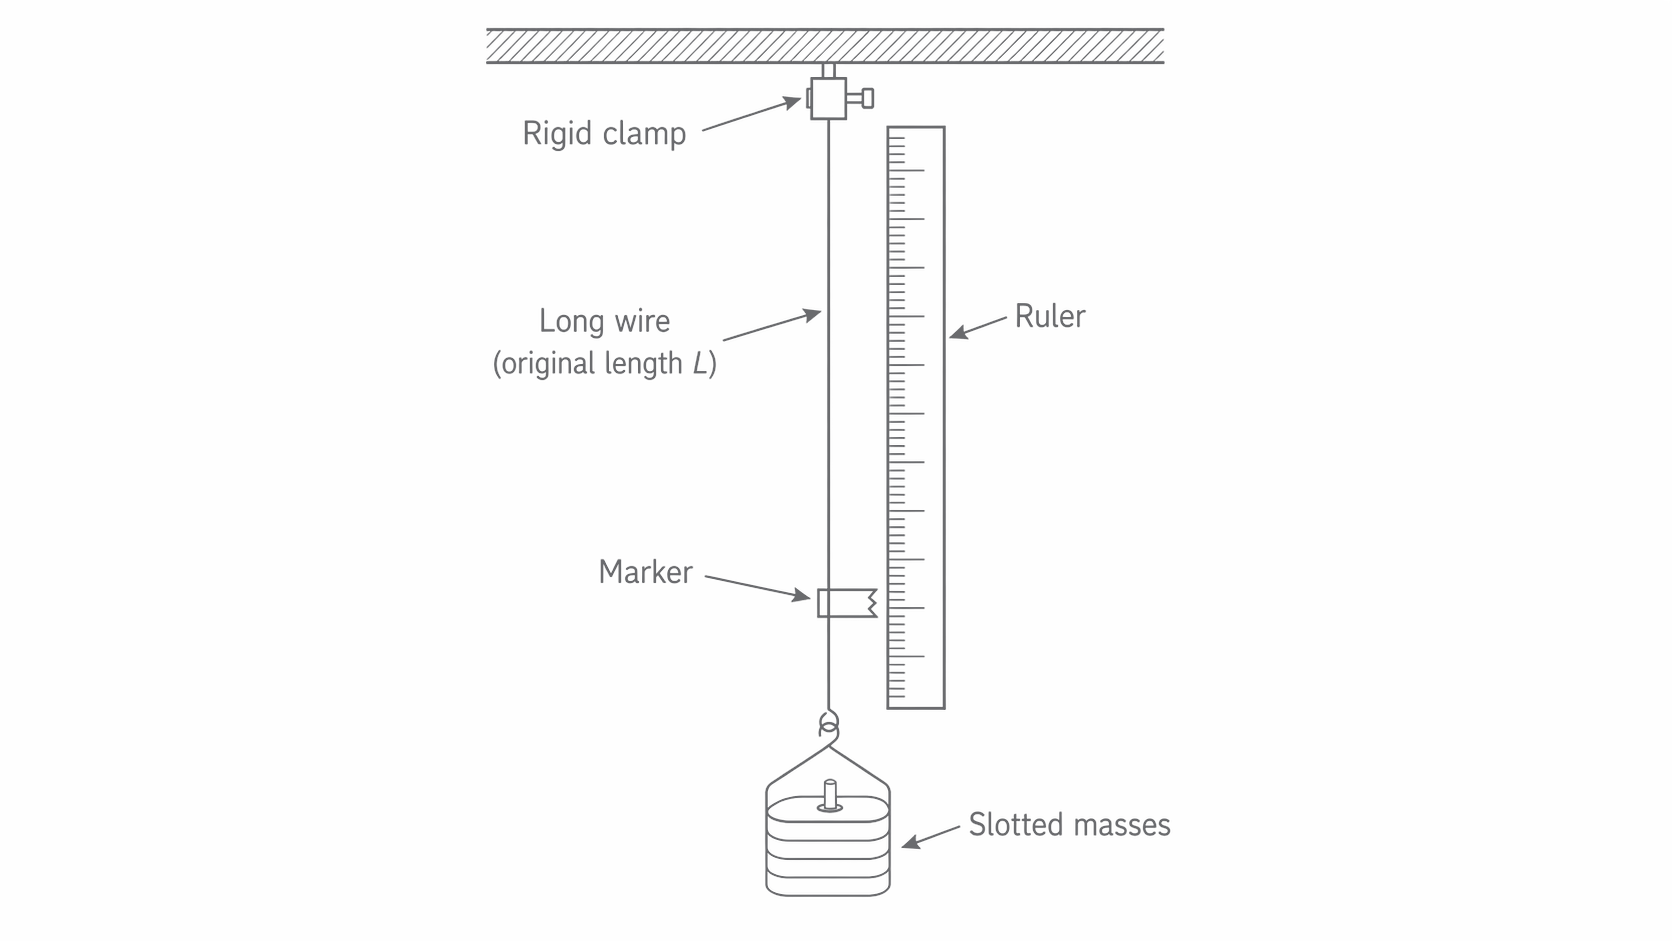
One simple method for measuring the Young modulus uses a long, thin wire loaded with known weights.
Apparatus
- A long, thin wire (e.g. copper, at least 1--2 m) clamped at one end to a rigid support.
- A ruler or metre rule fixed alongside the wire to measure extension.
- A set of slotted masses and a mass hanger attached to the lower end of the wire.
- A micrometer screw gauge to measure the diameter of the wire.
- A marker or sticky tape on the wire, level with the ruler, to read the extension.
The apparatus diagram below shows how the wire, ruler, marker, and hanging masses work together; notice that the extension is read at the marker while the load is applied vertically at the lower end.
[DIAGRAM: asset_name: 4.2.2 - The Young Modulus - Diagram 2; asset_slug: 4.2.2 - The Young Modulus - Diagram 2; recommended_method: retained_png; description: A vertical wire clamped at the top to a rigid beam. A ruler is fixed alongside the wire. A marker/tape flag is attached to the wire at a reference point near the bottom. Slotted masses hang from the lower end of the wire. Labels: "Rigid clamp" at top, "Long wire (original length )" along the wire, "Marker" at the reference point, "Ruler" alongside, "Slotted masses" at the bottom.]
Method
- Measure the original length of the wire from the clamp to the marker using a metre rule.
- Measure the diameter of the wire at several points along its length using a micrometer screw gauge. Take at least three readings at different positions and orientations, then calculate the mean diameter. The cross-sectional area is .
- Record the initial reading on the ruler at the marker position.
- Add masses to the hanger one at a time. After each addition, record the new ruler reading. The extension is the difference between the current and initial readings.
- Repeat for increasing loads, then unload and check that the wire returns to its original length (confirming you have not exceeded the elastic limit).
- Plot a graph of force (on the -axis) against extension (on the -axis). The gradient of the straight-line portion is .
- Calculate the Young modulus using:
Key Experimental Considerations
| Factor | Detail |
|---|---|
| Why use a long wire? | A longer wire gives a larger extension for a given stress, reducing the percentage uncertainty in . |
| Why measure diameter at several points? | The wire may not be perfectly uniform; averaging reduces random error. |
| Why use a micrometer? | A micrometer has a resolution of 0.01 mm, which is necessary because the diameter is small (typically < 1 mm). |
| Avoiding parallax error | Read the ruler at eye level, perpendicular to the scale. |
| Staying below the elastic limit | Ensure the wire returns to its original length on unloading. If it does not, the final data points are in the plastic region and should not be used for calculating . |
| Removing kinks | A small initial load should be applied before measurements begin to straighten the wire and remove any kinks. |
In civil engineering, the Young modulus is essential for designing structures such as bridges and skyscrapers. Engineers must ensure that steel beams and cables will not extend beyond acceptable limits under their working loads. For instance, the cables of the Humber Bridge (one of the longest single-span suspension bridges in the world) are made of high-tensile steel with a Young modulus of approximately Pa, allowing the bridge to support enormous loads with very small proportional extensions.
5. Worked Example
A steel wire of uniform diameter 0.35 mm and length 810 mm is stretched to an extension of 2.5 mm. The Young modulus of steel is Pa. Calculate (a) the tension in the wire and (b) the elastic energy stored.
Step 1: Convert all values to SI units.
- mm m
- mm m
- mm m
Step 2: Calculate the cross-sectional area.
Step 3 (a): Find the tension. Rearranging :
Step 4 (b): Find the elastic energy stored.
Notice that the elastic energy formula assumes the wire obeys Hooke's law (the force--extension graph is linear). This is valid provided the elastic limit has not been exceeded.
Now let us bring everything together by considering how the Young modulus relates to the behaviour of materials under load and unload cycles.
6. Pulling the Ideas Together
For this topic, keep three linked ideas secure. First, the Young modulus is the ratio of tensile stress to tensile strain, so it is a material property rather than a property of one particular sample. Second, on a stress--strain graph the gradient of the straight-line region is the Young modulus directly. Third, in the simple wire experiment you often measure a force--extension graph instead, so the gradient gives and must then be combined with the wire's original length and cross-sectional area:
That is the key bridge between the graph, the definition, and the practical method.
Once those three links are secure, the best final check is whether you can explain why engineers prefer the Young modulus over the spring constant when comparing materials.