75-81 - Lenses, Power, Ray Diagrams and Images
A lens is useful because it changes a bundle of rays. Sometimes it makes emergent rays actually meet, so a screen can catch a sharp real image. Sometimes it makes them spread out, so your eye sees them as if they came from a point where the emergent rays do not actually converge: a virtual image. The equations in this lesson are a compact way of predicting the same story that the rays tell.
Focal Length
Start with a beam of rays that are parallel to the principal axis. A converging lens bends those rays so they meet at the principal focus. A diverging lens spreads those rays out so they appear to have come from the principal focus on the incident side.
Focal length
The distance from the centre of a lens to its principal focus, where rays parallel to the principal axis meet (converging lens) or appear to diverge from (diverging lens).
In lens calculations, distances are measured from the lens centre.
For Edexcel's real-is-positive convention:
| Lens type | What happens to parallel rays | Sign of | Sign of |
|---|---|---|---|
| converging lens | real rays meet at the focus | positive | positive |
| diverging lens | rays appear to come from the focus | negative | negative |
The sign is not decoration. A negative focal length means the lens is diverging; it is not an impossible distance.
On an optics bench, a quick way to estimate the focal length of a converging lens is to focus a distant object onto a screen. Rays from a very distant object are nearly parallel, so the sharp image forms close to the focal plane. The screen does not create the real image; it only shows where the rays have already come together. A sharper method would measure from the lens centre to the screen, repeat the measurement, and record a sensible uncertainty based on the scale resolution and the spread of repeated readings.
For an Edexcel state what is meant by focal length response, include both the distance and the focus. "How strong the lens is" is too vague; lens strength is handled more precisely by power.
Ray Diagrams
Ray diagrams are not decorative sketches. They are a method for locating the image. Pick the top of the object, draw rays that are easy to predict, and locate the image where those rays meet or appear to meet.
[DIAGRAM: asset_name: lens construction rays; asset_slug: 022_lenses_power_ray_diagrams_images__diagram_01--physics-repaired; recommended_method: matplotlib; description: Exact converging and diverging thin-lens constructions with undeviated centre rays, correctly refracted parallel rays and virtual back-traces.]
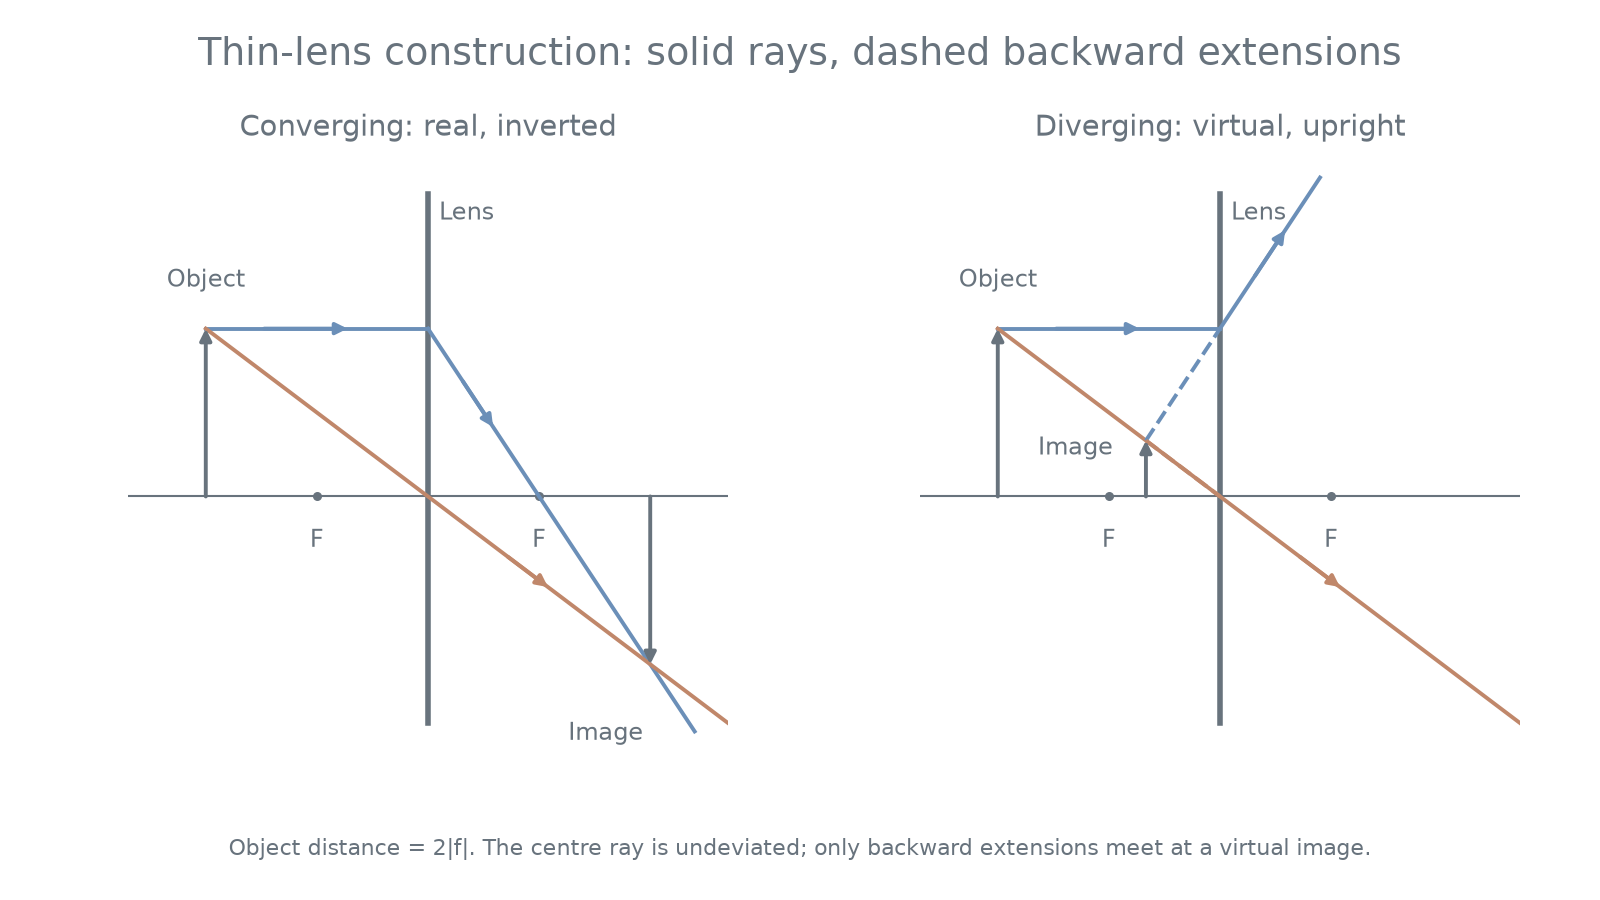
Use these construction rays:
- A ray through the centre of a thin lens continues approximately undeviated.
- For a converging lens, a ray parallel to the principal axis refracts through the focus on the far side.
- For a diverging lens, a ray parallel to the principal axis refracts as if it came from the focus on the object's side.
- A third useful ray for a converging lens goes through the near focus before the lens and leaves parallel to the axis.
Real and virtual images
A real image is formed where rays actually meet and can be shown on a screen; a virtual image is where rays only appear to come from and cannot be formed on a screen.
If emergent rays meet, the image is real. It can be formed on a screen, and for a single converging lens with the object beyond the focal length it is inverted. If only dashed back-traced rays meet, the image is virtual. The emergent rays do not actually converge at the virtual image position, but your eye can still receive them and interpret them as coming from that position.
Misconception contrast: the image is not automatically at the focal point. The focal point is where initially parallel rays meet or appear to come from. The image position depends on object distance as well as focal length.
For Edexcel draw or complete ray-diagram marks, the construction matters: a centre ray, a correctly refracted parallel ray, sensible dashed extensions for virtual rays, an image position from ray intersection, and arrows showing light direction where requested.
Draw these cases on paper as an ungraded construction check, using the two rays above and equal scales on each side: an object beyond gives a diminished real inverted image between and ; at it gives an equal-size image at ; between and it gives an enlarged real image beyond . At , emergent rays are parallel and there is no finite image distance. Inside , a converging lens gives an upright enlarged virtual image. A diverging lens with a real object gives an upright diminished virtual image between the lens and its near focus. Use the figure to check ray intersection and arrow direction; describing the rules alone is not a drawing check.
Lens Power
A lens with a short focal length bends rays more strongly than a lens with a long focal length. Lens power makes that idea quantitative:
Power of a lens
: power (dioptre, D = m⁻¹); : focal length in metres, positive for converging and negative for diverging lenses (real-is-positive).
The metre matters. If is in centimetres, convert before using .
Worked example 1:
A converging lens has focal length . Calculate its power.
Decision point: the equation needs in metres.
Then:
The positive answer matches the physical lens: it is converging.
Worked example 2:
A diverging lens has focal length . Calculate its power.
Convert first:
Then:
The negative power is not a mistake. It tells you the lens is diverging.
For Edexcel calculate, show the conversion, substitution, answer and unit. A common lost mark is calculating and calling that dioptres; that used centimetres as if they were metres.
Continue this lesson.
You’re previewing NovaLearn without an account. Create a free account to read the rest.
Create free account