Biology 1.6 - Observing cells
Prepare and observe onion and cheek-cell slides, calculate magnification and cell size, and record evidence in labelled scientific drawings. Evaluate the preparation and sampling choices that affect your observations.
Magnification calculations
Microscope lenses and a drawing have related but distinct magnifications. Magnification is a ratio, so it has no length unit.
Total microscope magnification
The objective forms a magnified image, which the eyepiece magnifies again.
Lens magnification
A eyepiece and objective give , written . Do not add the lens powers.
Image or drawing magnification
Image magnification
Use the same length unit before dividing. A drawing of an cell has image size . Therefore , or . Check: .
To find actual size, divide image size by magnification. A cell measuring on a micrograph is actually long. The actual object is smaller than its magnified image.
To find image size, multiply. A structure at has image length . Checking recovers the magnification.
An image's printed magnification only applies at its stated reproduction size. Resizing it changes image magnification. A scale bar resized with the image is therefore a more dependable size reference.
Core practical: preparing cell slides
The purpose is to prepare and observe a thin plant-cell specimen and a thin animal-cell
specimen, identify only the structures that are visible, estimate cell size, and make
labelled scientific drawings.
Useful apparatus includes a compound light microscope and lamp, clean slides and coverslips,
forceps, pipettes, a mounted needle or clean toothpick, paper towel, a transparent ruler,
onion bulb epidermis, iodine solution, a sterile cheek swab or spatula, methylene blue and
disinfectant.
This is primarily an observational comparison, not an investigation of how one variable
causes another to change. There is no manipulated independent variable when each slide is
simply observed. If the observations are compared, specimen type is the comparison variable;
the recorded outcomes are visible structures, cell arrangement and estimated size. For a
fair comparison of apparent detail, keep the microscope, total magnification, illumination,
field-selection rule and approximate specimen thickness as consistent as possible. The two
stains are deliberately different because they suit different specimens; stain identity is
not a controlled variable.
[DIAGRAM: asset_name: Biology 1.6 - Light microscope; asset_slug: biology_1_3_1_6_microscopes_scale_and_cell_observation__diagram_01; description: Labelled compound light microscope: eyepiece, rotating nosepiece, objectives, stage and clips, glass slide with coverslip, light source, coarse and fine focus controls.]
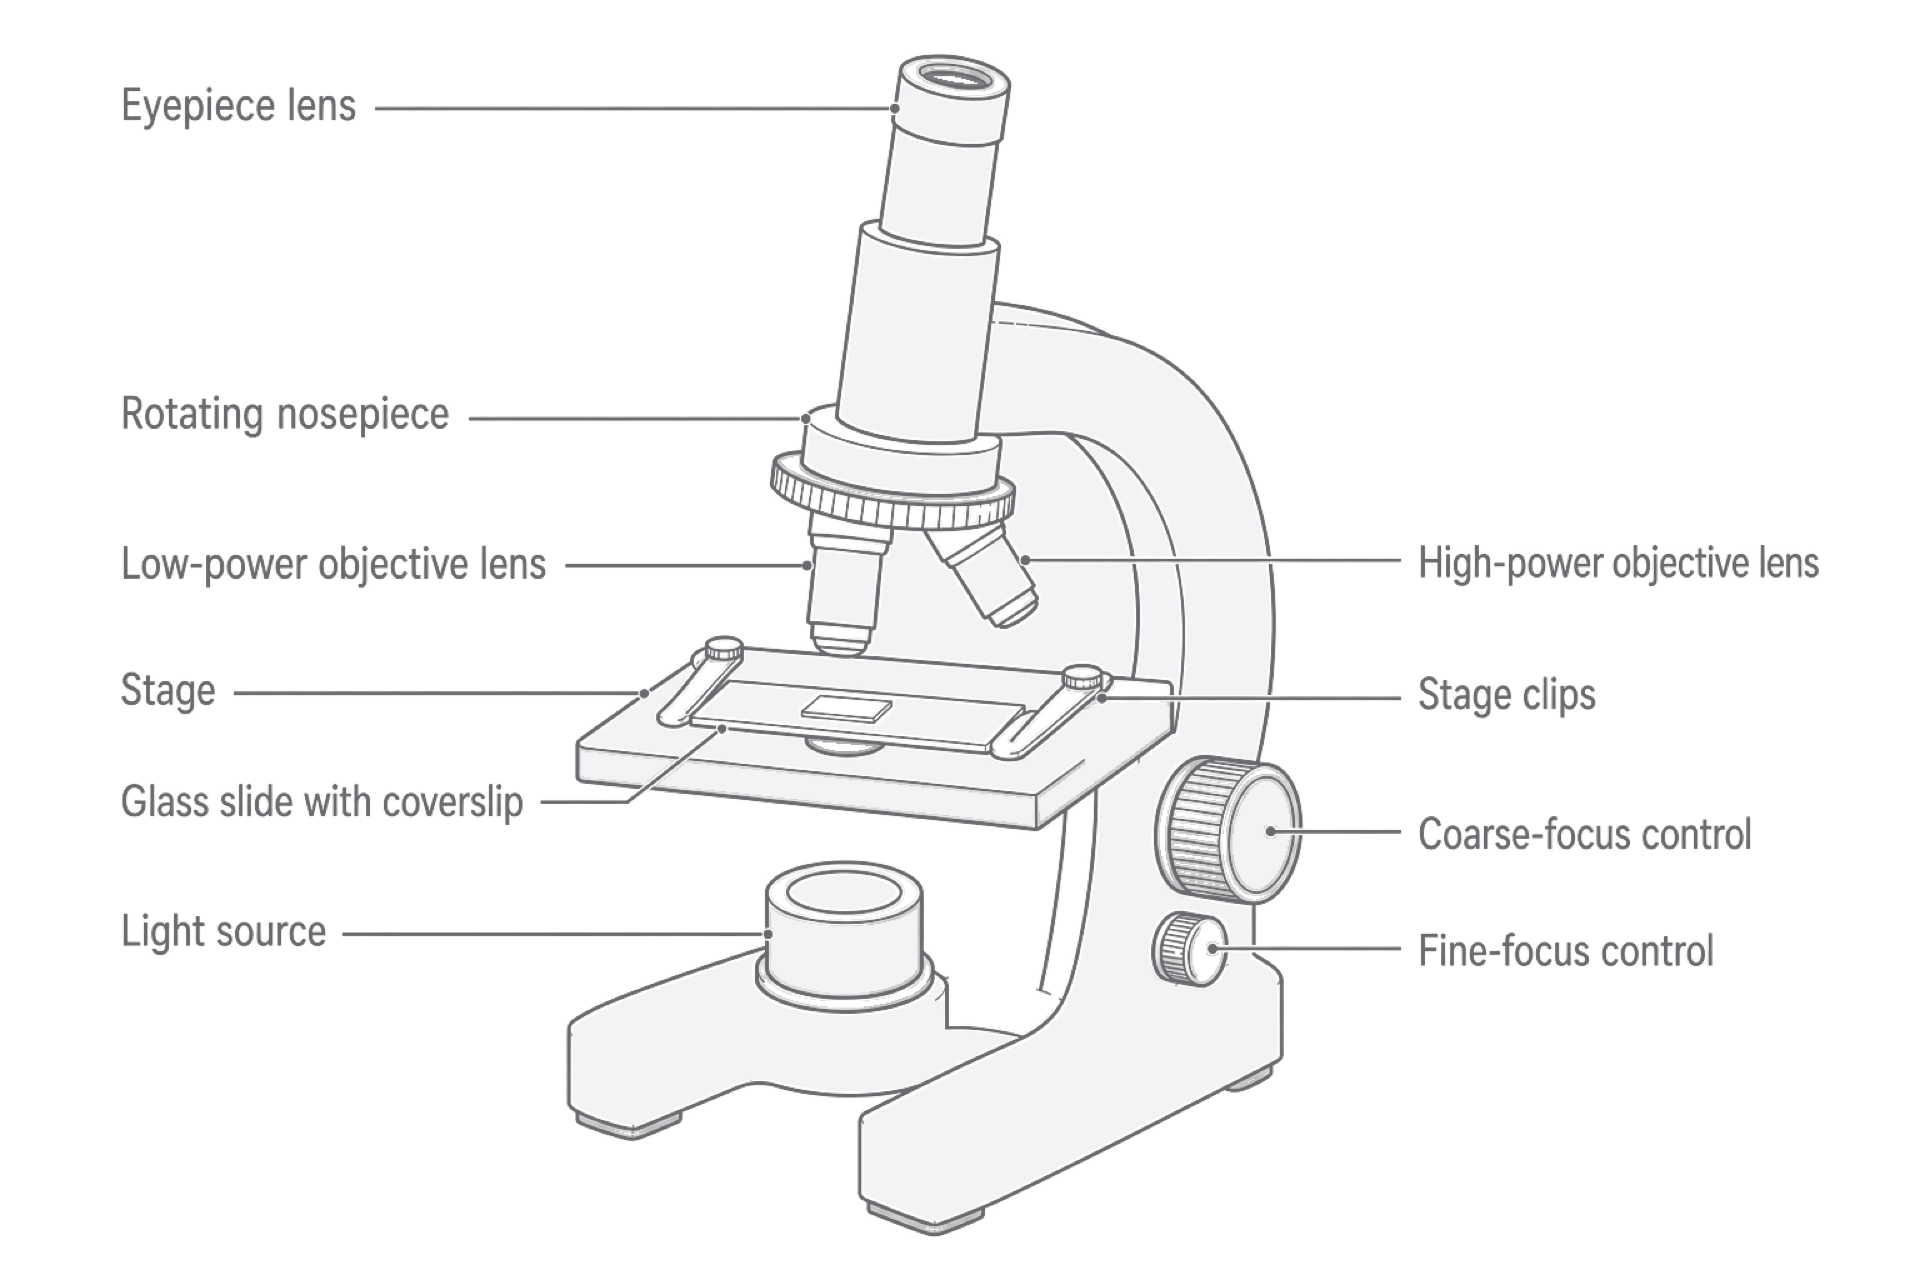
Preparing onion epidermis
- Put on eye protection. Add one small drop of dilute iodine solution to the centre of a
clean slide. - Use forceps to peel a very small piece of the transparent epidermis from the inside of an
onion-bulb layer. A thin, single layer lets light pass through and prevents cells hiding
one another. - Lay the epidermis flat in the iodine drop. The stain increases contrast, making some
structures easier to distinguish. - Touch one edge of a coverslip to the drop. Support it at about 45 degrees with a mounted
needle, then lower it slowly. Air is pushed ahead of the descending edge instead of being
trapped as bubbles. - Touch paper towel to liquid outside the coverslip to remove excess without pressing on the
glass.
Preparing cheek cells
- Place a small drop of water on a second clean slide.
- Gently stroke the inside of your own cheek with one sterile swab or spatula to collect
loose cells. Do not scratch the tissue and never share the sampler. - Stir the sampled end in the water drop, then place it immediately in disinfectant or the
teacher's designated biological-waste container. - Wearing eye protection and gloves, add one small drop of methylene blue. This increases
contrast; cheek-cell nuclei usually stain dark blue. - Lower a coverslip from about 45 degrees and blot only excess liquid, as for the onion
slide.
Hazards, routes and controls
| Hazard | How harm could occur | Proportionate control |
|---|---|---|
| iodine or methylene blue | splashes can irritate eyes/skin and stains can spread | wear eye protection; use a small pipetted drop; wear gloves as directed; clean splashes promptly |
| slide or coverslip | thin glass can break and cut skin | hold by the edges; do not press; report breakage and use the designated broken-glass procedure |
| cheek sampler | saliva and cells can transfer microorganisms | use only your own sterile sampler; never share; place it directly in disinfectant/waste; wash hands |
| objective lens and slide | the lens can strike and crack the slide during focusing | begin on low power; watch from the side while bringing lens and slide close; never allow contact |
Focusing, observing and recording
Using the microscope
- Rotate the lowest-power objective into place and switch on or position the lamp. Low
power gives the widest field, so the specimen is easier to locate. - Secure the slide on the stage and centre the stained specimen over the light opening.
- Looking from the side, use coarse focus to bring the objective close to the coverslip
without touching it. Then look through the eyepiece and move the lens and slide slowly
apart until the image appears. Sharpen it with fine focus. - Adjust illumination so boundaries are distinct rather than washed out. Centre a useful
region before changing objective. - Record the eyepiece power, objective power and calculated total magnification. Measure the
low-power field diameter with a transparent ruler, or use a field diameter supplied for
that microscope. - Move to the next objective for more detail. At high power use fine focus only, because the
working distance between objective and coverslip is small. - Observe at least three non-overlapping fields and several cells in each. Record folded
tissue, bubbles or damaged cells rather than silently treating them as typical.
Increasing objective power narrows the field of view and usually reduces brightness. It may
make already resolved detail easier to inspect, but a larger image is not evidence of higher
resolution by itself.
What may be observed
| Specimen | Direct observations likely under a school light microscope | Interpretation limits |
|---|---|---|
| onion-bulb epidermis | many adjoining, regularly arranged cells; clear cell-wall boundaries; stained nuclei in some cells; cytoplasm and a large clear central region may be distinguishable | label only visible features; onion-bulb epidermis is not expected to contain visible chloroplasts |
| cheek epithelium | separate or overlapping flattened cells with irregular outlines; pale cytoplasm; dark-stained nuclei; outer cell boundaries | no cell wall is present; very small organelles such as ribosomes cannot be resolved |
An observation is what the image directly shows, such as a dark oval region. Naming that
region as a nucleus is an interpretation, supported by its staining and position. If a
structure is not visible, it may be too small, have too little contrast, lie outside the focal
plane or be absent from that specimen. "Not seen" does not automatically mean "not present."
Scientific drawings from observations
A scientific drawing records evidence rather than decorating it.
- Draw two or three representative adjacent cells large enough to show their proportions.
- Use a sharp pencil and single, clear, continuous lines. Do not sketch repeatedly, colour or
shade. - Draw only structures actually observed; do not turn the view into a memorised ideal cell.
- Give the specimen a title. Use ruled, uncrossed label lines without arrowheads; each line
must touch the feature it identifies. - State the total microscope magnification and, where available, an estimated size or scale.
Do not claim the drawing's page size is the microscope's total magnification.
A useful results table is:
| Specimen and field | Eyepiece | Objective | Total magnification | Field diameter / µm | Approximate cells across | Estimated cell width / µm | Visible structures |
|---|---|---|---|---|---|---|---|
Make estimates in several fields because cells vary and edge cells may be only partly
visible. Report the spread of estimates or a representative mean, and keep the raw field
counts so another person can judge the result.
Putting a size on the observation
Suppose the field diameter is and about ten cells span it. Estimate cell width as . Repeating this in different fields reveals natural variation and reduces dependence on one unusual field. Average the separate width estimates; keep the raw counts and field diameter.
Evaluating microscope evidence
Evaluation should connect a specific limitation to its effect and then to a change that
addresses that effect.
| Limitation | Effect on evidence | Targeted improvement |
|---|---|---|
| epidermis is folded or several cells thick | cells overlap, less light passes through and boundaries become ambiguous | peel a smaller, thinner inner epidermal strip and flatten it before lowering the coverslip |
| air is trapped under the coverslip | black-edged circles hide cells and may be mistaken for structures | touch one coverslip edge to the drop and lower it slowly from about 45 degrees |
| stain is excessive or inconsistent | detail may be too dark, pale or hard to compare | use the same small measured drop for repeats and blot excess from the coverslip edge |
| only one field is selected | a damaged or unusual group of cells may not represent the specimen | use a stated field-selection rule and sample several non-overlapping fields |
| cell width is estimated from a rough count | partial edge cells and natural size variation increase uncertainty | estimate several cells across several fields and compare the values; use the correct field diameter for each objective |
| the light microscope cannot resolve a very small feature | extra magnification produces a larger blur, not new structural evidence | use an instrument with higher resolution, such as electron microscopy, when that detail is necessary |
Repeating fields improves repeatability by showing whether similar observations can be
made again. Keeping magnification and illumination consistent improves the validity of a
comparison. A known field diameter and clearly located boundaries improve the likely
accuracy of a size estimate. These improvements solve different problems, so "repeat it"
is not a complete response to every limitation.