2.1.1(b)-(d) - Light microscope slide preparation, staining and drawings
This lesson teaches how a microscope observation becomes reliable evidence: prepare a thin slide, use stains sensibly, measure with calibrated scale, then communicate only what is visible. The focus is practical microscopy, not electron microscopy or organelle ultrastructure.
Preparing A Slide
A light microscope works by passing visible light through, or reflecting light from, a specimen. For most cell work, the specimen must be thin enough for light to pass through and flat enough for structures to stay in one focal plane.
A common wet mount route is:
- Put a small, thin sample in a drop of water or mounting fluid on a clean slide.
- Lower a coverslip at an angle using a mounted needle.
- Blot away excess liquid.
- Start with low power, focus, then move to higher power only when the specimen is centred.
[DIAGRAM: slide_preparation_staining_measurement: Lesson 013: Light microscope slide preparation, staining and measurement - diagram 01; asset_slug: 013_m02_1_1_light_microscope_slide_preparation_staining_and_drawings__diagram_01; recommended_method: drawn_biology; description: Deterministic sequence showing thin sample, angled coverslip, stain drawn under the coverslip, and calibrated graticule measurement.]
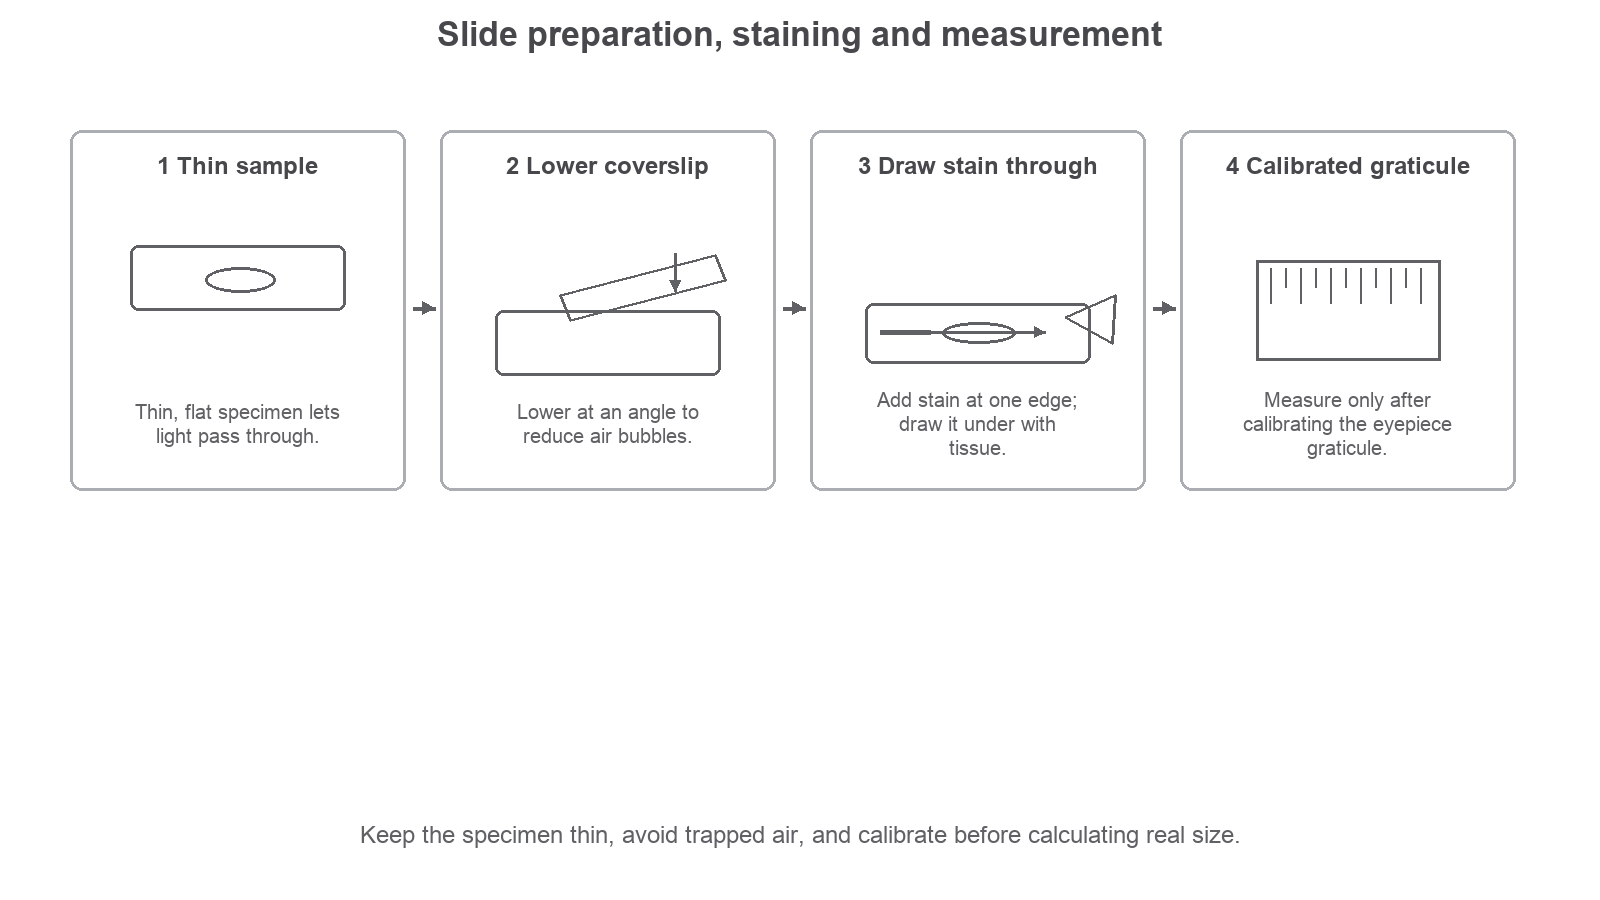
Each step controls an artefact. A thick sample gives overlapping structures. A trapped air bubble can look like a circular cell part. Dust, fingerprints and excess stain can all create false evidence.
Using Stains
Many cells are almost transparent under a light microscope. A stain increases contrast, so boundaries and cell components are easier to distinguish. Staining is useful evidence, but it can alter or kill cells, so a stained slide is not always evidence of a living state.
Differential staining uses more than one staining effect to distinguish different cellular components or cell types. The important idea is not to memorise a catalogue of stains. It is that different parts of cells can take up stains differently because they contain different molecules or have different structures.
Useful examples:
| Staining idea | What it helps with | OCR-safe interpretation |
|---|---|---|
| A stain taken up by nuclei | locating cells and cell stages | darker-stained regions may identify nuclei |
| A differential stain in tissue | distinguishing cell types or tissue areas | different colours/intensities can support identification |
| Too much stain | obscures detail | method quality matters as much as adding dye |
When explaining a stain, link the method to evidence: "stain increases contrast so the structure can be distinguished", not just "stain makes it visible".
Calibrating Measurements
An eyepiece graticule is a scale in the eyepiece. Its divisions have no fixed real size until calibrated. A stage micrometer has a known scale, usually in micrometres, so it can be used to find the real size represented by one eyepiece graticule division for a particular objective lens.
Calibration route:
- Place the stage micrometer on the microscope stage.
- Focus using the objective lens that will be used for the specimen.
- Align the eyepiece graticule with the stage micrometer scale.
- Calculate the value of one eyepiece graticule unit.
- Replace the stage micrometer with the specimen slide and measure the specimen in graticule units.
Calibrating A Graticule
With the x40 objective, 50 eyepiece graticule divisions line up with 200 micrometres on the stage micrometer.
Value of one eyepiece division:
A cell is 18 eyepiece divisions wide.
Actual width:
The answer is 72 micrometres.
The calibration must be repeated if the objective lens changes, because the image size changes but the eyepiece scale stays physically the same.
Drawing Observations
A biological drawing is a scientific record, not an artwork. It should represent what is observed, not what a textbook says ought to be there.
[DIAGRAM: biological_drawing_conventions: Lesson 013: OCR-safe biological drawings from microscope observations - diagram 02; asset_slug: 013_m02_1_1_light_microscope_slide_preparation_staining_and_drawings__diagram_02; recommended_method: drawn_biology; description: Deterministic comparison of low-power tissue plan and high-power cell drawing, with scale bars, ruled labels and drawing-quality checklist.]
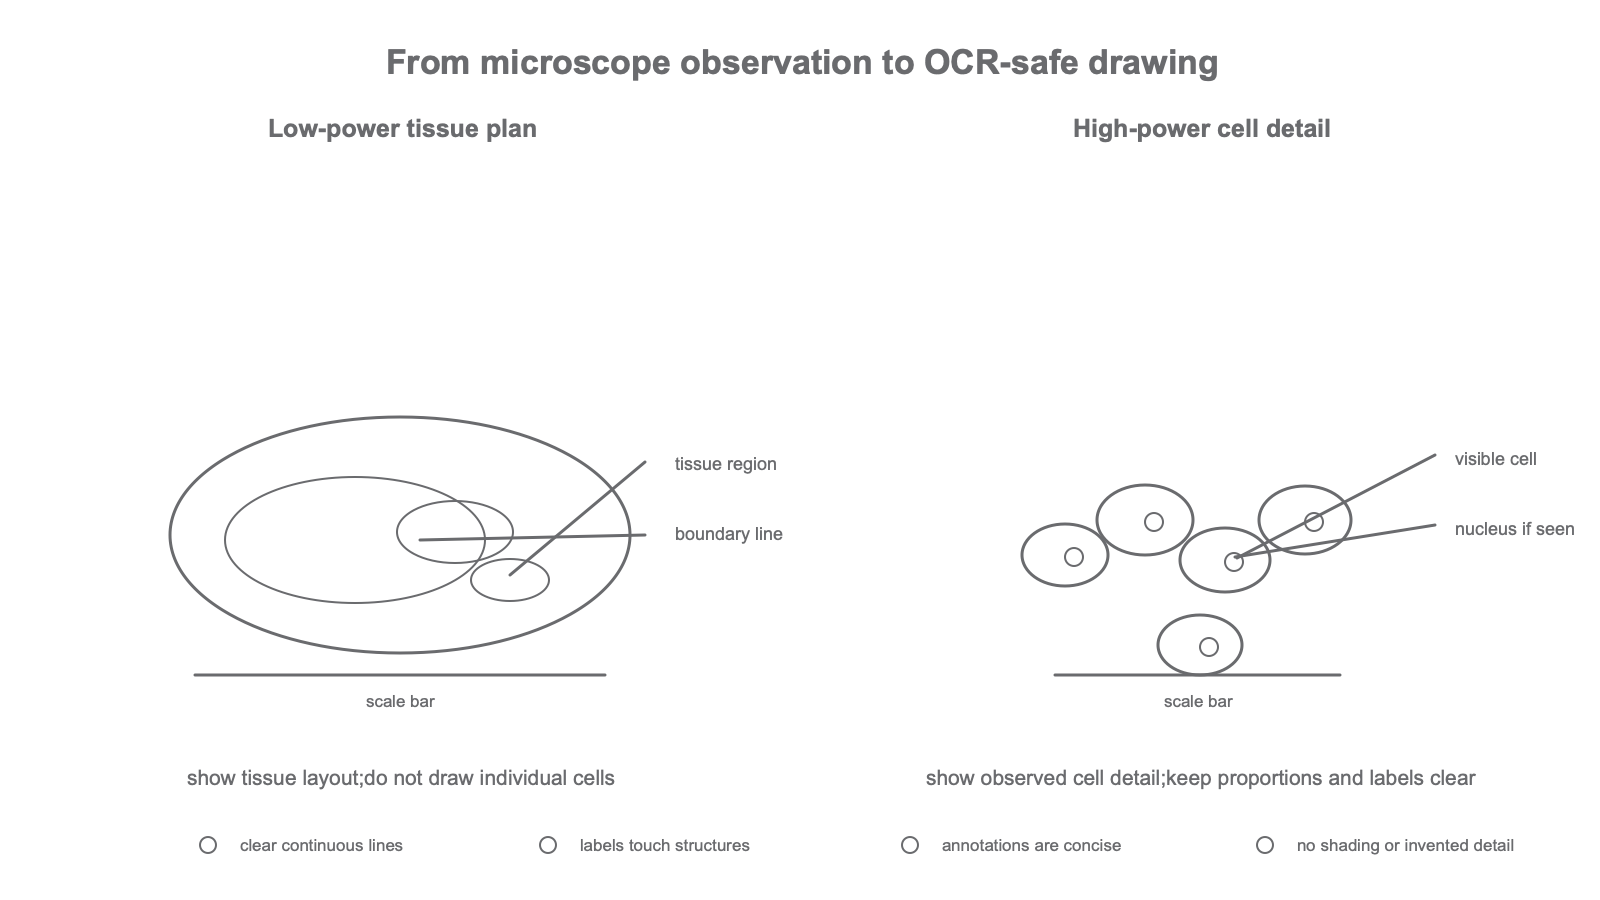
Low-power tissue plans show the distribution and boundaries of tissues. They should not include individual cell detail. High-power drawings may show individual cells and visible cell structures.
Good drawing conventions:
| Feature | Good practice | Common error |
|---|---|---|
| Lines | clear, single, continuous outlines | sketchy or shaded lines |
| Proportion | relative sizes match the view | enlarged favourite structures |
| Labels | horizontal labels with ruled lines touching the structure | crossed label lines or floating labels |
| Scale | scale bar or calibrated size | total magnification alone |
| Detail | only visible structures | invented organelles |
| Annotation | short note about an observed feature | long explanation of theory |
Practical Judgement
Microscopy evidence is strongest when method, scale and drawing all agree. A good answer separates what was done, what was observed and what can be concluded.
Use this routine:
- Method: is the specimen thin, clean, stained appropriately and focused?
- Scale: was a calibrated graticule or scale bar used?
- Observation: which visible features support the label?
- Communication: does the drawing show observed structure without invented detail?
Practical Judgement Summary
A microscope slide is evidence only if the specimen is prepared well, contrast is interpreted cautiously, measurements are calibrated, and drawings record what was actually seen.
Explain It Back
Use this as a self-explanation check after the section above. It is for diagnosing what you can already explain, not for learning new material from scratch.