4.1.1.2b - Microscopy of Plant and Animal Cells
In this required practical, you use a light microscope to observe plant and animal cells, then record what you see as a clear labelled scientific drawing. AQA can assess the method, the apparatus, safe focusing, drawing conventions, magnification scale, and estimates of relative size or area. The key discipline is simple: observe first, then record only what the evidence supports.
What This Practical Must Show
The aim is to use a light microscope to observe a selection of plant and animal cells, then draw and label them accurately. This is not an investigation into a cause-and-effect relationship, so there is no usual independent variable. The evidence is the quality of your observations, drawings, labels and scale information.
Light microscope
A microscope that uses visible light and lenses to magnify a specimen so that cells and some larger sub-cellular structures can be observed.
For AQA, this practical links to two apparatus and technique skills: using appropriate apparatus to record length and area, and using a microscope to make observations and produce labelled scientific drawings. It also links to maths skills because you may need to estimate the relative size or area of structures inside a cell.
You should be able to recognise which structures are visible in your specimen. In many school light microscope observations, you may see the cell wall in plant cells, the cell membrane, cytoplasm and nucleus. Chloroplasts are visible only in suitable green plant cells. Very small structures such as ribosomes are not visible with a school light microscope, so you must not invent them on a drawing.
Prepare and Focus the Microscope
If your teacher gives you prepared plant and animal slides, place one slide on the microscope stage and secure it with clips if they are present. If you prepare a simple plant slide, use a thin layer of tissue such as onion epidermis, add a drop of stain if instructed, and lower the coverslip gently at an angle to reduce air bubbles. Animal cell observations are often made from prepared slides; do not collect cheek cells unless your teacher has given a specific risk-assessed method.
[DIAGRAM: asset_name: microscope_set_up_and_focusing - diagram 1; asset_slug: 003_4_1_1_2b_required_practical_1_microscopy_of_cells_diagram1; file: diagram_assets/imagegen_regen_all/003_4_1_1_2b_required_practical_1_microscopy_of_cells_diagram1_imagegen.png; recommended_method: codex_image_gen; description: Monochrome labelled light microscope schematic showing eyepiece, objective lens, stage, slide, light source, coarse focus and fine focus, plus a safe low-power-to-high-power focusing sequence.]
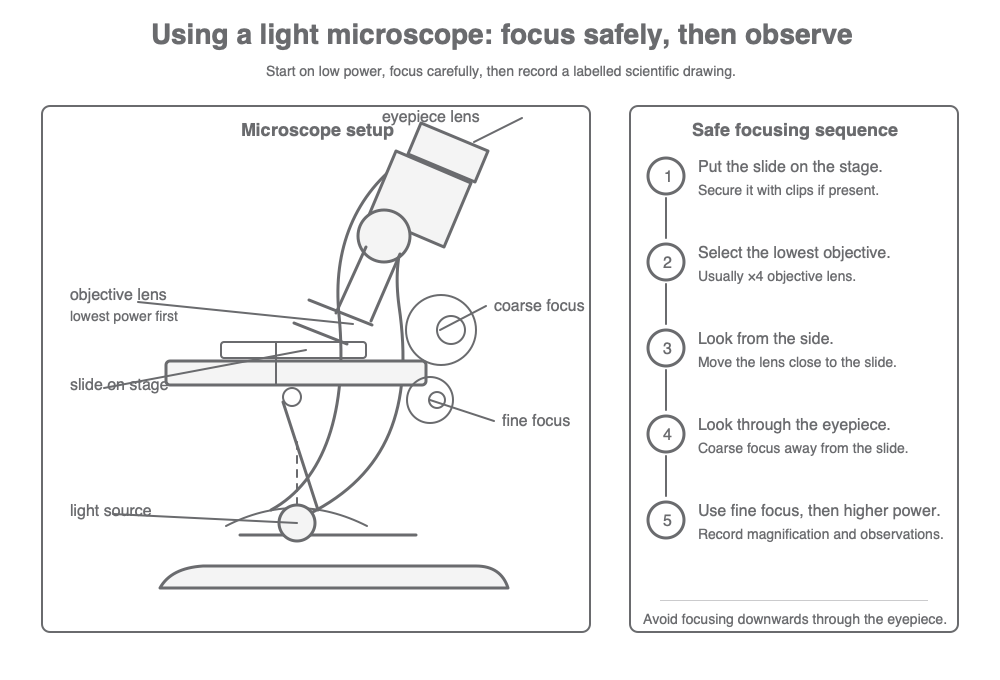
Start with the lowest-power objective lens. Look from the side while moving the objective close to the slide, then look through the eyepiece and turn the coarse focus so the objective moves away from the slide until the image appears. Use the fine focus to sharpen the image. Only then should you move to a higher-power objective, using fine focus again.
Handle glass slides and coverslips carefully because broken glass can cut skin. Wear eye protection if using stains such as iodine or methylene blue, keep stains away from skin and eyes, and clean spills as instructed. Carry the microscope with two hands and keep lenses away from the slide to avoid damaging the lens or breaking the coverslip.
Make a Scientific Drawing
A scientific drawing is a record of an observation, not an art task. Use a sharp pencil or clear digital line style. Draw large enough to show detail, use single clear lines, do not shade, and do not sketch over the same line repeatedly. Labels should be outside the drawing with ruled label lines that touch the structure being labelled.
[DIAGRAM: asset_name: scientific_cell_drawing_with_scale_bar - diagram 2; asset_slug: 003_4_1_1_2b_required_practical_1_microscopy_of_cells_diagram2; file: diagram_assets/imagegen_regen_all/003_4_1_1_2b_required_practical_1_microscopy_of_cells_diagram2_imagegen.png; recommended_method: codex_image_gen; description: Monochrome example of animal and plant cell scientific drawings with clear labels, no shading, and labelled example scale bars.]
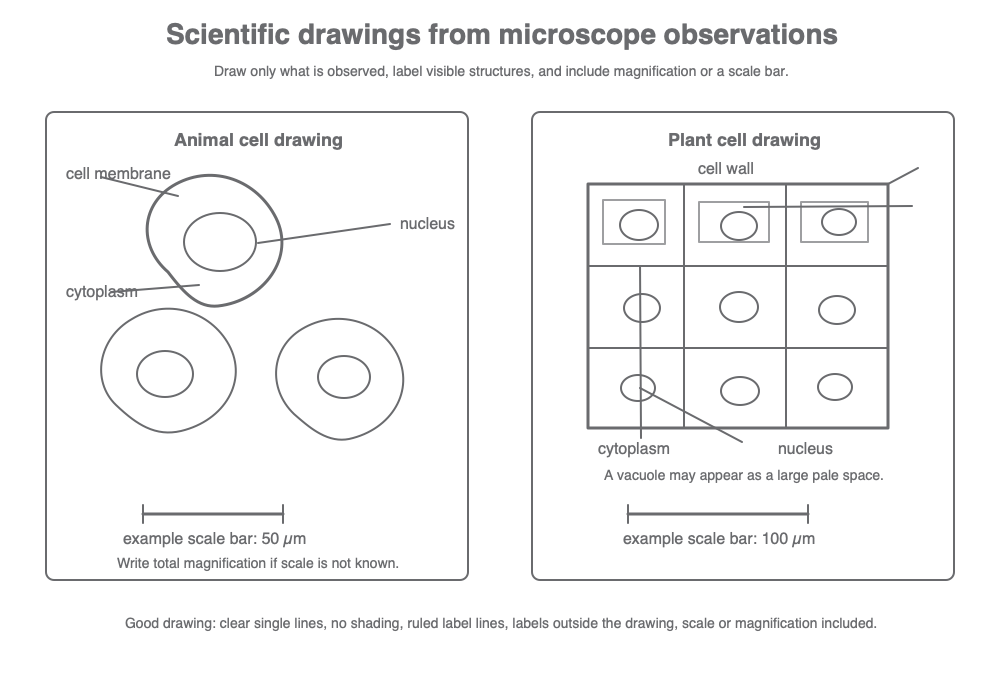
Only label structures that are visible or can be identified confidently from the specimen. For example, an onion epidermis cell may show a cell wall, cytoplasm, nucleus and a large vacuole area if stained clearly. An animal cell may show the cell membrane, cytoplasm and nucleus. If a structure is not visible, do not label it just because you know cells contain it.
The drawing should also include scale information. In class, this may be recorded as the total microscope magnification used, such as eyepiece × objective lens, and where a known distance has been measured it should be shown as a labelled scale bar. A scale bar is useful because it stays meaningful even if the image or drawing is resized.
A good microscopy drawing is evidence: clear lines, accurate labels, no invented detail, and scale or magnification information.
Scale and Size Estimates
For this practical, magnification information is part of the observation record. The total microscope magnification used for the observation comes from the eyepiece and objective lens combination, for example ×10 eyepiece with ×40 objective gives a ×400 observation. Record the magnification used, or include a labelled scale bar when you have reliable scale information.
The rest of the record should make clear what was visible: specimen name, the cells or structures observed, the labels you can justify, and any scale information. A labelled scale bar is especially useful because it lets someone interpret size from the drawing without needing to know how large the drawing appears on their screen or page.
Estimating relative size or area is different from finding an exact size. If a nucleus is about one fifth of the cell's width, you can state that it is roughly 0.2 of the cell width. If a vacuole appears to take up about half the cell length and half the cell width, its area is roughly 1/2 × 1/2 = 1/4 of the visible cell area. These are estimates, so give sensible approximate language such as "about", "roughly" or "approximately".
Improve Validity and Avoid Exam Mistakes
A valid microscopy record represents the specimen clearly and honestly. For comparisons between plant and animal cells, keep the comparison fair by recording the same type of information: specimen name, total magnification, visible labels, and scale information. If estimating cell size, measure several cells in clear focus and calculate a mean where possible. Ignore a damaged, folded, overlapping or badly focused cell only if you can explain why it is not representative.
Control the preparation quality as far as possible. Use a thin specimen so light can pass through it, keep the coverslip flat, avoid trapping air bubbles over the cells being observed, and use enough light to see the cell boundaries without washing out detail. If stain is used, use it consistently for the observations being compared.
Common exam mistakes are easy to avoid:
- Saying "zoom" instead of using the term magnification.
- Drawing thick, shaded or artistic cells instead of clear biological lines.
- Labelling structures that could not be seen.
- Forgetting the magnification scale, scale bar or clear units on scale information.
- Describing a method without explaining how it prevents lens damage or improves the observation.
After this practical, a strong written answer should be able to connect apparatus, method and evidence. For example, "Use the lowest-power objective first" is not just a method step; it helps locate the specimen and reduces the risk of the objective lens hitting the slide. "Include a scale bar" is not decoration; it lets another person interpret the real size of the observed cells.