3.1.1.3 - Electron Configuration
Electron configurations let us describe exactly where electrons are in an atom, while ionisation energy data lets us test whether that description makes sense. In this lesson, you will build electron configurations for atoms and ions up to krypton and then use first and successive ionisation energies to explain why chemists know shells and sub-shells really exist.
Shells, sub-shells, and orbitals
Electrons occupy main energy levels, often called shells. Within each shell there are sub-shells, and within each sub-shell there are orbitals. For this specification, the important sub-shells are s, p, and d.
Atomic orbital
A region of space that can hold up to two electrons with opposite spins.
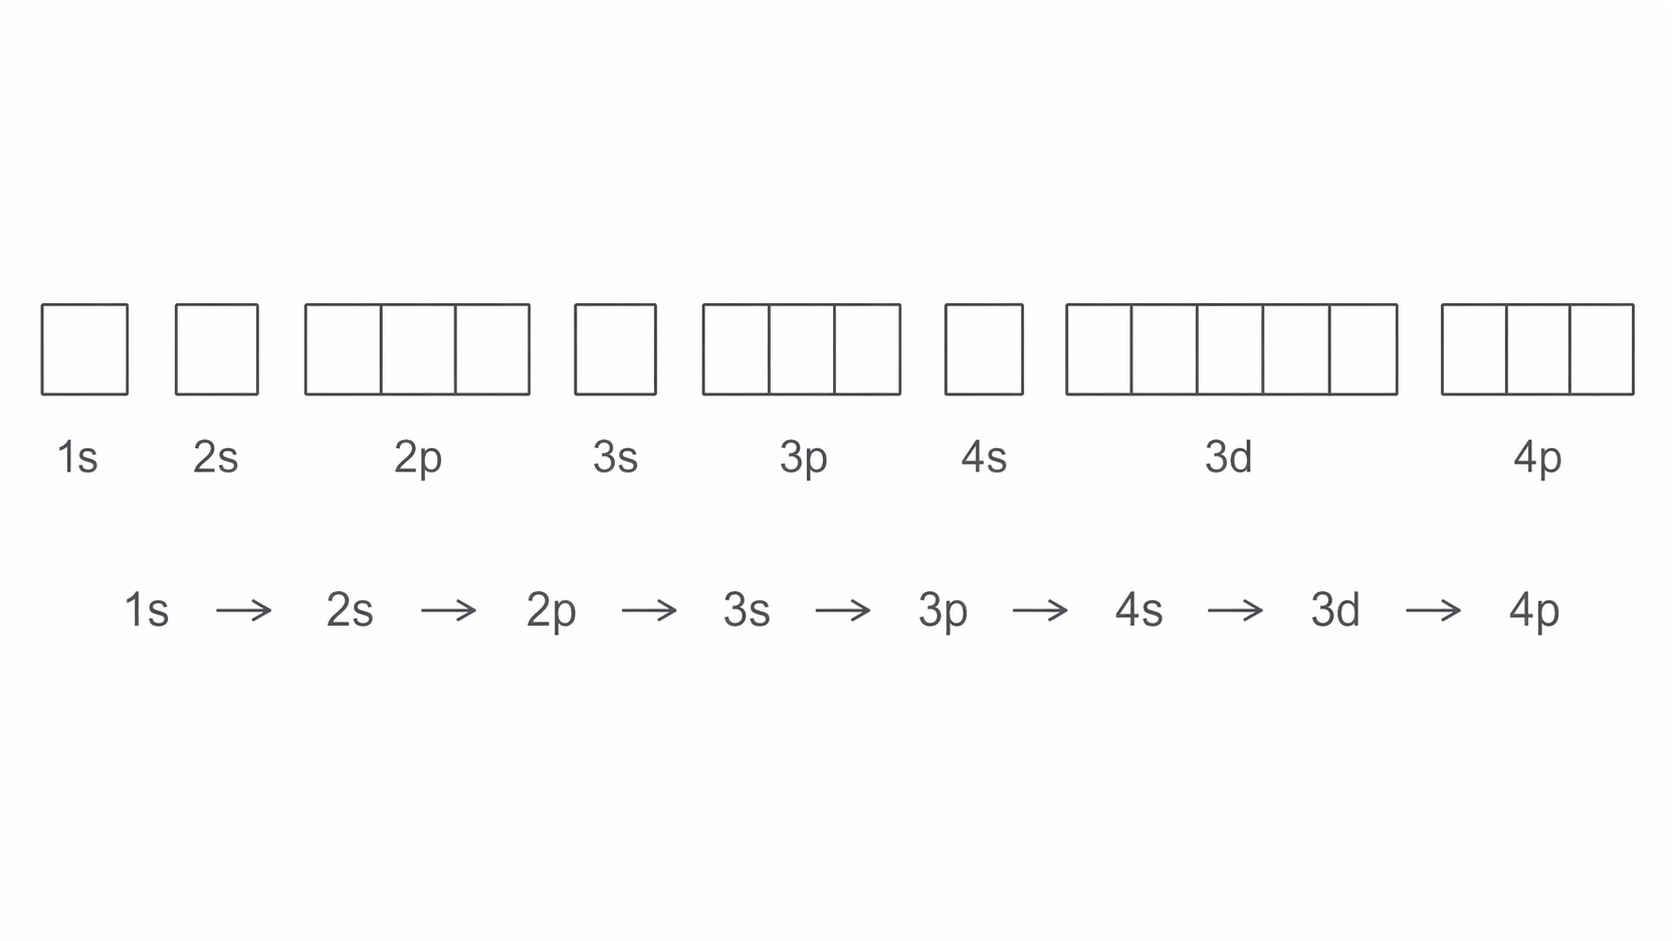
An s sub-shell contains 1 orbital, so it can hold 2 electrons. A p sub-shell contains 3 orbitals, so it can hold 6 electrons. A d sub-shell contains 5 orbitals, so it can hold 10 electrons. Up to Z = 36, the filling order you need is:
1s -> 2s -> 2p -> 3s -> 3p -> 4s -> 3d -> 4p
This order matters because electrons fill the lowest available energy orbital first. Orbitals of the same energy fill singly before pairing, and no orbital can hold more than two electrons.
The diagram below lays out the orbital boxes and the filling order up to 4p.
[DIAGRAM: asset_name: 1.1.3 - Electron Configuration - Diagram 1; asset_slug: 1.1.3 - Electron Configuration - Diagram 1; recommended_method: retained_png; description: Clean orbital box-filling diagram for A-level chemistry. Arrange eight empty sub-shell box groups in one horizontal row from lowest to highest energy in this exact order: 1s, 2s, 2p, 3s, 3p, 4s, 3d, 4p. Show each s sub-shell as 1 empty box, each p sub-shell as 3 adjacent empty boxes, and the d sub-shell as 5 adjacent empty boxes. Label every sub-shell clearly beneath its boxes and add a filling-order sequence underneath reading exactly 1s -> 2s -> 2p -> 3s -> 3p -> 4s -> 3d -> 4p.]
For example:
- Sodium,
Z = 11:1s^2 2s^2 2p^6 3s^1 - Calcium,
Z = 20:1s^2 2s^2 2p^6 3s^2 3p^6 4s^2 - Vanadium,
Z = 23:1s^2 2s^2 2p^6 3s^2 3p^6 3d^3 4s^2 - Krypton,
Z = 36:1s^2 2s^2 2p^6 3s^2 3p^6 3d^10 4s^2 4p^6
You should be able to translate between shell language and sub-shell language. Calcium is 2,8,8,2 in shells, but 1s^2 2s^2 2p^6 3s^2 3p^6 4s^2 in sub-shell notation.
A useful detail here is the order: for neutral atoms, 4s is filled before 3d.
Writing configurations for ions
To write the electron configuration of an ion, start from the neutral atom and then add or remove electrons.
For negative ions, add electrons to the next available orbital:
- Chloride ion,
Cl-:1s^2 2s^2 2p^6 3s^2 3p^6 - Oxide ion,
O^2-:1s^2 2s^2 2p^6
For positive ions, remove electrons from the outer shell first. That means the electrons in the highest main energy level are lost first.
- Sodium ion,
Na+:1s^2 2s^2 2p^6 - Calcium ion,
Ca^2+:1s^2 2s^2 2p^6 3s^2 3p^6
This rule is especially important for transition-metal ions. Although 4s fills before 3d in a neutral atom, the 4s electrons are removed first when the ion forms because they are in the outer shell.
Worked example: iron has the neutral configuration 1s^2 2s^2 2p^6 3s^2 3p^6 3d^6 4s^2. Therefore Fe^2+ is 1s^2 2s^2 2p^6 3s^2 3p^6 3d^6, not 3d^4 4s^2.
Start by working out how many electrons the ion actually has, then write the configuration. The proton number stays the same, but the charge changes the electron count.
First and successive ionisation energies
Ionisation energy is about removing electrons from gaseous species.
First ionisation energy
The energy required to remove one electron from each atom in one mole of gaseous atoms to form one mole of gaseous 1+ ions.
So the first ionisation energy of sodium is represented by:
Na(g) -> Na+(g) + e-
Successive ionisation energies remove more electrons from the ions formed:
- second ionisation energy:
Na+(g) -> Na2+(g) + e- - third ionisation energy:
Na2+(g) -> Na3+(g) + e-
Each successive ionisation energy is usually larger than the one before it because the same nucleus is attracting fewer electrons. The ion becomes more positive, the remaining electrons are held more strongly, and more energy is needed to remove the next one.
A very large jump between two successive ionisation energies is the key pattern to spot. It means the next electron would come from a lower shell, closer to the nucleus.
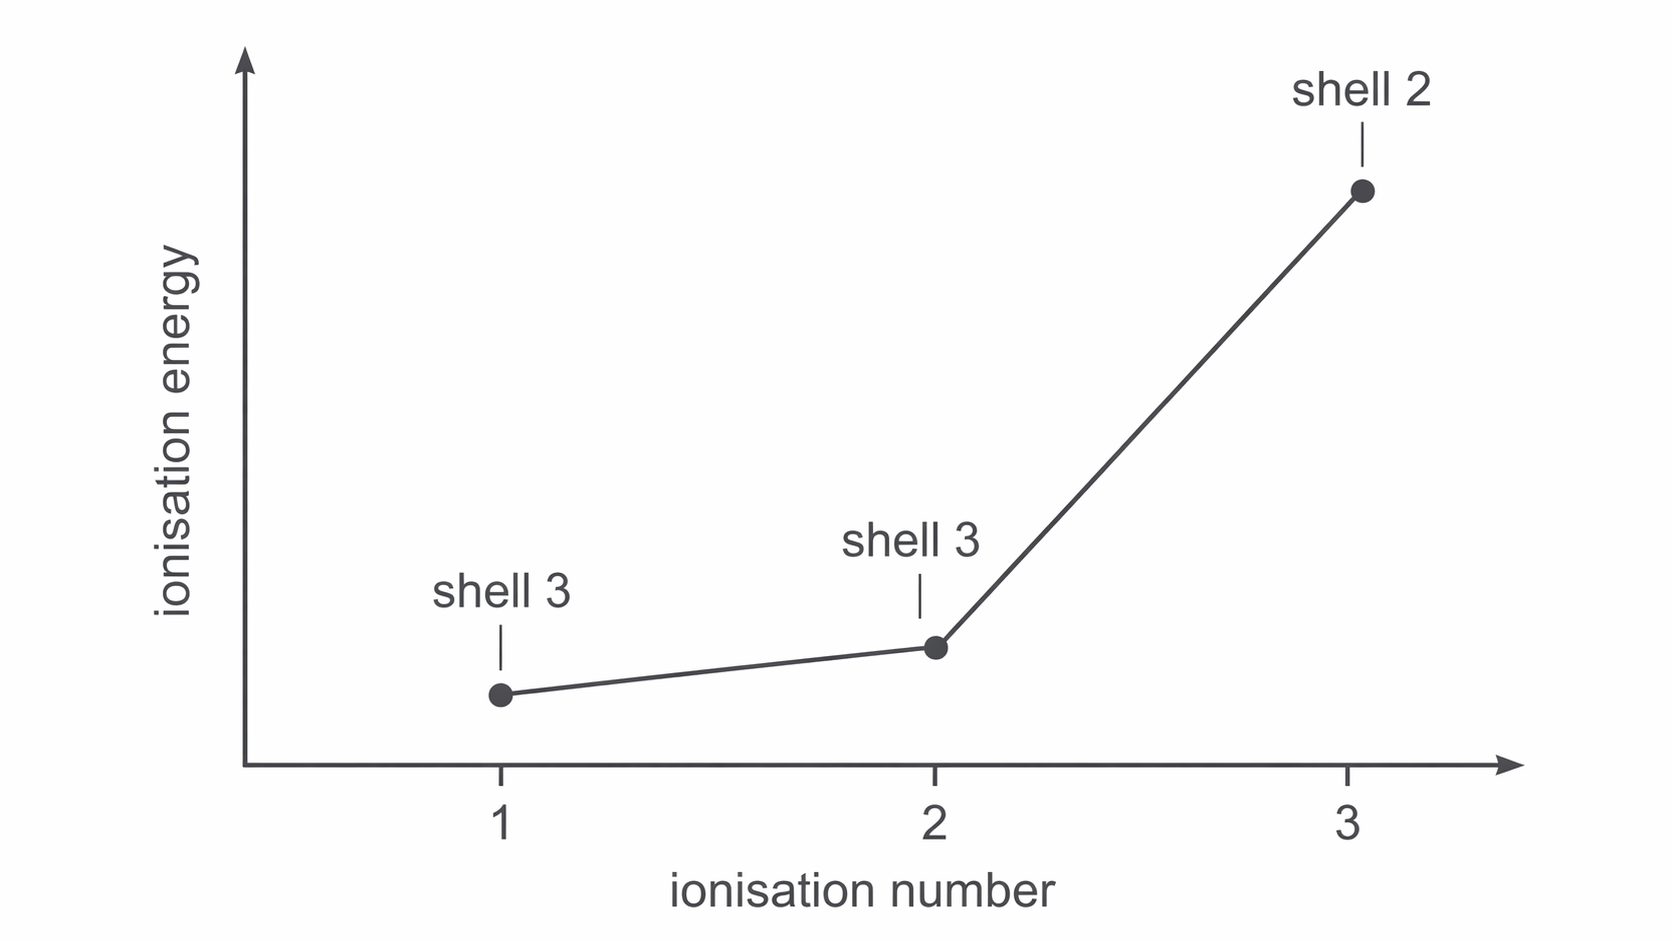
Worked example: magnesium has configuration 1s^2 2s^2 2p^6 3s^2. Its first two electrons are removed from the 3s sub-shell, but the third electron would have to come from the n = 2 shell. So there is a large jump between the second and third ionisation energies.
This is how successive ionisation energy data gives evidence for shells: large jumps show when you start removing electrons from a new shell.
Evidence for shells from data
Successive ionisation energies are powerful because they let you work backwards to an electron arrangement. If an atom shows a very large jump after the second ionisation energy, it has two outer electrons. That is exactly what you expect for a Group 2 element.
For sodium, the huge jump after the first ionisation energy shows that sodium has one outer electron. The next eight electrons are much harder to remove because they are in the second shell, and the final two are hardest of all because they are in the first shell. That pattern supports the shell arrangement 2,8,1.
For magnesium, a huge jump after the second ionisation energy supports 2,8,2. Across Period 3, the position of the big jump changes from Na to Ar because the number of outer-shell electrons changes across the period.
The diagram below shows that characteristic jump for magnesium very clearly.
[DIAGRAM: asset_name: 1.1.3 - Electron Configuration - Diagram 2; asset_slug: 1.1.3 - Electron Configuration - Diagram 2; recommended_method: retained_png; description: Simple three-point line graph of successive ionisation energies for magnesium. Label the y-axis ionisation energy and the x-axis ionisation number, with tick marks 1, 2, and 3 only. Plot a low first point, a slightly higher second point, and a dramatically higher third point so the large jump after the second ionisation energy is obvious. Annotate the first and second points as shell 3 and the third point as shell 2.]
First ionisation energies down Group 2 also support the idea of shells. From Be to Ba, the first ionisation energy decreases overall even though nuclear charge increases. The reason is that the outer electron is in a higher shell each time, so it is further from the nucleus and more shielded by inner electrons.
That means Group 2 first ionisation energy data is evidence that electrons occupy different main energy levels, not all the same distance from the nucleus.
You can use the same logic in reverse: find the big jump, then count how many electrons were removed before it.
So, successive ionisation energy patterns tell you how electrons are grouped into shells, while Group 2 first ionisation energy trends show that outer electrons sit in shells of increasing distance and shielding.
Evidence for sub-shells in Period 3
Across Period 3, first ionisation energy increases overall from Na to Ar because proton number increases while electrons are added to the same main shell. The attraction between the nucleus and the outer electron becomes stronger, so more energy is usually needed to remove it.
However, the graph is not perfectly smooth, and those small dips matter. They are evidence for sub-shells and electron pairing.
The diagram below combines the overall Period 3 trend with the two structural explanations for the dips.
[DIAGRAM: asset_name: 1.1.3 - Electron Configuration - Diagram 3; asset_slug: 1.1.3 - Electron Configuration - Diagram 3; recommended_method: retained_png; description: Combined Period 3 first-ionisation-energy teaching plate. Main graph with the x-axis labelled Na, Mg, Al, Si, P, S, Cl, and Ar and the y-axis labelled first ionisation energy; show an overall rise from sodium to argon with visible dips at aluminium and sulfur. Add a top-right inset comparing Mg 3s and Al 3p, with Al 3p drawn slightly higher in energy than Mg 3s. Add a bottom-right inset with orbital boxes for P 3p^3 and S 3p^4, showing phosphorus as three singly occupied p orbitals and sulfur as one paired orbital plus two singly occupied orbitals.]
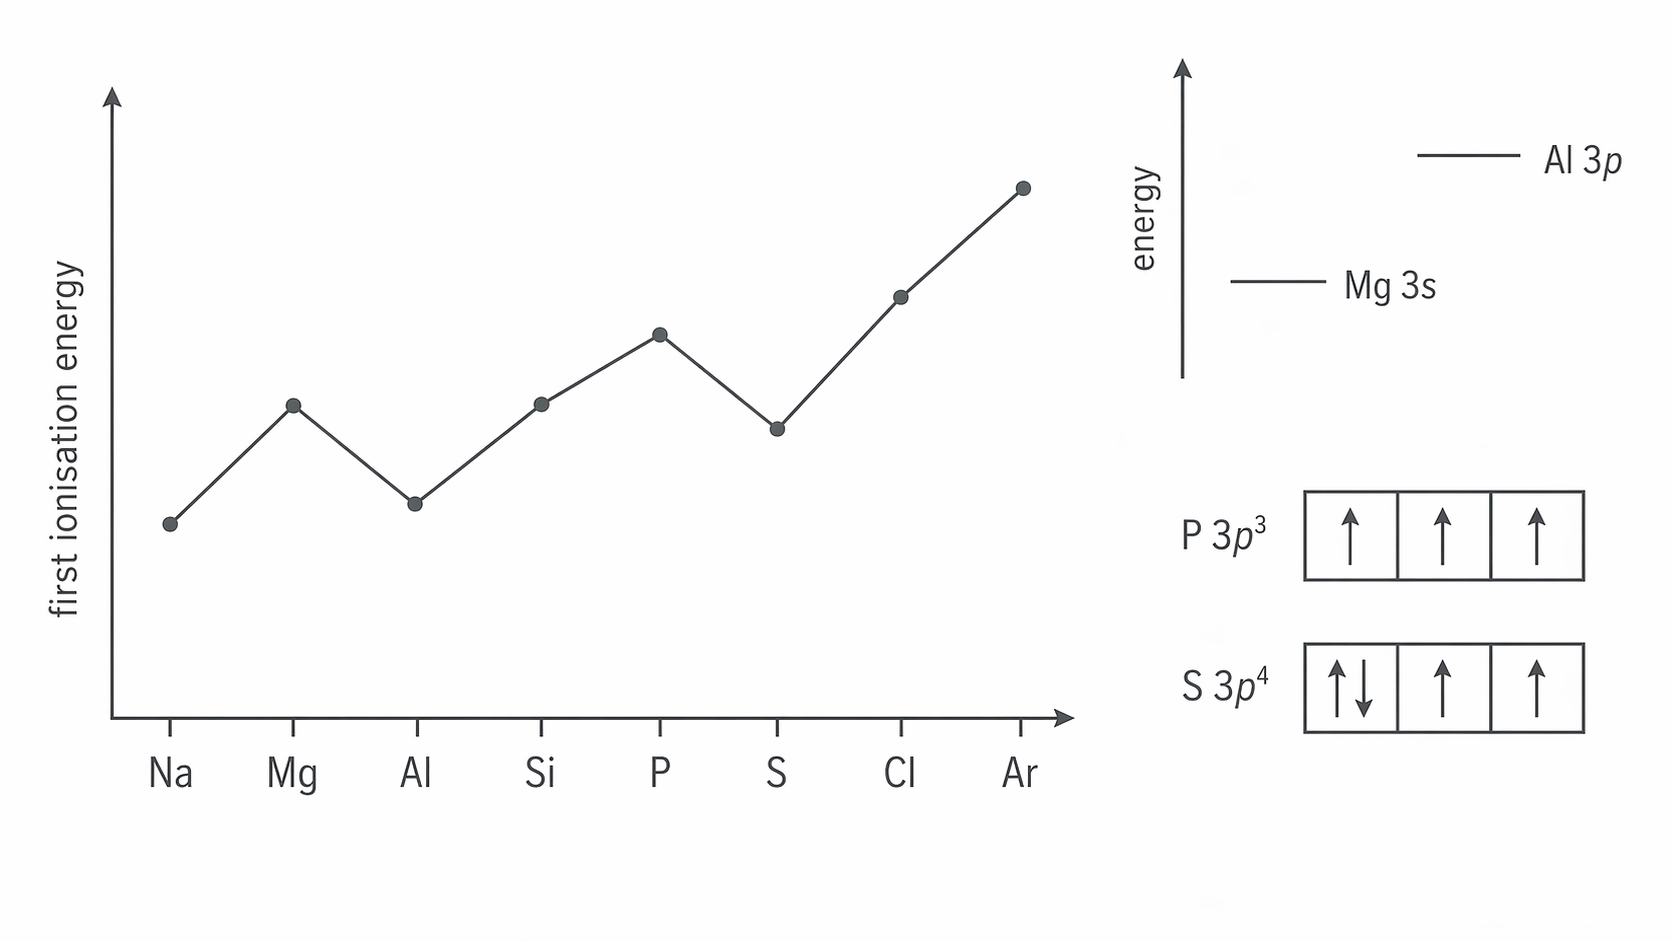
The first dip is from magnesium to aluminium. Magnesium ends in 3s^2, but aluminium ends in 3p^1. A 3p electron is in a higher-energy sub-shell than a 3s electron, so it is easier to remove. That is why aluminium has a lower first ionisation energy than magnesium.
The second dip is from phosphorus to sulfur. Phosphorus has 3p^3, with one electron in each 3p orbital. Sulfur has 3p^4, so one 3p orbital contains a pair of electrons. Repulsion between paired electrons makes one of them slightly easier to remove, so sulfur has a lower first ionisation energy than phosphorus.
These two anomalies are important evidence:
- the Mg to Al dip shows that
3sand3pare different sub-shells with different energies - the P to S dip shows that electrons can pair within an orbital and that this affects the energy needed to remove one
Putting the whole topic together: electron configurations predict where electrons are, and ionisation-energy data tests that model. Large jumps in successive ionisation energies show shells, while the small dips across Period 3 show sub-shells and pairing effects.