3.6 - Extracting DNA from fruit
Follow a fruit DNA extraction from broken tissue to a visible precipitate. Explain what each step does, what to keep after filtering, and why the collected material is a crude DNA-containing extract.
3.6 — Releasing DNA from fruit cells
An individual DNA molecule is much too small to see in a school extraction. The method releases DNA from many fruit cells, removes large pieces of tissue and then makes many DNA molecules collect together. Pearson requires this method knowledge in 3.6, although it is not designated as a core practical.
Use a soft fruit such as strawberry or kiwi fruit and follow the stages in order.
1. Mash the fruit with salt solution and detergent.
Mashing breaks up the fruit tissue and exposes many cells to the extraction solution. The detergent disrupts the cell membranes and the membranes around the nuclei, releasing DNA into the liquid. Salt helps the released DNA molecules clump together when alcohol is added later.
2. Filter the mixture.
Pour the mixture through filter paper in a funnel. Large insoluble pieces of fruit remain on the paper as the residue. The liquid that passes through is the filtrate; this is the part to keep because it contains the released DNA.
3.6 — Precipitating and collecting DNA
3. Layer ice-cold ethanol onto the filtrate.
Pour the filtrate into a tube, tilt the tube and gently run ice-cold ethanol down its side. This forms a separate alcohol layer instead of immediately mixing the liquids. DNA does not dissolve in ethanol, so it leaves the liquid and precipitates: a solid forms from the solution. Ice-cold ethanol helps DNA become insoluble and collect as a visible precipitate.
4. Observe and collect the precipitate.
White or cloudy, stringy material appears where the ethanol and filtrate meet. A glass rod can be turned gently at this boundary to spool the material. The visible strings contain very many DNA molecules clumped together; they are not one enlarged DNA molecule. This is a crude DNA-containing extract and may also contain other substances from the cells, so it should not be described as purified DNA.
[DIAGRAM: asset_name: 3.4-3.6 - DNA, genes and extraction - diagram 02; asset_slug: edexcel-gcse-biology-3-4-3-6-fruit-dna-extraction; recommended_method: image_gen; description: An original left-to-right monochrome textbook process schematic of the complete fruit DNA extraction. Show five clearly separated stages with directional arrows: soft fruit being mashed with labelled salt solution and detergent; the mixture poured through filter paper in a funnel with solid fruit residue retained and DNA-containing filtrate collected; the filtrate transferred to a tilted test tube; ice-cold ethanol poured slowly down the tube wall to make a separate upper layer; and white stringy DNA-containing precipitate labelled at the interface and spooled with a glass rod. Include the labels keep the filtrate, ice-cold ethanol, DNA-containing precipitate, and ethanol: highly flammable - no naked flames. Use a white background, #6A6B6E linework and text, and minimal neutral fills. Exclude exact quantities, heating, protease, Bunsen burners, centrifuges, electrophoresis, microscopic DNA strands, photorealism, copied Pearson layouts and decorative equipment.]
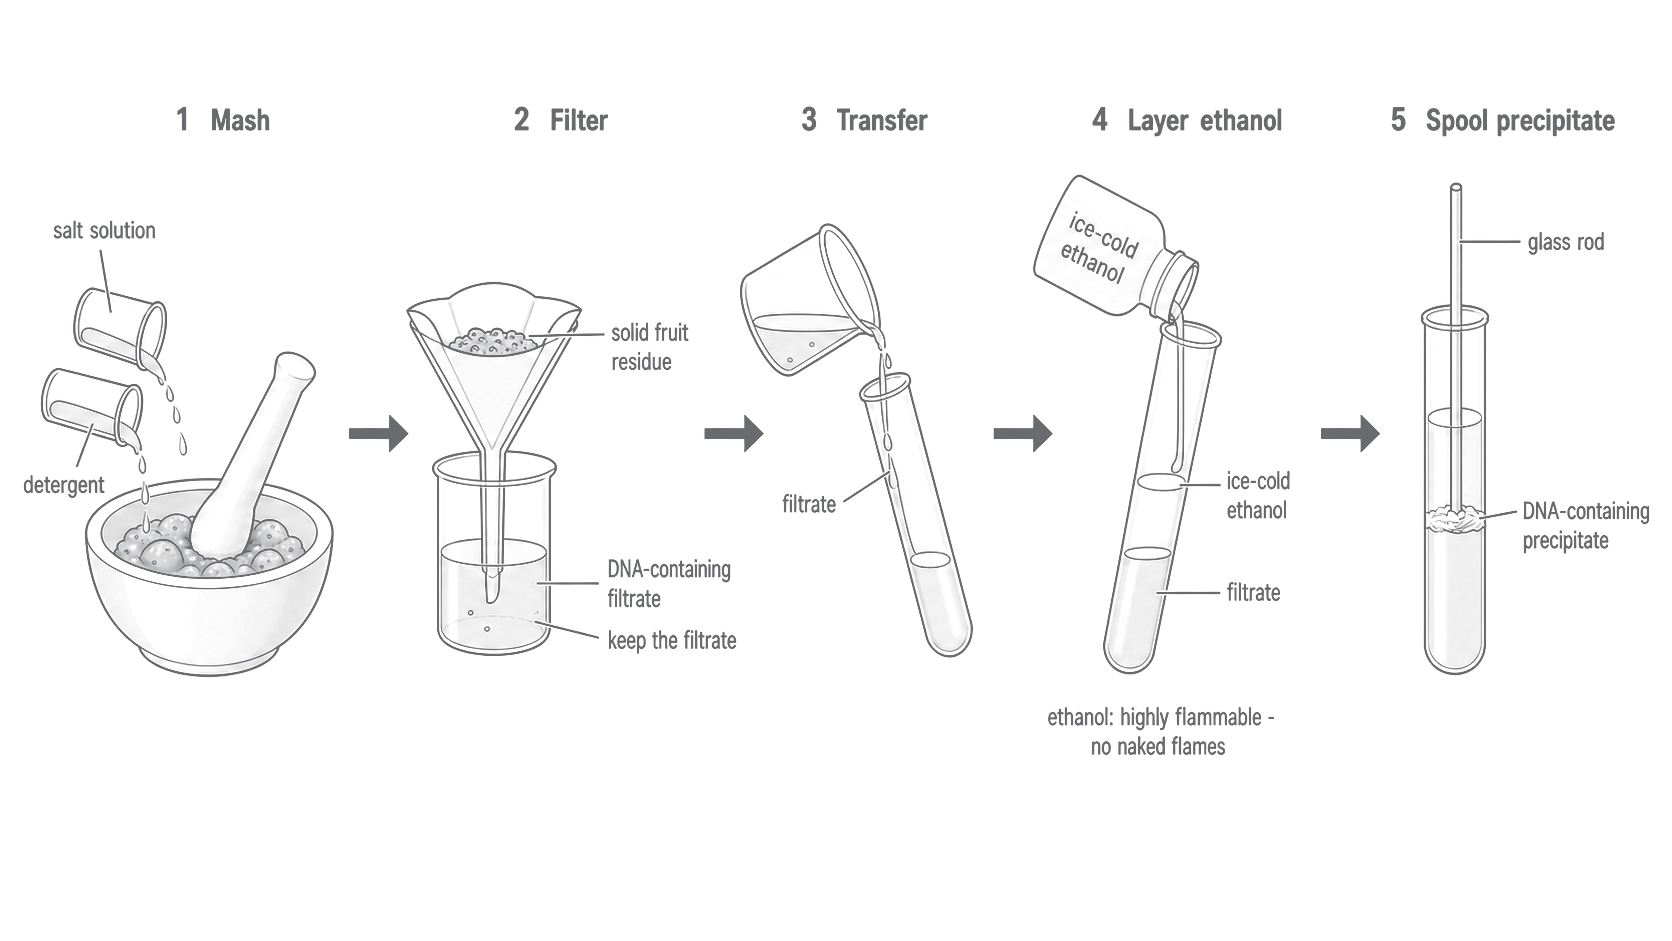
Ethanol is highly flammable, so keep the practical away from naked flames and other ignition sources. Use eye protection and avoid skin contact with the ethanol.