1.6 - Microscopy practical
Prepare plant and animal specimens, bring them into focus and make labelled scientific drawings from observations. Use lens values, image sizes and scale bars to calculate magnification and actual size; all of this lesson applies to both tiers.
1.6 — Magnification calculations
Use the unit relationships 1 mm = 1000 µm, 1 µm = 1000 nm and 1 nm = 1000 pm when comparing lengths. A conversion changes the number and unit, not the physical size.
A compound light microscope magnifies an image twice: first through the objective lens and then through the eyepiece lens. Multiply the two lens values:
For a ×10 eyepiece and a ×40 objective:
For a printed image, screen image or scientific drawing, use the measured image size and actual size.
Magnification relationship
Image size and actual size must be in the same unit before division. Magnification has no unit because it is a ratio of two lengths measured in the same unit.
Worked example 1: calculate magnification
A cell image is 36 mm wide. The actual cell is 60 µm wide. Calculate the magnification.
- The requested quantity is magnification. The given values are image size = 36 mm and actual size = 60 µm.
- Equation: .
- Align units: .
- Substitute: .
- Final answer: ×600. There is no unit.
- Sense-check: the image is much larger than the cell, so a magnification greater than 1 is expected.
Worked example 2: calculate actual size
A cell image is 24 mm wide at ×800 magnification. Calculate its actual width in micrometres.
- The requested quantity is actual width. Image size = 24 mm and magnification = 800.
- Equation: .
- Substitute without changing units yet: .
- Convert: .
- Final answer: 30 µm.
- Sense-check: a micrometre-scale answer is sensible for a cell, and multiplying 30 µm by 800 returns the 24 mm image size.
Reading a scale bar
A scale bar represents a stated actual length. It is enlarged with the image, so its ratio to a cell stays useful even if the image is resized. A printed magnification label is reliable only at its intended reproduction size.
For example, a micrograph has a scale bar labelled 10 µm. On one print the bar measures 8 mm and a cell measures 32 mm. The cell is 32 ÷ 8 = 4 scale-bar lengths wide, so its actual width is 4 × 10 = 40 µm. Measure the bar and cell on the same version of the image and in the same units.
1.6 — Core practical: preparing and focusing
Core practical 1.6 is an observational investigation. Its purpose is to prepare biological specimens, use a light microscope to bring plant and animal cells into clear focus, identify structures that are genuinely visible, calculate magnification and record observations. It is not a test of how one independent variable causes a change in a dependent variable, so forcing it into a fair-test pattern would misrepresent the evidence.
The apparatus includes a compound light microscope, clean slides and coverslips, dropping pipettes, forceps, a mounted needle, tissue paper, inner onion epidermis, iodine solution, and, for the animal specimen, a sterile cotton swab, physiological saline, methylene blue and a disinfectant container.
[DIAGRAM: asset_name: 1.3-1.6 - Microscopy, scale and magnification - diagram 01; asset_slug: edexcel-gcse-biology-1-3-1-6-light-microscope-apparatus; recommended_method: image_gen; description: Simple monochrome textbook apparatus schematic of a compound light microscope for the core practical. Label only eyepiece lens, rotating nosepiece, low- and high-power objective lenses, stage, stage clips, glass slide with coverslip, light source, coarse-focus control and fine-focus control. Show the light source aligned below the specimen and enough clearance between objective and coverslip to make the focusing method intelligible. Use white background, #6A6B6E linework and minimal neutral fills. Exclude cell images, simulated micrographs, exact quantitative scales, decorative elements and off-spec internal optical detail.]
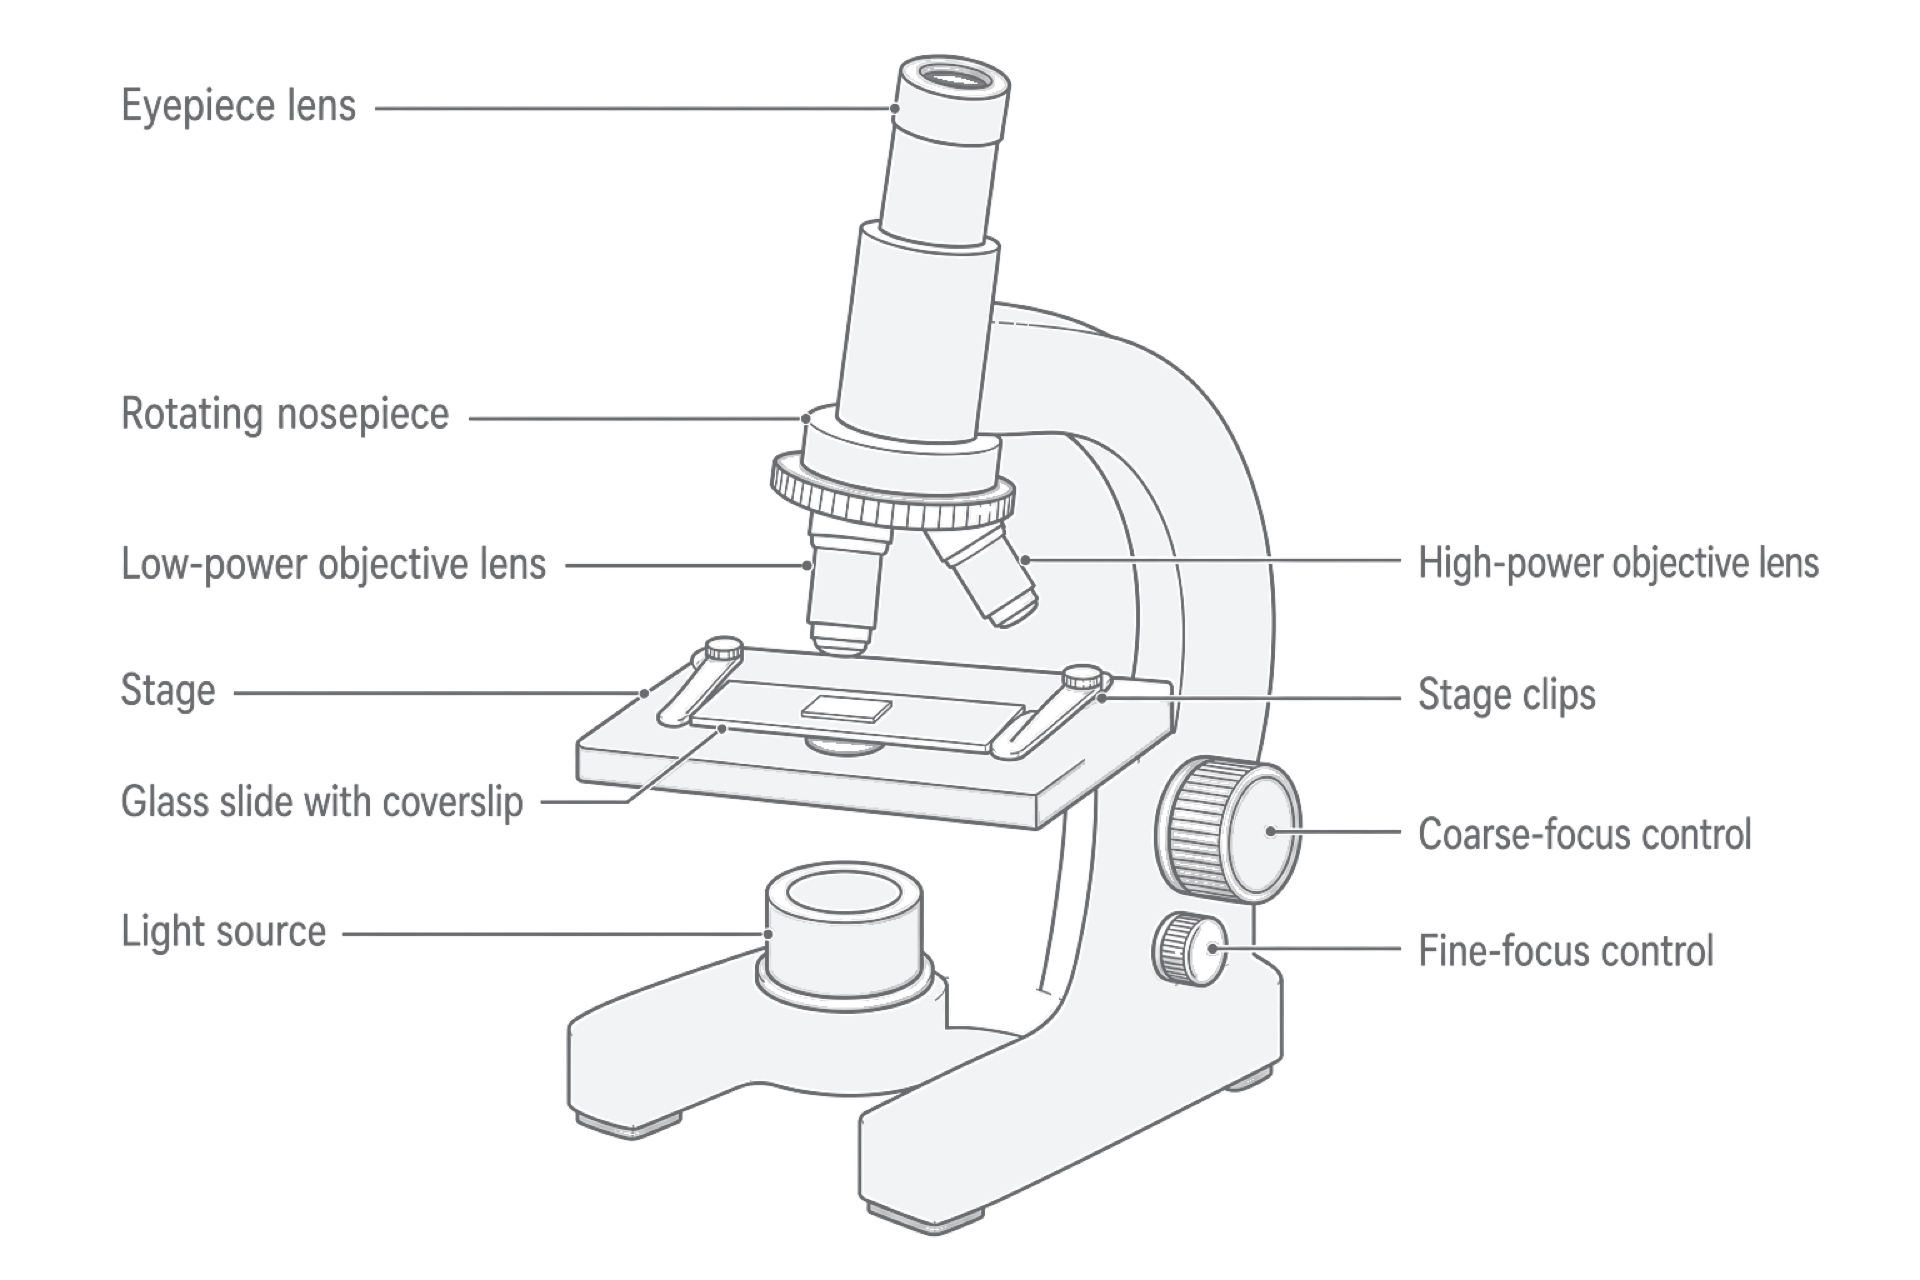
The apparatus drawing is schematic: use the magnification engraved on each objective to identify its power, rather than judging power from its drawn length.
Preparing thin specimens
For a plant specimen, use forceps to peel a thin piece of inner onion epidermis. Lay it flat in a drop of water on a clean slide, add a drop of iodine solution as a stain, then use a mounted needle to lower a coverslip gently at an angle. A thin, flat layer lets light pass through and prevents several cell layers from obscuring one another. Stain increases contrast, while lowering the coverslip gradually reduces trapped air bubbles that could be mistaken for structures.
For an animal specimen, use a new sterile cotton swab to collect cells gently from the inside of your own cheek. Smear the swab into a drop of physiological saline on a clean slide, add methylene blue stain and lower a coverslip. Never share swabs. Place used swabs and cheek-cell slides in the disinfectant container provided, then wash your hands, because human-cell material could transfer microorganisms between people or surfaces.
Bringing the specimen into focus
- Rotate the nosepiece until the lowest-power objective is in position. Secure the slide and centre the stained specimen over the light source.
- Looking from the side, bring the low-power objective and slide close together without allowing them to touch.
- Look through the eyepiece and use the coarse-focus control to move the objective and slide farther apart until the specimen is broadly focused. Adjust the illumination if the view is too dark or bright.
- Use the fine-focus control to sharpen the visible boundaries.
- Centre the feature of interest before rotating to a higher-power objective. At high power, use fine focus only: coarse movement could drive the objective into the coverslip and damage the slide or lens.
- Record the eyepiece and objective values and calculate total magnification by multiplying them.
- Observe more than one non-overlapping field and, where possible, more than one prepared slide. A repeated feature in several cells is stronger evidence than a feature seen once beside an air bubble or tissue fold.
The exact component that moves during focusing differs among microscope designs, so follow the instrument's instructions. The safe principle is constant: locate the specimen at low power, avoid contact between objective and slide, and make only small fine-focus movements at high power.
Safety linked to the method
| Hazard or contamination route | Specific precaution |
|---|---|
| Glass slide or coverslip can break and cut skin | Carry glass by its edges, lower the coverslip without pressing hard, and tell the teacher about breakage rather than picking up fragments by hand. |
| Stain can splash into the eyes or mark skin and clothing | Wear eye protection, use only small drops and clean spills as instructed. |
| Cheek-cell material can transfer microorganisms | Use only your own sterile swab, never share it, place used material in disinfectant and wash hands. |
1.6 — Recording valid observations
A microscope drawing is a record of what was observed, not a remembered textbook cell. A well-prepared onion epidermis commonly shows regular cell outlines formed by cell walls and may show cytoplasm and stained nuclei. Cheek cells have no cell wall, so their outlines are less regular; a cell membrane, cytoplasm and stained nucleus may be visible. Label a structure only when the observation supports that identification.
In the supervised practical, select a clear group of onion cells and make your own labelled drawing from the microscope view. Record the lens magnifications and compare the drawing with the live field: check proportions and remove any structure you cannot actually resolve. This observation task practises drawing itself; answering a text question about drawing rules does not replace it.
A labelled scientific drawing should:
- have a clear title naming the specimen;
- be large enough to show the observed proportions accurately;
- use a sharp pencil to make single, continuous lines, with no sketching, shading or colour;
- include only structures actually visible in the selected field;
- use straight ruled label lines that do not cross, have no arrowheads and touch the labelled feature;
- state the total observation magnification and include a scale bar when a reliable scale is available.
The total microscope magnification records the lens combination used to make the observation. It is not automatically the same as the magnification of the drawing: a drawing can be made larger or smaller on the page. If the drawing's image size and the specimen's actual size are known in the same unit, its magnification can be calculated with the relationship already taught.
Preparation faults can create artefacts, which are features caused by the method rather than by the cells. A round ring with a dark edge may be an air bubble; a dark band may be a folded piece of epidermis; excess stain can hide boundaries. Change the focus and field, compare several cells, and prepare a fresh, thinner slide if the feature does not repeat consistently.
This is also why several non-overlapping fields improve the observation. They reduce the chance that the final drawing or size estimate is based on one damaged, folded or unusual area. Record the specimen, stain, total magnification and any size estimate alongside the drawing so another observer can understand how the evidence was produced.
A defensible microscope record joins four things: a correctly prepared specimen, a focused observation, scale or magnification information, and a drawing that contains only visible evidence.